28
N1-HV/AC Series
User Manual
29
N1-HV/AC Series
User Manual
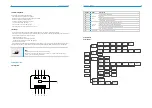
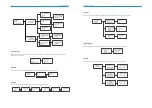
Press up and down to select, and review the data of , press ’ESC’ to return to the Menu.
3. History
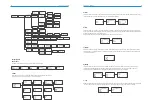
Setting function is used for set the inverter for language, date and time, work mode, PV config, communication address,
advanced and so on.
4. Settings
Press up or down button to choose language. Press ‘OK’ to confirm .
A) Language
=====History=====
>Inver Total
kWh
===Error Logs===
01: xx-xx-xx
xx:xx:xx
Xxx Fault
=====Menu=====
Status
>History
Setting
====History====
>Yield Logs
Error Logs
=====History=====
>Eps Total
kWh
=====History=====
>Solar Total
kWh
=====History=====
>Batdischr Total
kWh
=====History=====
>Batchr Total
kWh
=====History=====
>Charge Total
kWh
====Language====
>English
OK
=====Settings=====
>Language
Data&Time
Work Mode
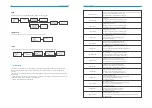
Press up or down button to change date and time. Press ‘OK’ to confirm.
B) Date Time
===Data&Time===
Data:xx-xx-xx
Time:xx:xx:xx
OK
=====Settings=====
Language
>Data&Time
Work Mode
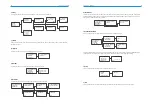
Press up or down button to select different work modes. Press ‘OK’ to confirm.
C) Work Mode
=====Settings=====
Language
Data&Time
>Work Mode
===Work Mode===
>Self Use
OK
===Work Mode===
>Remote Use
OK
===Work Mode===
>Force Time Use
OK
===Work Mode===
>Backup Use
OK
===Work Mode===
>Feedin Use
OK
===Work Mode===
>FFR Use
OK
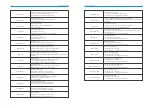
This function can set the mode of PV input. There are two modes for selection; Comm and Multi. The ‘Comm’ mode means
single MPP tracking, 2 MPPT working together; ‘Multi’ means multi-MPP tracking, 2 MPPT work independently. Press up or
down button to select and press ‘OK’ to confirm.
D) PV Connection
=PV Connection=
>Comm
OK
=PV Connection=
>Multi
OK
=====Settings=====
Data&Time
Work Mode
>PV Config
Press up or down button to change address of local and meter. Press‘OK’to confirm.
Since the ‘advanced’ function will change the inverter’s parameter, the end user with the user password as‘0000’have the
limited authority to change the settings. We need installer password to do the most of professional setting.
E) Communication Address
===Comm Addr===
Local Addr
>Meter Addr
===Comm Addr===
>Local Addr
Meter Addr
===Local Addr===
>001
OK
===Meter Addr===
>001
OK
=====Settings=====
Work Mode
PV Config
>Comm Addr
Press up or down button to change the grid code. Press‘OK’to confirm.
F) Safety
==User Verify==
0 0 0 0
OK
=====Settings=====
PV Config
Comm Addr
>Advanced*
====Safety====
>AS4777
OK
====On-Grid====
>Safety
Grid
Export Control
Press up or down button to change the value of grid voltage and grid frequency protect. Press ‘OK’ to confirm.
G) Grid


