


6
1.3 Display
Wird das Gerät eingeschaltet und es befindet sich keine
CD im Schubfach, erscheint auf dem Display -10- „NO
DISC“. Wurde die CD korrekt eingelegt, wird für kurze
Zeit die Gesamtspielzeit und die Gesamtzahl aller Titel
angezeigt.
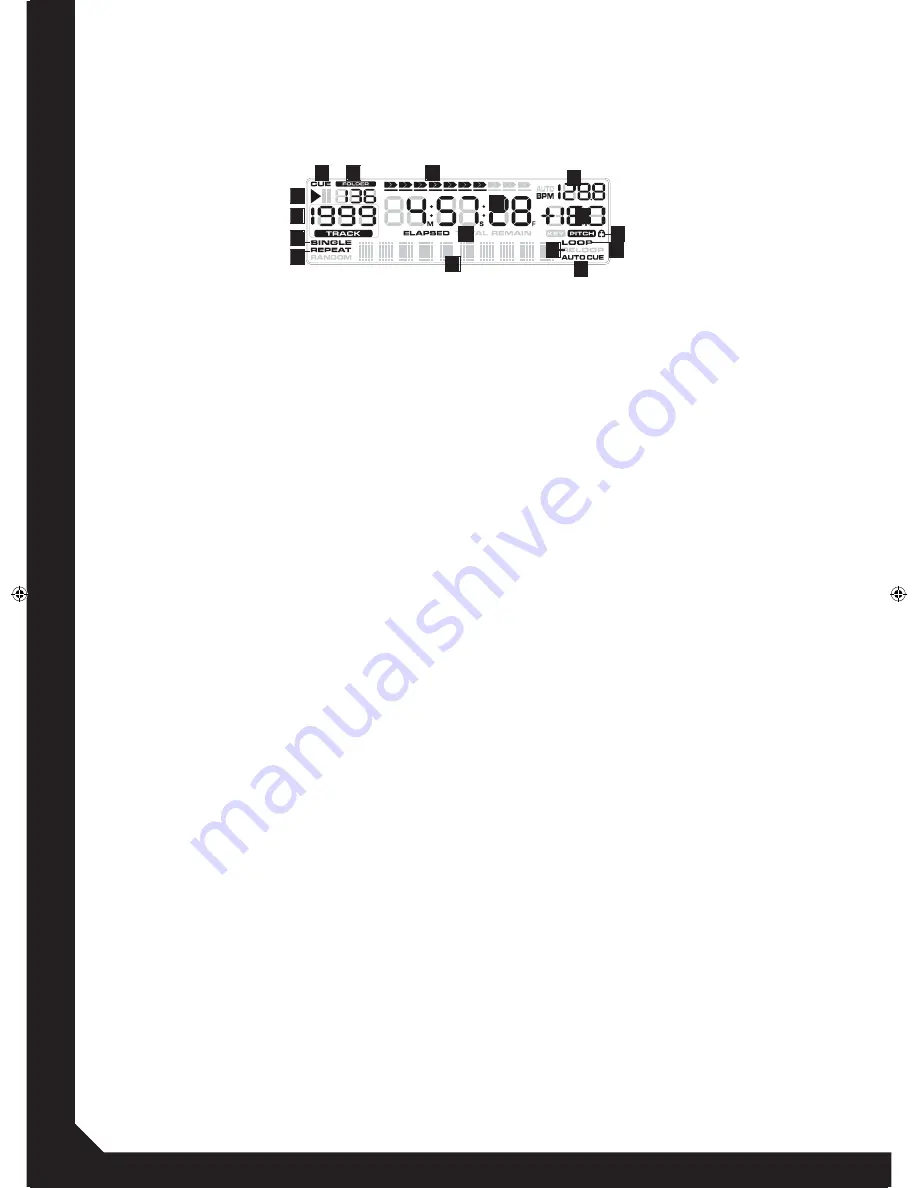
Im Folgenden wird auf die einzelnen Elemente des
Displays -10- genauer eingegangen.
A) Play/Pause-Anzeige
Das Play-Symbol wird während der Wiedergabe eines
Tracks angezeigt. Befindet sich der Player im Pause-
Modus, so erscheint das Pause-Zeichen.
B) Cue-Anzeige
Diese Anzeige erscheint, wenn ein geladener Track an-
gehalten ist und sich der Player folglich im Cue-Modus
befindet. Wird ein neuer Cue-Punkt gesetzt, blinkt das
entsprechende Symbol einmalig auf.
C) Folder-Anzeige
Diese Anzeige gibt wieder, in welchem Ordner Ihrer
MP3-CD oder Ihres USB-Mediums Sie sich aktuell
befinden.
D) Fortschrittsanzeige
Die 10-stellige Fortschrittsanzeige stellt, neben der
Zeitanzeige, die Abspielzeit grafisch dar.
E) BPM-Anzeige
Zeigt den aktuellen BPM-Wert an. Wenn die TAP/
BPM-Taste -17- länger gedrückt wird, kann der Auto
BPM-Counter ein- bzw. ausgeschaltet werden. Ist der
Counter aktiv, so erscheint „AUTO BPM“ im Display.
F) Pitch-Anzeige
Zeigt den eingestellten Pitch-Wert des wiedergegebe-
nen Tracks in Prozent an.
G) Keylock-Symbol
Das Keylock-Zeichen (Vorhängeschloss) leuchtet
auf, sobald die Keylock-Taste -21- gedrückt wird. Der
Keylock-Modus ist somit aktiv. Im aktiven Zustand wird
die Tonhöhe des Tracks bei verändertem Tempo (Pitch)
beibehalten.
H) Loop-Anzeige
Wenn ein Loop programmiert wurde und im Speicher
liegt, so leuchtet im Display die Anzeige „Loop“ auf.
I) Reloop-Anzeige
Der zuletzt programmierte Loop kann mit der Reloop-
Taste -13- wieder abgerufen und aktiviert werden.
Dass der Loop aktiv ist, bestätigt das Display mit dem
blinkenden Reloop-Symbol.
J) Auto Cue-Anzeige
Indem die Single/Continue-Taste -9- eine Sekunde
gedrückt und gehalten wird, kann der Auto Cue-Modus
aktiviert bzw. deaktiviert werden. Ist der Modus aktiv,
leuchtet das Auto Cue-Symbol im Display auf.
K) Abspielzeit
Dieser Bereich des Displays gibt die Abspielzeit in
M(inuten), S(ekunden) und F(rames) an.
L) Time-Modus
Über die Time-Taste -8- lassen sich verschiedene Zeit-
anzeigen auswählen.
Remain
Im Display erscheint „Remain“. Die verbleibende Zeit
des aktuellen Tracks wird angezeigt. Die Fortschritts-
anzeige -D- nimmt von links nach rechts ab. Naht der
gespielte Track sich dem Ende, so blinkt der komplette
Balken warnend auf.
Total Remain
Im Display erscheint „Total Remain“. Es wird die verblei-
bende Zeit der gesamten CD bzw. des ausgewählten
Medienverzeichnisses angezeigt. Die Fortschrittsan-
zeige -D- nimmt von links nach rechts ab. Naht das
Medium sich dem Ende, so blinkt der komplette Balken
warnend auf.
Elapsed
Im Display erscheint „Elapsed“. Die verstrichene Zeit
des aktuellen Tracks wird angezeigt. Die Fortschritts-
anzeige -D- nimmt von rechts nach links zu. Naht der
1.3 Display
When the device is turned on and there is no CD in the
tray, “NO DISC” will appear on the Display -10-. If a CD
has been inserted correctly, the total playing time and
number of tracks will be shown shortly on the Display.
The single Display -10- elements are described in the
following.
A) Play/Pause Display
The play symbol is shown during playback of a track. If
the player is in pause mode, the pause symbol appears.
B) Cue Display
This symbol will appear when a loaded track is stopped
and the player is in cue mode. When a new cue point is
set, the corresponding symbol flashes up once.
C) Folder Display
This display element represents your currently selected
MP3 CD‘s or USB device‘s folder.
D) Progress Display
Besides the time display, the 10 digit Progress Display
represents the playback time graphically.
E) BPM Display
Shows the current BPM value. When the TAP/BPM
Button -17- is being pressed for a longer period, the
automatic BPM counter can be turned on and off res-
pectively. If the counter is active, “AUTO BPM” appears
on the display.
F) Pitch Display
Shows the adjusted pitch value of the current track
expressed in percentage.
G) Keylock Symbol
The Keylock Symbol (padlock) lights up as soon as the
Keylock Button -21- is pressed. This way the keylock
function is active. When active, the track‘s key is kept
when changing the its pitch.
H) Loop Display
If a loop has been set and stored it will be shown as
“Loop” on the display.
I) Reloop Display
The last stored loop can be called up and activated via
the Reloop Button -13-. This will be confirmed via the
blinking Reloop symbol.
J) Auto Cue Display
By pressing and holding the Single/Continue Button -9-
for one second, the auto cue mode can be de-/activa-
ted. When this mode is active, the auto cue symbol on
the display is lit.
K) Playback Time
This section of the display shows the playback time in
m(inutes), s(econds), and f(rames).
L) Time Mode
Via the Time Button -8- several time modes can be
selected.
Remain
„Remain“ appears on the display. The remaining time
of the current track is shown. The Progress Display -D-
decreases from left to right. When the track is approa-
ching its ending, the complete bar will flash warningly.
Total Remain
„Total Remain“ appears on the display. The total
remaining time of the CD or selected media folder is
shown. The Progress Display -D- decreases from left to
right. When the medium is approaching its ending, the
complete bar will flash warningly.
Elapsed
„Elapsed“ appears on the display. The elapsed time of
the current track is displayed. The Progress Display
-D- increases from left to right. When the current track
is approaching its ending, the complete bar will flash
warningly.
M) ID3 Tag Display
This display section shows artist, title, bit rate, and
folder (only available for MP3 titles).
1.3 Affichage
Lorsque l‘appareil est allumé et que le tiroir est vide,
l‘affichage -10- indique „NO DISC“. Si le CD audio est
inséré correctement, le temps total de lecture et le
nombre total de pistes est affiché quelques secondes.
Veuillez trouver ci-dessous les détails des différents
éléments de l‘affichage -10-.
A) Témoin Play/Pause
Le témoin Play s‘affiche lors de la lecture d‘une piste.
Si le lecteur est en mode Pause, le symbole Pause est
affiché.
B) Témoin Cue
Ce témoin s‘affiche, lorsqu‘une piste chargée est
arrêtée et que le lecteur est en mode Cue. Lorsqu‘un
nouveau point Cue est sélectionné, le témoin clignote
une fois.
C) Témoin Folder
Indique le répertoire actuel du CD en format MP3 ou
du support USB.
D) Barre de progression
En plus du témoin de durée, un diagramme à barres
à 10 positions indique la durée de lecture par un
graphique.
E) Affichage BPM
Indique la valeur BPM actuelle. Enfoncer la touche
TAP/BPM -14- pendant quelques secondes pour acti-
ver ou désactiver le compteur automatique de BPM.
Lorsque le compteur est activé, l‘affichage indique
„AUTO BPM“.
F) Affichage Pitch
Indique le pourcentage de la vitesse réglée pour la
piste.
G) Symbole Keylock
Le symbole Keylock (cadenas) s‘éclaire dès que la
touche Keylock -21- est enfoncée. Le mode Keylock
est alors activé et la hauteur du ton de la piste est
conservée lorsque le tempo (Pitch) est modifié.
H) Témoin Loop
Le témoin „Loop“ indique qu‘une boucle est program-
mée et disponible en mémoire.
I) Témoin Reloop
La boucle mémorisée peut être activée et lue avec la
touche Reloop -13-. L‘affichage indique que la boucle
est active par le clignotement du témoin Reloop.
J) Témoin Auto Cue
Enfoncer la touche Single/Continue -9- pendant une
seconde pour activer ou désactiver le mode Auto
Cue. Lorsque ce mode est activé, le témoin Auto Cue
s‘éclaire dans l‘affichage.
K) Temps de lecture
Cette zone de l‘affichage indique le temps de lecture
en M(inutes), S(econdes) et F(rames).
L) Mode Time
La touche Time -8- permet de sélectionner différents
modes d‘affichage de la durée.
Remain
L‘affichage indique „Remain“. Le temps restant de
la piste actuelle est affiché. La barre de progression
-D- diminue de gauche à droite. Lorsque la piste en
lecture touche à sa fin, la barre complète clignote.
Total Remain
L‘affichage indique „Total Remain“. Indique le temps
restant du cédérom complet ou du répertoire de mé-
dia sélectionné. La barre de progression -D- diminue
de gauche à droite. Lorsque le média touche à sa fin,
la barre complète clignote.
Elapsed
L‘affichage indique „Elapsed“. Le temps écoulé de
la piste actuelle est affiché. La barre de progression
-D- augmente de droite à gauche. Lorsque la piste en
lecture touche à sa fin, la barre complète clignote.
M) Affichage ID3 Tag
Cette zone de l‘affichage indique l‘interprète, le titre,
A
B
C
D
K
L
M
J
I
G
F
E
H
P
O
N
RMP1660USB.indd 6
03.07.2014 16:06:11


