background image

34

35

9. 

TECHNICAL SPECIFICATIONS

Display

Size

10.1 inch /25.65 сm

Resolution

1024×600 Pixels

Panel

TFT, LED Screen (digital)

Brightness, cd/m

2

200

Contrast ratio

300:1

Storage

Build in

for 3 test images

Memory Card

Slot for SD/SDHC/MMC cards

USB Port 

USB×1, mini-USB×1 (protocol USB 2.0)

Pictures viewing

Format

JPEG

Actions

Rotate, zoom

Modes

Full screen, slide show, thumbnails

Multimedia

Speakers

Build in speaker (1×2W)

Music formats

MP3, WMA

Video formats

M-JPEG, AVI with codecs Divx4.0

Divx5.0, 

Xvid for standards MPEG1, MPEG2, MPEG4 

(max. 720×536)

Extra functions

Calendar, clock, turn on/off by schedule  

Sizes, mm

Screen

271×175×9

Stand

121×46×17-20

Weight

450 g

Power supply

AC/DC adaptor ~110V-240V(50-60Hz)

Accessories

AC/DC adaptor, user manual, remote control, 

warranty card

8. 

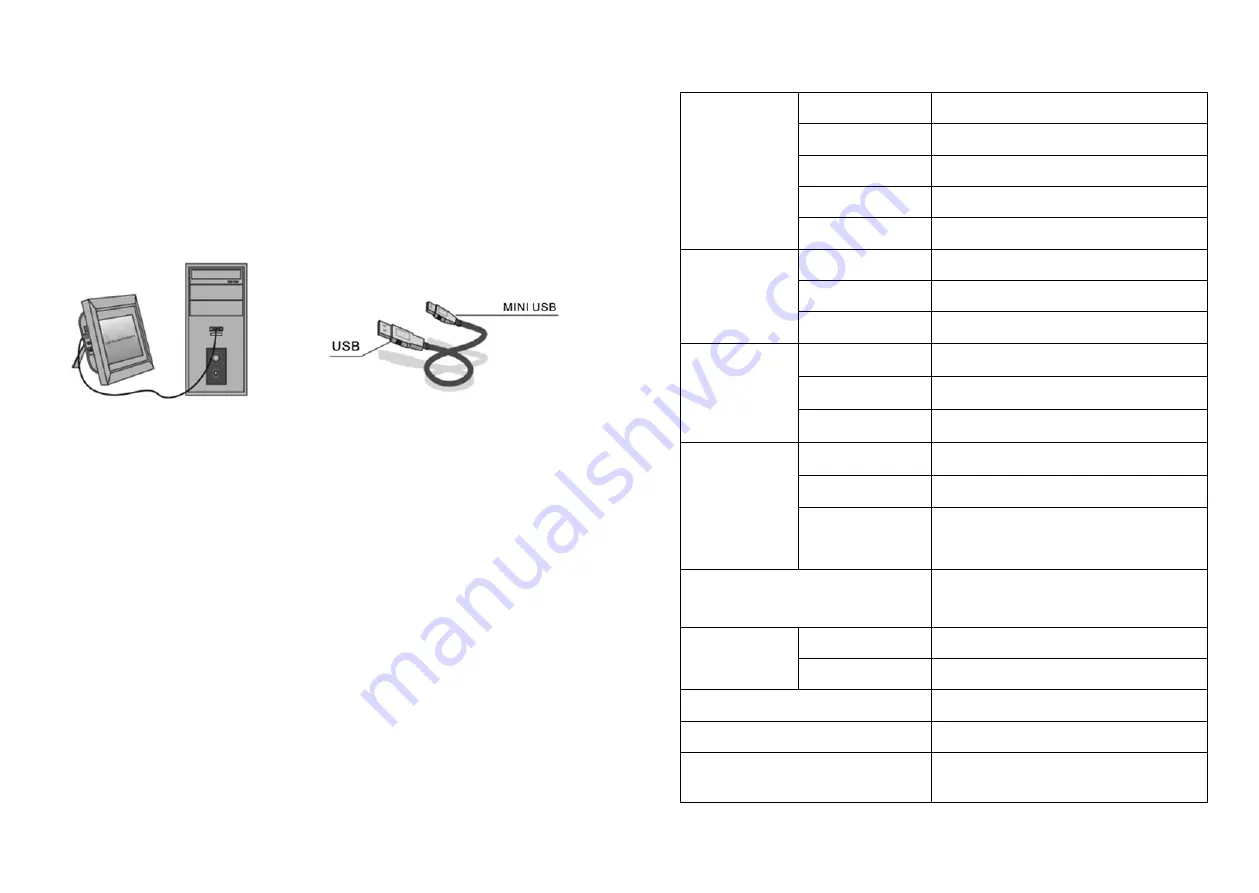
PC CONNECTION 

You can connect the unit to the PC by using USB Cable for file copy &delete or edit 

Operation.

A  –  

Please turn on the digital photo frame, then connect it with your PC by 

using USB cable 

B  –  

The unit will be automatically detected and it will display “PC Connected” 

Icon, then you can copy & delete & edit files in built-in memory and other 

storage devices.You need to restart the digital photo frame after you fin-

ished the copy/delete or inserted or edit Operation .

NOTE:

 Never disconnect the USB cable when files are transferring or running. Do-

ing so may damage your DPF. Press Safely Remove Hardware Icon in the computer 

is the right operation way. 

Summary of Contents for Deja View SL101

Page 1: ...DejaView SL101...

Page 2: ...2 3 1 JPEG 2 MP3 WMA 3 M JPEG AVI Divx4 0 Divx5 0 Xvid MPEG1 MPEG2 MPEG4 H 264 720 576 4 5 SD MMC SDHC 6 USB USB 2 0 HOST Mini USB 7 8 9 10 11 12 13 1 2 14 15 16 1 2 3 4 5 USB...

Page 3: ...2 BGM 3 MUTE 4 MENU 5 6 RETURN 7 8 9 10 SETUP 11 12 OK 13 ZOOM ZOOM 14 15 VOL 1 5 1 1 5 2 7 3 7 4 8 4 1 USB 9 4 2 10 4 3 10 4 4 11 5 12 6 12 6 1 13 7 14 8 PC 16 9 16 10 18 1 2 3 6 8 11 13 16 5 12 9 1...

Page 4: ...6 7 2 CR2025 3 3 1 DC IN 110 240 3 2 3 3 2 3 4 POWER 16 ROTATE 90 17 18 3 2 6 4 1 7 5 1 2 3 4 OK 5 6 7 1 2 3 4 1 SD SDHC MMC 2 MINI USB 3 USB 4 DC IN...

Page 5: ...8 9 4 1 USB SD MMC SDHC USB c USB 2 0 USB Return USB USB 3 RETURN 3 4 1 1 3 5 USB 2 RETURN 2...

Page 6: ...10 11 4 1 OK VOL 4 4 6 4 1 OK OK VOL OK OK 4 2 4 1 OK OK 4 OK 4 3 5...

Page 7: ...12 13 6 1 9 9 10 10 OK 5 7 OK 6 8 4 1 OK...

Page 8: ...14 15 11 OK 00 40 OK 00 40 OK 00 40 OK 00 40 12 OK OK 13 12 24 OK 14 OK OK OK 15 16 OK OK 17 OK 18 OK 19 7 11 OK OK OK 1 2 3 4 5 3 5 15 30 1 5 15 30 1 6 7 3D 8 9 10...

Page 9: ...USB USBx1 mini USB 1 USB 2 0 JPEG 1 2 MP3 WMA M JPEG AVI Divx4 0 Divx5 0 Xvid MPEG1 MPEG2 MPEG4 720 575 271 175 9 121 46 17 20 450 110V 240V 50 60HZ 8 PC USB A USB B PC 9 10 1 25 65 1024 600 TFT c LE...

Page 10: ...10 USB USB USB USB Mute DejaView SL101 USER MANUAL Thank you for your purchase of the Digital Photo Frame Please read this User Manual carefully to learn the correct way to use the Digital Photo Frame...

Page 11: ...e the unit to moisture or condensation condition To avoid overheating do not block the ventilation holes on the Digital Photo Frame Keep the Digital Photo Frame from direct sunlight Do not dismantle t...

Page 12: ...s this button it will pause repress this button it will play again 12 OK Press to confirm Play pause In the playing mode press this button it will pause repress this button it will play again 13 ZOOM...

Page 13: ...2 Remove the protective film covering LCD 3 3 Remove the plastic battery insulator from the battery compartment and make sure the remote control has a battery inside Please refer to Installing Replac...

Page 14: ...four windows tripe windows 4 OPERATING INSTRUCTION After turning on the unit it will display startup logo and then show the Main in terface after 3 5 seconds If there are pictures and music in USB de...

Page 15: ...e playlist press OK to Play Press VOL to turn up down the volume Press OK to pause repress again continue playback 4 3 Music Mode Select the desired storage device in the Card Selection Menu Press OK...

Page 16: ...mory or memory card In six picture mode use to select the picture you want to delete in the built in memory or card device then press MENU to enter delete interface press OK to confirm 5 CALENDAR Sele...

Page 17: ...lues 7 18 Exit Press to exit setup interface Contrast Press OK to select Use to select from 00 lowest to 40 high est Brightness Press OK to select Use to select from 00 lowest to 40 highest Saturation...

Page 18: ...271 175 9 Stand 121 46 17 20 Weight 450 g Power supply AC DC adaptor 110V 240V 50 60Hz Accessories AC DC adaptor user manual remote control warranty card 8 PC CONNECTION You can connect the unit to th...

Page 19: ...CARD or USB Please confirm whether there is storage in the card or USB device Empty devices can not be read Can not play the file Please confirm if the file format is compat ible with the player Disp...

Reviews: