background image


6.1 Basic Settings 

Setup description

Long press SETUP button to make the printer enters into setup mode, choose“√ ”(SETUP button)means 

“ok”, choose “          ”(FEED button) means “Next” , choose“X”(POWER button) means exit setup mode and save settings. 
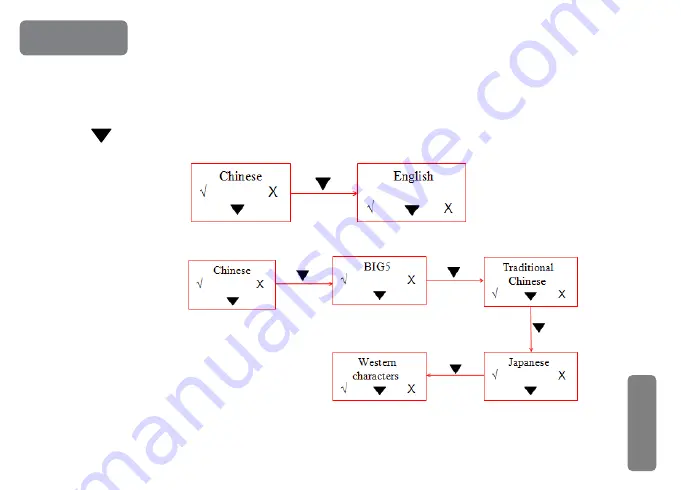
1.Display language:


2.Printing language: 


6. Settings   

Summary of Contents for RG-MLP80B

Page 1: ...RG MLP80B User Manual V1 00 Mobile Label Printer...

Page 2: ...SB Connection 12 2 Printer Part List 2 7 2Serial Connection 12 3 OLED Display 3 7 3Bluetooth Connection 14 4 Preparation Before Use 4 7 4WI FIConnection 15 4 1Battery Installation 4 8 Specification an...

Page 3: ...e of the product REGO reserves the right to change the software and hardware specifications in the manuals without prior notice If you find any errors or omissions in the information mentioned in thes...

Page 4: ...be sure to remove the battery otherwise the battery may leak liquid which is corrosive liquid If improper operation causes battery leak liquid and it pastes in the skin or clothes please rinse it by...

Page 5: ...rs and 100 meters outdoors Otherwise the printer doesn t print or prints abnormally Too high over 45 or too low below 5 environment temperature and too high over 85 or too low below 20 environment hum...

Page 6: ...d 95 Normal thermal paper label and black mark paper can t be kept too long if you need to keep the receipt or label for a long period please choose long term effective thermal paper or label The ther...

Page 7: ...1 Accessories USB Cable RG MLP80B Printer Paper Roll Battery Power Convertor 1 Carry case Optional...

Page 8: ...Paper Case Cover Paper Slot out USB RS232 Setup Button Feeding Button Power Button OLED Display Power Paper Cover Switch 2 Printer Parts List 1 2...

Page 9: ...U upper black mark paper D down black mark paper L label paper 3 OLED Display Bluetooth connection WI FI connection 3 L B Work normal www regotek com Notice The display content will be different from...

Page 10: ...battery cover 4 2 Battery Charge Plug the USB cable with power convertor into the USB outlet of the printer In power off status the printer s display screen will display the charging situation when th...

Page 11: ...on 1 Press PUSH button open paper case cover and slide the two parts in the direction of arrows 2 Pull out a part of paper and put them in the middle of the paper housing and close the paper case cove...

Page 12: ...ding Paper Under the normal work status and use thermal receipt paper press FEED button the paper feeding begins and stop when loosen FEED button When the printer apply to black mark paper and label p...

Page 13: ...ong press SETUP button to make the printer enters into setup mode choose SETUP button means ok choose FEED button means Next choose X POWER button means exit setup mode and save settings 1 Display lan...

Page 14: ...3 Font 4 Density The method to set paper type restore factory setting paper width auto power off upgrade mode Bluetooth MAC address and firmware version is same as above 9...

Page 15: ...tus at anytime Do self test as below in power off hold down FEED button then press POWER button Release FEED and POWER button when you hear the printer beeps and the current settings and status will b...

Page 16: ...erSensor Medium PrintDirection Normal Command System CPCL ESC POS CodePage CP437 PrintDensity 10 ShutDownMode Never ExtRAMCapacity 32MB Serial Parameter Baud Rate 115200 Parity None Handshaking RTS CT...

Page 17: ...w Pin no Signal Signal direction Specification 1 DTR Out The same as RTS 2 RXD In Printer received the data from PC 3 TXD Out The printer will be sent XON XOFF to PC when operating the XON XOFF handsh...

Page 18: ...two type handshaking is as follows table Handshaking Data direction RS 232C interface signal Hardware control Data can be access RTS and DTR in Space status Data can not be access RTS and DTR in Mark...

Page 19: ...in RG SetTools User Manual The mobile printer need to pair with host device Bluetooth first the pairing initiated by the master device before RG MLP80B working The pairing is as follows 1 Power on the...

Page 20: ...168 1 110 Printer IP address DHCP 0 0 0 0 0 0 0 0 0 0 0 0 AP mode RG MLP80B is as a WI FI access point and other device is as the WI FI information terminal to connect with the printer STA mode RG ML...

Page 21: ...l line Paper Type Continuous thermal paper black mark paper label paper Paper Width 44 83mm Paper diameter 50mm Valid Printing Width 72mm Resolution 8dot mm 203dpi Dot line 576dots Printing Speed 60mm...

Page 22: ...rs Codepages user defined characters 12 24 and 9 17 1D barcode UPCA UPCE EAN13 EAN8 CODE39 ITF25 CODABAR CODE93 CODE128 2D barcode PDF417 QR CODE DATA Matrix 8 2 Power Supply Power Supply DC5V 1A powe...

Page 23: ...Parameters Dimension 131 L 124 W 66 H mm Weight 360g excluding battery and paper 8 5 Environment Parameters Operation Temperature 0 50 Operation Humidity 20 85 Storage Temperature 25 70 Storage Humid...

Page 24: ...per is out there s notice displayed on the screen and the printer beeps and stop printing Control Command Support ESC POS and CPCL Please refer to REGO Thermal Printer Technical Manual Power Volume Wh...

Page 25: ...face of RG MLP80B and set it by WEB management The default SSID of AP interface is RG MLP80B IP address user name and passwords see below RG MLP80B network default setting table Parameter Default conf...

Page 26: ...g box enter the user name and password and then OK Pic 5 1 Open management page Then pop up RG MLP80B management web interface This management web interface can support Chinese and English optional Me...

Page 27: ...tain the important information of current device including device serial number firmware version wireless networking information and related parameter settings Also can read wireless signal strength i...

Page 28: ...point AP mode convenient for users to configure It can also be used as a wireless information terminal STA mode by connection fortune server via a wireless router It can also be configured AP STA mode...

Page 29: ...atically search for nearby wireless access points and connect it by setting the network parameters It can be connected only when encrypted information is consistent with the corresponding wireless acc...

Page 30: ...rs need to set up wireless and network parameters on this page Most systems support DHCP to automatically obtain IP It is recommended to set the LAN DHCP parameter type as Server otherwise STA need to...

Page 31: ...t the module and the printer via the serial port the serial port parameters can not be altered otherwise it can not work properly In this page Users simply set the device to communicate with the TCP l...

Page 32: ...9 1 7 Account Management Page This page is used to set the user device Web Server user name and password Pic 5 8 Account management page 27...

Page 33: ...file on the local computer to upload the WI FI modules firmware Please consult our technical staff for detailed upload methods If not really need to upgrade firmware please do not arbitrarily set or...

Page 34: ...9 1 9 Module Reset Page After the restart newly saved configuration parameters will be used Pic 5 10 Module reset page 29...

Page 35: ...re the factory settings the user s former configuration will be deleted Users can reconfigure at http 192 168 1 1 username and password are admin And the system will automatically turn off STA mode wi...

Page 36: ...face Users can also use other debugging tools Network debugging tool TCPUDPDbg 9 2 2 Net work Connection There are 2 kinds of connection when debugging Users can be tested in accordance with the actua...

Page 37: ...elow 9 2 3 The Initial Parameters Printer default SSID RG MLP80B Printer default encryption open none Printer default network parameters TCP Server 9000 192 168 1 1 Printer default IP address DHCP 0 0...

Page 38: ...ection shown above to open TCPUDPDbg program in PC2 create a new connection If printer works in Server mode users should create a client connection or create a server mode connection Pic 5 14 TCPUDPDb...

Page 39: ...Then configure TCP UDP connection parameter default parameter shown as below Pic 5 15 TCPUDPDbg configuration 34...

Page 40: ...Well configuration click Create Pic 5 16 TCPUDPDbg connection 35...

Page 41: ...Then click connection button after well connected users can send data via TCPUDPDbg to printer to control the printer for printing operation Pic 5 17 TCPUDPDbg connection succeed 36...

Page 42: ...identify the black mark Te black mark pre print regulations are as below Printing Position As the picture above the black mark should be printed on the right or left edge of the side of words Width r...

Page 43: ...el width 44 83mm Label space 10mm 10 3 Technical Manual REGO Thermal Printer Technical Manual is used to support the developers to develop the application with RG MLP80B 10 4 Printer Parameter Setting...

Page 44: ...www regotek com m...

Reviews: