


Redpine Signals, Inc.
Page 53
R
R
S
S
-
-
W
W
C
C
-
-
3
3
0
0
1
1
E
E
v
v
a
a
l
l
u
u
a
a
t
t
i
i
o
o
n
n
B
B
o
o
a
a
r
r
d
d
U
U
s
s
e
e
r
r
G
G
u
u
i
i
d
d
e
e
V
V
e
e
r
r
s
s
i
i
o
o
n
n
2
2
.
.
5
5
1
1
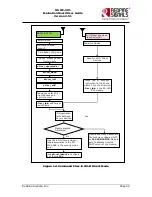
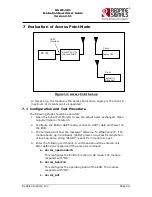
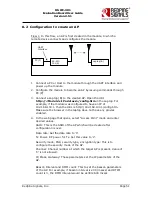
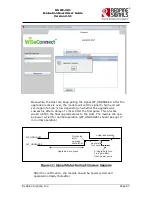
Flow 2:
In this flow, the module is connected to an AP. A remote device
connects to the same AP and configures the module.
1.
Connect a PC or Host to the module through the UART interface and
power up the module.
2.
Configure the module to become a client and connect to an AP by
issuing commands from the PC (P).
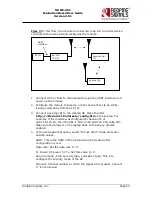
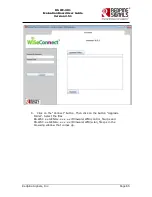
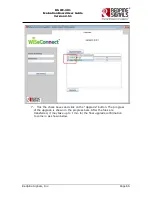
3.
Connect a Laptop (B) to the created AP. Open the URL
http://<Module’s IP address>/config.htm
in the Laptop. For
example, if the module was configured to have an IP of
192.168.100.20, then the URL is http://192.168.100.20/config.htm.
Make sure the browser in the laptop does not have any proxies
enabled.
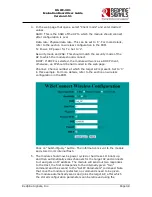
4.
In the web page that opens, select “Access Point” mode and enter
desired values.
SSID: This is the SSID of the AP which will be created after
configuration is over.
Data rate: Set the data rate to „0‟.
Tx Power: RF power for Tx. Set this value to „2‟.
Security mode , PSK, security type, encryption type: This is to
configure the security mode of the AP.
Channel: Channel number at which the target AP is present. Value of
„0‟ is not allowed.
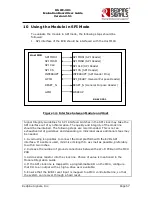
PC (P)
RS-WC-
301(A)
UART
Interface
Access Point
(C)
Laptop (B)


