


Redpine Signals, Inc.
Page 47
R
R
S
S
-
-
W
W
C
C
-
-
3
3
0
0
1
1
E
E
v
v
a
a
l
l
u
u
a
a
t
t
i
i
o
o
n
n
B
B
o
o
a
a
r
r
d
d
U
U
s
s
e
e
r
r
G
G
u
u
i
i
d
d
e
e
V
V
e
e
r
r
s
s
i
i
o
o
n
n
2
2
.
.
5
5
1
1
8
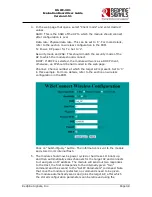
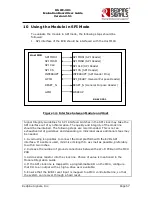
Wireless Configuration
The module can be configured wirelessly to join a specific AP (referred to as
“auto-connect”) or create an Access Point (referred to as “auto-create”).
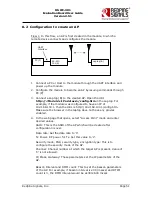
8.1
Configuration to join a Specific AP
Flow 1: In this flow, an AP is first created in the module, to which a
remote device connects and configures the module.
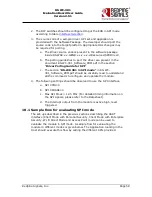
1.
Connect a PC or Host to the module through the UART interface and
power up the module.
2.
Configure the module to become an AP by issuing commands from PC
(P) as in section
Evaluation of Access Point Mode
. The sequence of
commands is given below.
a.
at+rsi_opermode=6
b.
at+rsi_band=0
c.
at+rsi_init
d.
at+rsi_fwversion?
e.
at+rsi_ipconf=0,192.168.50.1,255.255.255.0,192.168.5
0.1
f.
at+rsi_apconf=1,redpine,2,2,12345678,300,2,4
g.
at+rsi_join=redpine,0,2
The module is now configured as an Access Point. Its IP address is
192.168.50.1.
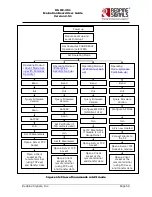
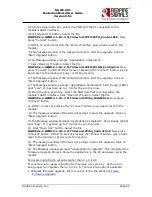
3.
Connect a Laptop (B) to the created AP. Open the URL
http://<Module’s IP address>/config.htm
in the Laptop. In this
case, the URL is
http://192.168.50.1/config.html
. Make sure the
browser in the laptop does not have any proxies enabled.
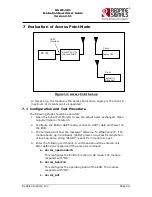
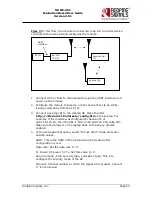
PC (P)
RS-WC-
301(A)
UART
Interface
Laptop (B)


