


7
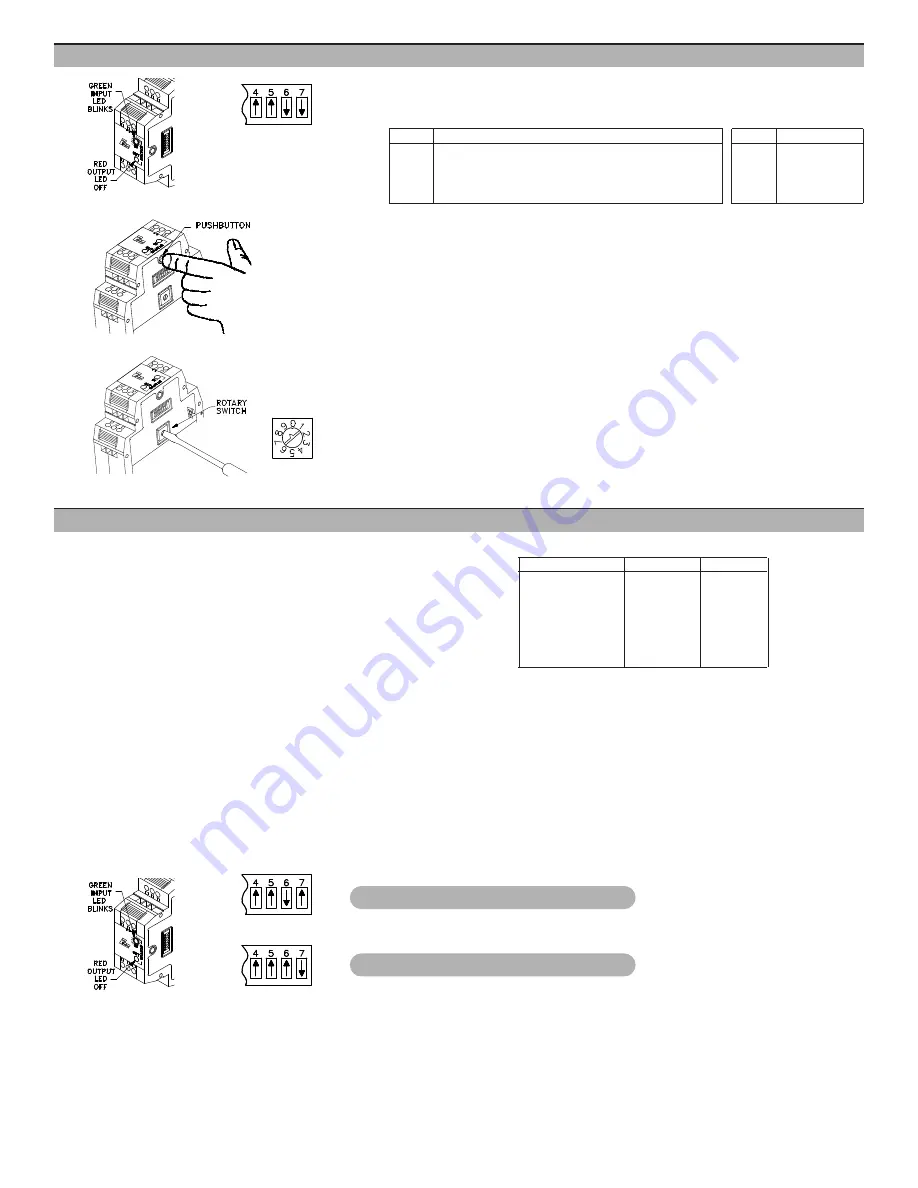
5.1 Place DIP switch 4 to the ON (up) position and DIP switches 5, 6, and 7 as shown.
5.2 The Green input LED blinks the corresponding Maximum Response Time Setting (see following
list), pauses and repeats.
Setting Time
Setting Time
0
1024 times Input Range period ( 40 msec min., 10 sec max.)
5
200 msec (5 Hz)
1
10 msec
(100 Hz)
6
500 msec (2 Hz)
2
20 msec
(50 Hz)
7
1 sec
(1 Hz)
3
50 msec
(20 Hz)
8
5 sec
(.2 Hz)
4
100 msec
(10 Hz)
9
10 sec
(.1 Hz)
u
If the existing Maximum Response Time setting is your desired requirement, this section is
complete
*
. Otherwise, continue with Step 5.3.
5.3 Press the push-button. The Green input LED blinks rapidly. Maximum Response Time setting is
now accessed.
5.4 Turn the rotary switch to the selected numerical value for Maximum Response Time desired. (see
list in Step 5.2)
5.5 Press the push-button. The Green input LED blinks the value entered, pauses, and repeats the new
Maximum Response Time setting.
u
If the new Maximum Response Time setting is acceptable, this section is complete
*
.
u
If the new Maximum Response Time setting is not acceptable, repeat from Step 5.3.
u
If the Red output LED blinks, the rotary switch numerical value is invalid. Repeat Steps 5.4 and
5.5.
*
Section complete; place DIP switch 4 to the Down position for normal operation, or change DIP
switches 5, 6, and 7 for the next Configuration Section.
6.0 Calibration
Analog Output Minimum Value
5.0 Maximum Response Time Setting (Low Frequency Cut-Out Setting)
The IFMA is factory calibrated for all operating modes. These settings are
permanently stored in the unit’s configuration memory. The IFMA
automatically selects the proper calibration setting for the selected Operation
mode.
The Minimum and Full Scale output values established at the factory can be
changed using the calibration routines. The Minimum output value can be
adjusted to any value less than the Full Scale output value, and the Full Scale
value can be adjusted to any value greater than the Minimum value.
Changing the factory calibration settings does affect the accuracy of the unit.
Specified accuracy for modes 2, 3, and 4 holds until the factory calibration
range has been halved. This does not apply to mode 1, since it already uses only
half of the IFMA’s output range. When increasing the output range, the new
calibration settings can not exceed the factory Full Scale value by more than
10%. The 0 to 5 VDC range can be doubled.
The IFMA can store user calibration settings for only one mode at a time. If
calibration is changed for one operating mode, and the user then selects a
different operating mode, the unit reverts to factory calibration settings.
Calibration steps can be combined (added) to obtain a total calibration change.
This is done by repeated push-button entries of the same value, or different
values, before saving the change. The calibration steps as shown in the table at
right are approximations. A current or volt meter should be connected to the
appropriate output pins to verify the actual calibration setting.
Approximate Calibration Increments
ROTARY SWITCH
VOLTAGE
CURRENT
1
3 mV
5 µA
2
5 mV
10 µA
3
10 mV
25 µA
4
25 mV
50 µA
5
50 mV
100 µA
6
100 mV
200 µA
7
200 mV
400 µA
8
400 mV
800 µA
Calibration Direction
The default direction for calibration changes is up (increasing values) on
entry to either calibration routine. This direction can be toggled from within the
routine with the following steps:
1. Enter the calibration routine you wish to change (Minimum or Full Scale).
2. Press the push-button. The Green input LED blinks rapidly.
3. Turn the rotary switch to position 9. Press the push-button.
4. The Output LED indicates the direction of calibration:
OFF = Increasing Value
ON = Decreasing Value
Analog Output Full Scale Value
Step 5.3
Step 5.2
Step 5.1
6.1 Connect a current or voltmeter of appropriate accuracy to the desired output pins (voltage or
current)
6.2 Place DIP switch 4 to the ON position and DIP switches 5, 6, and 7 as shown. The Green input
LED blinks slowly.
Step 6.2
Step 6.2
Step 6.2
Setting ‘9’
Selected
Step 4.4


