background image

Recordex® StudioJet 50™/StudioJet 100™  AutoPrinter - QuickStart Guide

Insert the StudioJet™ Installation Disc into
your CD/DVD drive.  After a few seconds an
installation menu will be displayed.  For now
you can ignore the install menu.

Connect  the  StudioJet™  to  your  computer
with the supplied USB cable.  After a few sec-
onds  the  computer  will  report  that  it  has
found new hardware.  If this does not happen
check to make sure there is power to the
printer and that the printer is plugged into
your computer.  Try reconnecting the Power
and USB cables.

After the computer reports that it has found

new  hardware  simply  follow  the  Add  New
Hardware Wizard to install the printer driver.

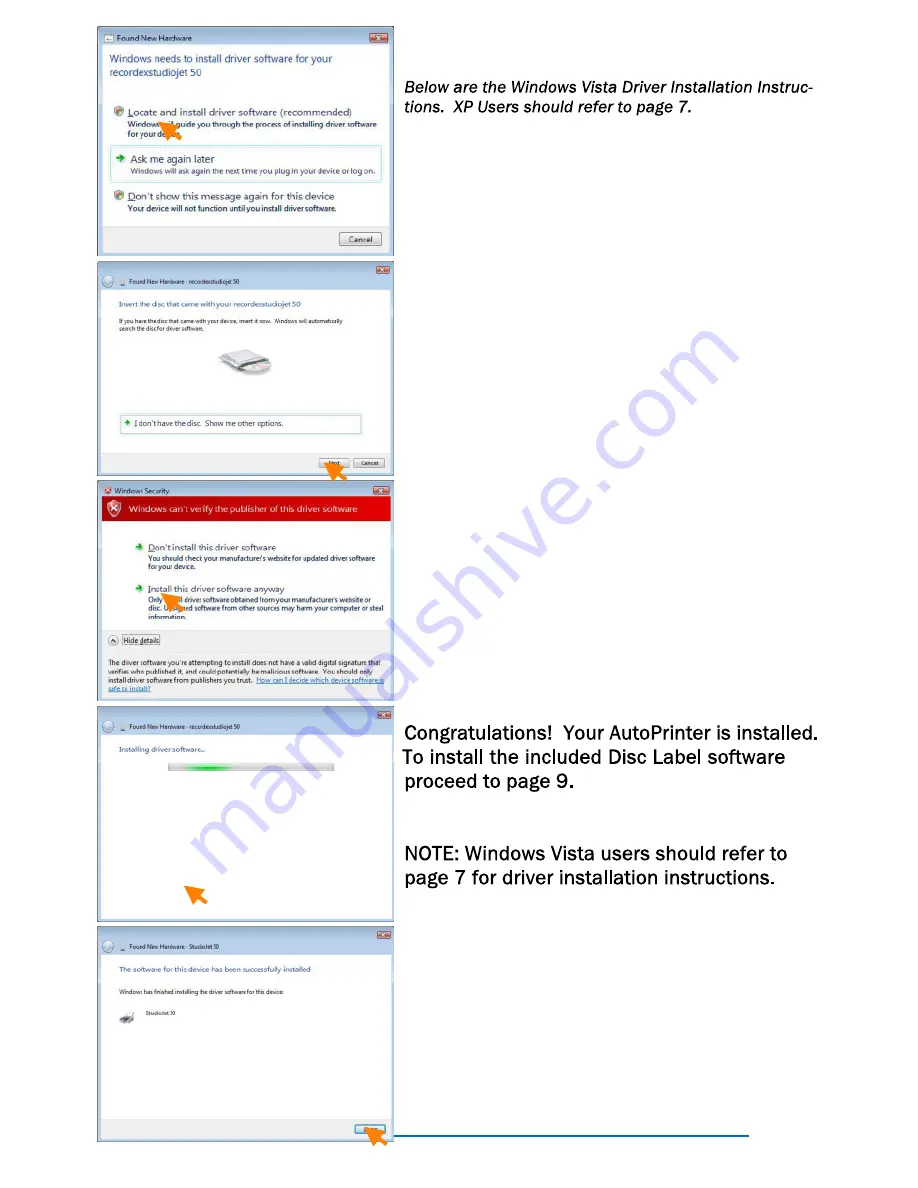
Refer to the screen shots to the left as you
proceed through the Add New Hardware wiz-
ard.

STEP 5b: Install Vista Printer Driver

Summary of Contents for StudioJet 100

Page 1: ...50 or 100 Disc AutoPrinter QUICKSTART GUIDE StudioJet AutoPrinter Manual for Models StudioJet 50 StudioJet 100 ...

Page 2: ...Recordex StudioJet 50 StudioJet 100 AutoPrinter QuickStart Guide ...

Page 3: ...ervice during the warranty period and you don t have original packaging we will send you a replacement set but the cost for a replacement set is 45 00 So we recommend hanging on to the original box foam To save space you can remove the packing tape from the top and bot tom of your printer box and fold the box flat This might free up a little room in your at tic When calling for service we will nee...

Page 4: ...sc tray in place Remove plastic film from printer chassis NOTE Once plastic film is removed the printer can not be returned for a refund Save the box and packaging material for return shipment should your printer require service STEP 1 Unbox and Verify Contents Figure 1 1 Printer Contents NOTE StudioJet 50 Depicted StudioJet 100 will include a 100 capacity output bin and longer input spindles ...

Page 5: ...base see Figure 2 1 Screw the four input spindles down onto the top of the loading mechanism see Figure 2 2 Load blank inkjet printable media into the input bin on the top of the printer see Figure 2 3 Figure 2 1 Insert Output Bin Figure 2 2 Assemble Input Spindles Figure 2 3 Load Blank Media ...

Page 6: ...ge by connecting it to a surge protec tor or an uninterruptible power supply UPS STEP 4 Install Ink Cartridges 1 Open printer cover and wait for cartridges to stop moving 2 Remove protective film from cartridge see Figure 4 1 3 Lift Cartridge cover and insert cartridge into printer See Figure 4 1 NOTE The cartridges provided with your printer are starter cartridges and will provide approximately t...

Page 7: ...SB cable After a few sec onds the computer will report that it has found new hardware If this does not happen check to make sure there is power to the printer and that the printer is plugged into your computer Try reconnecting the USB ca ble After the computer reports that it has found new hardware simply follow the Add New Hardware Wizard to install the printer driver Refer to the screen shots to...

Page 8: ...ter a few sec onds the computer will report that it has found new hardware If this does not happen check to make sure there is power to the printer and that the printer is plugged into your computer Try reconnecting the Power and USB cables After the computer reports that it has found new hardware simply follow the Add New Hardware Wizard to install the printer driver Refer to the screen shots to ...

Page 9: ...ake sure the install setup disc is in your CD DVD drive If the menu does not appear after 20 30 seconds then try running it manually by Click Start Click Run Type E Setup exe where E is the drive letter for you CD DVD drive and press Enter The Install Menu will appear STEP 7 Install Discus LE 4 To install the bundled version of Discus Label Editor simply click on the Install button on the Installa...

Page 10: ...o create jewel case inserts This function is not available with the version of Discus bundled with your printer however the layout methods are the same for la bels and inserts so it is still worth reading Try using your own pictures You ll be amazed at the photo quality printing you can achieve with your StudioJet Disc AutoPrinter Experiment with Discus You ll learn the fastest if you just sit dow...

Page 11: ...ur loading mechanism is the fastest in the industry and is designed to provide superior performance with 120 mm discs Unfortunately we do not have an option at this time for non standard disc sizes A Not yet We are working on an Apple driver but we do not have one avail able yet A Yes We support all inkjet print surfaces A The StudioJet was designed to work with any 120 mm inkjet printable disc If...

Page 12: ...apter 4 of the user s guide SYMPTOM The printer has stopped and will not resume and there is a disc in the disc tray SOLUTION Unplug the printer at the back of the unit open the cover and man ually pull the drive tray forward until you can easily access the stuck disc Push the tray back into the printer close the cover and reconnect the power source SYMPTOM There is ink on the outside edge or the ...

Page 13: ...he left of the disc The alignment needs adjusted to the left Image is shifted to the left and down leaving a white space on the right and top of the disc The alignment needs adjusted to the right and up Hub Printable Disc Print Alignment Problem Standard Printable Disc Print Alignment Problem Image is not printing all the way to the outer edge of the printable area The outer hub mask settings need...

Page 14: ...iver utilities To do so follow these simple steps 1 Open your printers and faxes 2 Right click on your StudioJet printer and select Printing Preferences from the drop down menu 3 This will open the Printer Preferences Menu where you can select from a number of printer driver utilities and settings You ll see a tab for Mask Settings and one for Alignment ...

Page 15: ...e down or right you enter positive numbers to shift an image up or left you enter negative numbers The number you enter rep resents 1 millimeter or 1 tenth of a millimeter depending on the option selected 1 Usually you will only need to make small adjustments and the 1 millimeter option is preferred To adjust the offset simply enter a positive or negative value into the X and or Y offset box and t...

Page 16: ...ed during the warran ty period One 1 year from the date of the original purchase You are responsible for shipping the printer to our Printer Service Depot Recordex will pay for return shipment of printers repaired un der warranty Return shipment will be by ground service to the 48 contiguous US states You are responsible for shipping to Alaska Hawaii and any address outside of the United States If...

Reviews: