background image

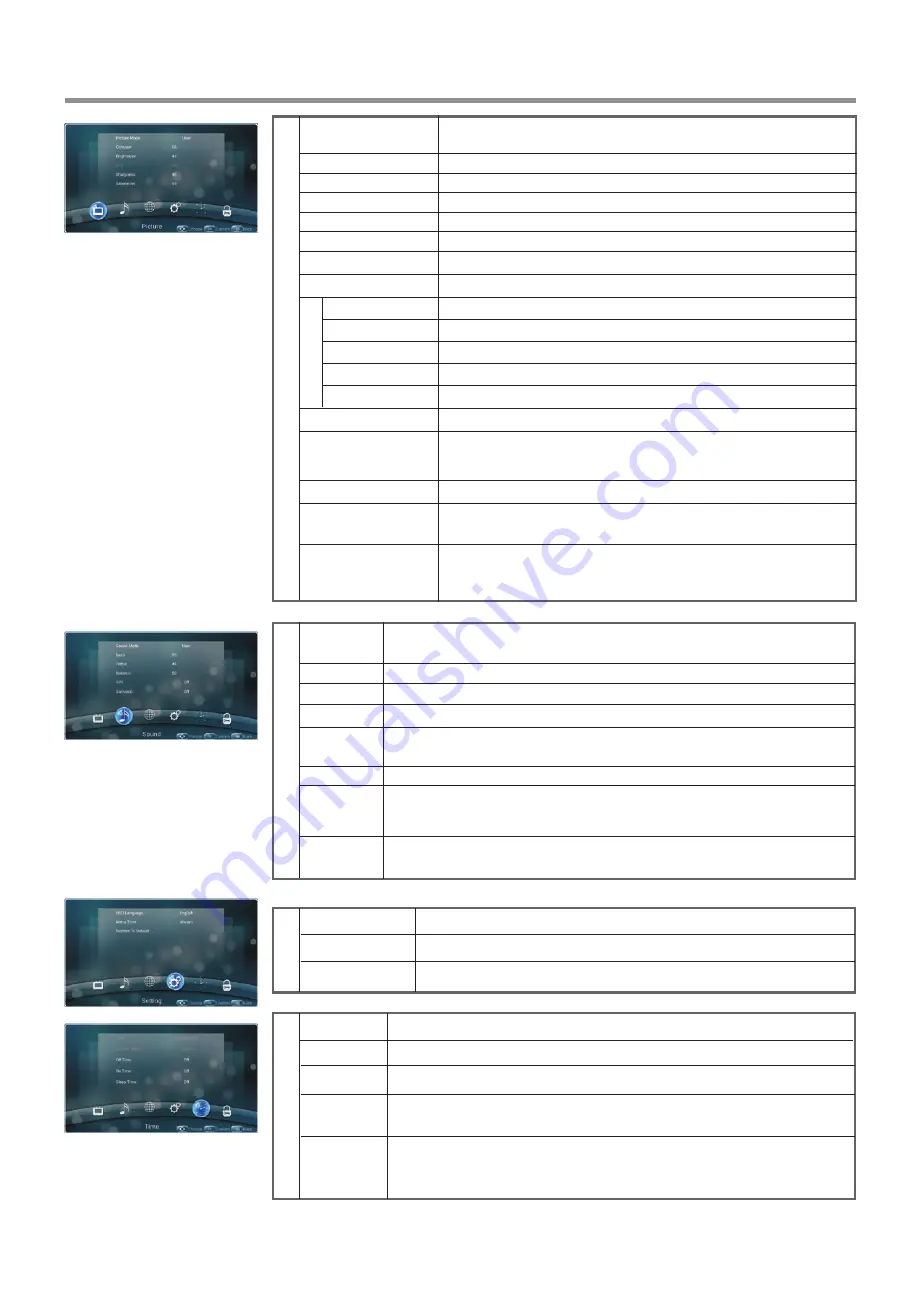
Sleep Time

Off Time

On Time

Time

Date

Current


Time

Set the duration of time until the TV automatically goes into Standby mode.
[Off] / [10 Minute] / [20 Minute] / [30 Minute] / [60 Minute] / [90 Minute] / [120 
Minute] / [180 Minute] / [240 Minute]. 

Set  On  timer  to  turn  on  the  TV  automatically  to  a  preset  channel  or 
source at a certain time. 

Set Off timer to switch the TV to standby at a specified time. 

Set current date manually.

Set current time manually. 

Menu Time

OSD Language

Select on-screen menu language.

Setting

Restore To Default

Select OSD menu display time. 

Reset all settings to factory defaults. 

Menu List

Noise


Reduction

Select  the  noise  reduction  mode  to  reduce  picture  noise  (snow)You  can 
select 

Weak, Middle, Strong, 

or

 Off

.

Set up the overall brilliance of the screen. 

Backlight

Color


temperature

Select the color temperature. You can select

 Warm

Cool

 or 

Normal

Brightness

Adjust the brightness.  

Contrast

Adjust the contrast. 

Saturation

Adjust the color saturation. 

Tint

 Adjust the image hue. (Only for NTSC system) 

Sharpness

Adjust the sharpness.

Picture

Sc

re

en

The backlight brightness is decreased.

Energy


Save

Aspect


ratio

Select the aspect ratio (display proportions) according to your video signal 
type  or  personal  preference 

[4:3]  /  [16:9]  /  [Auto]  /  [Panorama]  /   

[Zoom1] / [Zoom2] 

Clock

Adjust the screen size.

Phase

Adjust the focus of stable images.

Horizontal


Position Move the image right or left.

Vertical


Position

Move the image up or down.

Auto


Tune

Automatically adjust the image settings such as position and phase. 

DLC

Enhance  the  contrast  ratio  between  light  and  dark  areas  of  the  picture. 
You  can  select 

On

  or 

Off

.  If  this  is  set  to 

On

Backlight

  cannot  be 

adjusted.

MWE

Select magic picture demo mode.

Picture


Mode

Select  your  favourite  picture  mode  for  each  input   

/

[Soft] / [User].

[Dynamic] 

[Standard] / 

Turn the Surround sound effect on or off.  

Surround

Treble

Adjust Treble (high sounds). 

Bass

Adjust Bass (low sounds) .

Sound

Alone

Select

 [On]

 to turn off the picture on your IFP and listen to the program audio only.

Select 

[Off]

 to turn off the feature. 

Balance

Adjust volume level of right and left speakers.

AVC

Select 

[On] 

to equalize overall volume levels across all channels.

Select 

[Off] 

to turn off the auto volume control. 

SPDIF Output Select the digital audio output mode for S/PDIF. 

Select 

[RAW]

 to output audio signal as its original format.

Select 

[PCM]

 to output audio signal by PCM format.

(digital signal only)

Sound


Mode

Select  your  favourite  sound  mode  for  each  input

  [On-Site]  /  [Standard]  / 

[Music] / [Movie] / [News] / [User]

.

13

Summary of Contents for LE-70PA88

Page 1: ...INSTRUCTION MANUAL Interactive Flat Panel Before connecting operating or adjusting this product please read the manual completely Please keep this manual for future reference ST 700 LE 70PA88...

Page 2: ...tant Safety Precautions 2 Important Notice 4 Identification of Controls 5 Remote Control 6 Setting Up 7 Connections 8 Basic Operations 10 System Settings 12 Menu List Troubleshooting 17 Specifications...

Page 3: ...while watching a program especially on a larger than life IFP Make sure that you place or install the IFP where it cannot be pushed pulled over or knocked down Make sure that you route all cords and c...

Page 4: ...ightning storm or when it is left unattended and unused for long periods of time unplug it from the power outlet and disconnect any antenna or cable system This helps prevent property damage and perso...

Page 5: ...e pixels may appear on the screen as a fixed blue green or red point These non active pixels do not adversely affect the performance of your IFP and are not considered defects Legal notices FCC Statem...

Page 6: ...is used in rooms locations with low temperature the picture may leave trails or appear slightly delayed This is not a malfunction and the unit will recover when the temperature returns to normal Do no...

Page 7: ...To connect with those equipments with HDMI or DVI interface for example Set top box or DVD player A HDMI to DVI adapter cable is required when you are connecting a DVI equipped device to the IFP 3 VGA...

Page 8: ...the on screen menu Mute the sound Display or exit the setting menu screen Switch to HDMI mode Switch to VGA mode Display the current program information 0 9 number buttons Display desktop Home page o...

Page 9: ...lecting a location You should select a location for the IFP Where direct light does not reflect on the screen That has indirect and soft lighting Where the IFP has access to an antenna or cable TV con...

Page 10: ...ends of cables to make sure that they are the correct type before you try plugging them into jacks on the IFP Make sure that all plugs are securely inserted into the jacks Loose connections can result...

Page 11: ...showed in the shadowed area The second is to connect PC with IFP via IR and HDMI cable Please choose the proper method of connection based on your device VGA OUT AUDIO OUT USB Not After installation o...

Page 12: ...To cut off the power completely press Power Switch on the IFP Warning When the IFP is in standby mode power is still flowing into the IFP For the sake of energy saving and safety issue please press P...

Page 13: ...to the OPS interface Show TV system program Shortcuts you created on Home page Show all applications Go to your web Browser Open the System Setup menu p 13 Go to normal TV viewing Go to your local US...

Page 14: ...mation or restore to factory default To set on screen language To set default input method To set Google pinyin input method Wallpaper Setting Note To manually set date and time you should toggle Set...

Page 15: ...y proportions according to your video signal type or personal preference 4 3 16 9 Auto Panorama Zoom1 Zoom2 Clock Adjust the screen size Phase Adjust the focus of stable images Horizontal Position Mov...

Page 16: ...want to pull out the USB device please exit USB mode first For instructions on using your USB device refer to the user s manual of your USB device Please name your files in English Otherwise the file...

Page 17: ...mpatible with the IFP due to technical update Using USB Multi Media Player Playing Music With the USB music player you can play compatible music in MP3 or AAC format Note The USB music player supports...

Page 18: ...MOV format video files but not all AVI MPG MPEG DAT MP4 TS RM RMVB MKV MOV files are compatible with the IFP due to technical update Now AB repeat starts To cancel highlight Section replay and toggle...

Page 19: ...may be muted Press MUTE again to cancel Audio noise Communication problems may occur if infrared communication equipment e g infrared cordless headphones is used near the IFP Move the infrared communi...

Page 20: ...torage humidity 10 80 Atmospheric pressure 86kPa 106kPa 5 C 35 C Connection terminals of the IFP AV IN HDMI Input VGA OUT USB Note Headphone 18 1 Design and specifications are subject to change withou...

Page 21: ...PRINTED ON RECYCLED PAPER...

Reviews: