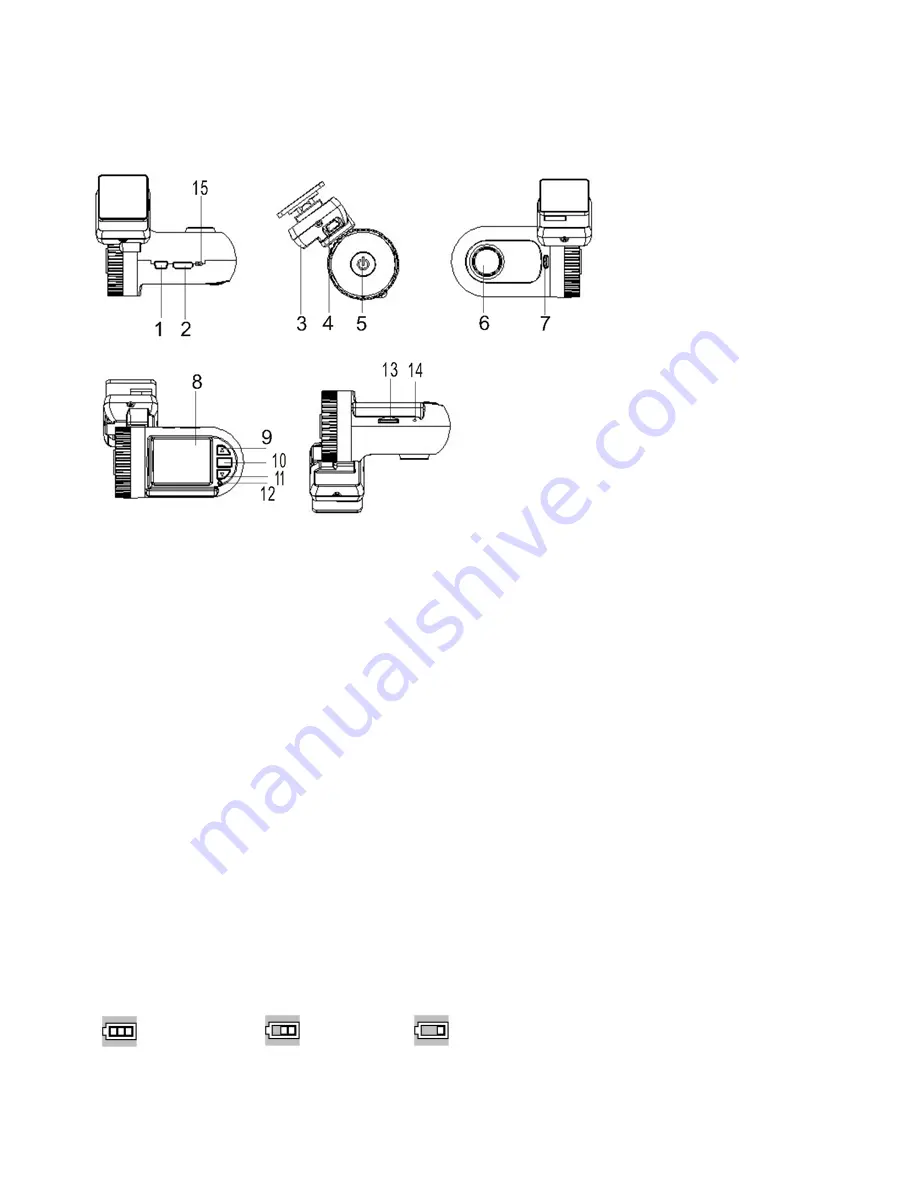
background image


PRODUCT FEATURES: 


1. USB port 
2. HDMI port 
3. Bracket base 
4. Car charger port   
5. Power/Mode 
6. Lens 
7. Speaker 
8. LCD Screen 

9. Up/Menu (Mute ON/OFF) 
10. REC/OK 
11. Down (SOS lock) 
12. Indicator 
13. Micro-SD card slot 
14. Reset hole 
15. Microphone 


What’s In the box

: DR-170 DVR, 3M Mount, Car Charger, USB Cable and User Manual. 


Charging the Battery: 

1. Connect the DVR to car charger through Mini-USB port. The DVR will power on automatically and enter standby mode. 
The red indicator light will turn on to indicate that the unit is charging. 
2. Connect DVR to computer via USB cable. The DVR will power on automatically and enter an option menu letting you 
select between “Mass Storage (MSDC)” and “PC-Cam”. Press “UP/DOWN” to choose the desired mode and “REC/OK” to 
select the option. The system will then start charging.   

[Note]

  During charging, the DVR can be turned on and off manually.  Once the unit has been fully charged, the red 

indicator light will turn off. 
 

Battery Level Indicators: 


  Full                  Middle               Low    


Summary of Contents for DR-170

Page 1: ... system records in HD 1080P and the recordings are stored on a Micro SD card 32GM max which can be retrieved from the system or the unit itself to view the video files The unit can have the time and date programmed into it and will display the time and date of each recording The system also has a built in 1 5 color LCD screen for on site playback of the recordings and a built in microphone for aud...

Page 2: ...t The DVR will power on automatically and enter standby mode The red indicator light will turn on to indicate that the unit is charging 2 Connect DVR to computer via USB cable The DVR will power on automatically and enter an option menu letting you select between Mass Storage MSDC and PC Cam Press UP DOWN to choose the desired mode and REC OK to select the option The system will then start chargin...

Page 3: ...utomatically When the ignition turns off or when the car charger is disconnected the DVR will turn OFF automatically within 10 seconds as per setting System Setup In Video or Photo mode press and hold UP button to enter menu interface DOWN REC OK button to enter the System Setup G Sensor On Off When G sensor is ON DVR will protect and lock the current video once G sensor been triggered by instant ...

Page 4: ... Setup Menu 1 Take Photos Press the power key to enter video recording mode as default Press the Mode button to enter Photo mode The icon will be displayed on the upper left corner of the LCD screen Then hold the DVR firmly press REC OK key to take photos Photos will be stored into memory card automatically 2 Set Photo Menu Hold the DVR firmly and press OK on the LCD screen or press REC OK button ...

Page 5: ...nload all photos and videos NOTE To watch recorded videos please transfer videos from the SD card to the computer This DVR is compatible with Windows XP Windows 7 and Windows 8 Operating system as well as Apple OSX operating systems PC CAM Connect the DVR to your computer while the DVR system is powered off and the display will show 2 options MSDC PC CAM PC CAM allows you to use the DVR as a web c...

Page 6: ...s 120 A class Glass lens OSD language English Russian Chinese etc Video resolution 1080P 30fps 720P 60fps Video format H 264 codec AVI Photo size 12M 10M 8M 5M 2M Photo format JPEG Memory card Micro SD card support from 4GB 32GB C4 C10 Microphone Speaker Built in Power frequency 50Hz 60Hz TV output NTSC PAL USB port Mini USB 2 0 Power supply Car charger DC12V 24V adapt to 5V 1000mA Battery 3 7V 35...

Reviews: