background image

4

PARTS ASSEMBLY

Your Jet Pro comes as a pre-assembled unit. This section shows how to safely detach Jet Pro’s components: the engine, 
battery, lens, and nosepiece.

WARNING: 

When removing Jet Pro’s engine or battery, take care to avoid damaging the frame and the other components.

BATTERY

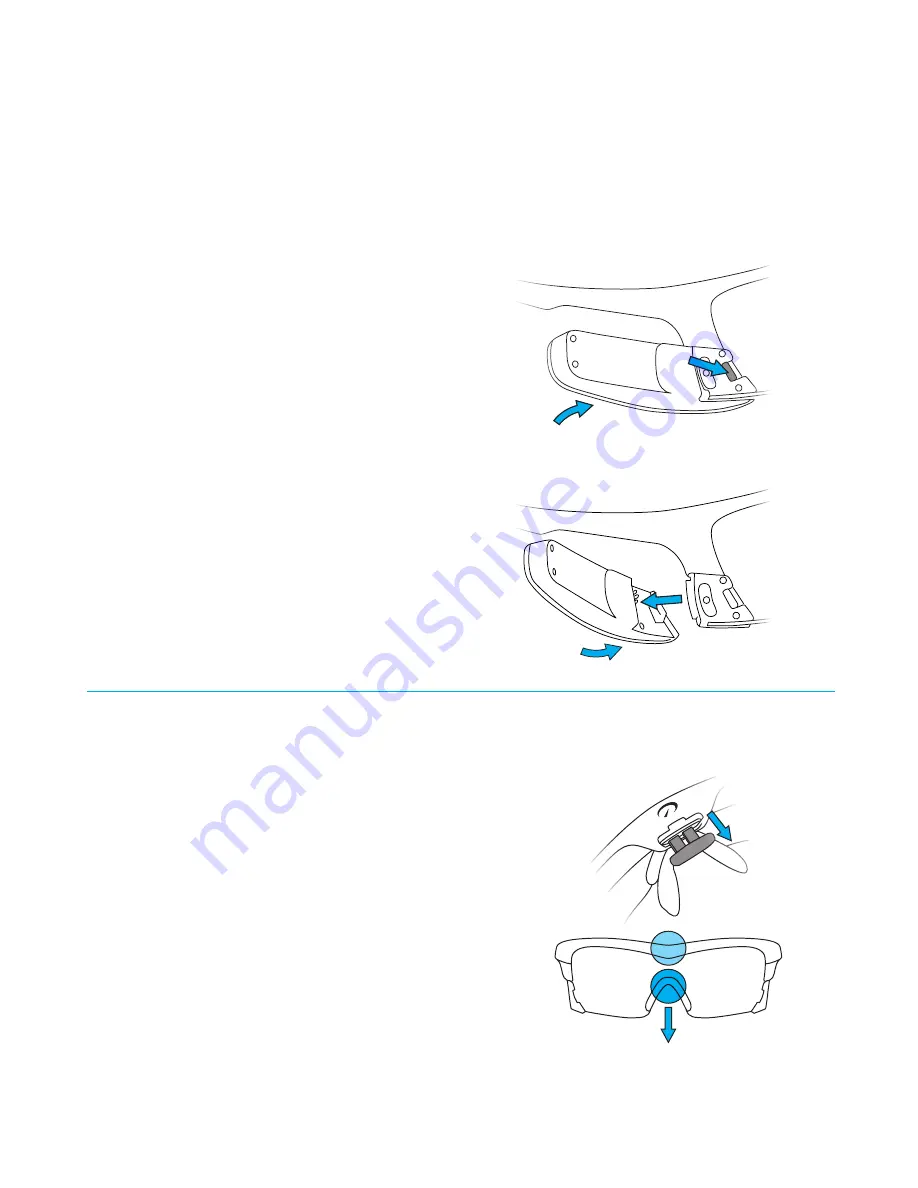
REMOVING THE ENGINE AND BATTERY

1. 

Gently push the release tab forward with your thumb. 

2.   With the release tab pushed forward, swing the battery 


or engine inward to release it from the frame.

WARNING:

 Removing the engine or battery while Jet Pro is on 

or charging may cause permanent damage. 

RE-ATTACHING THE ENGINE AND BATTERY

1. 

 Hold the engine or battery with one hand. Hold the 
frame with your other hand.

2.   Line up the groove on the engine or battery with the 

corresponding lip on the frame.  

3.   Gently swing the engine or battery outward until 


the release tab snaps into the corresponding slot  
on the frame.

LENS

REMOVING THE LENS

1. 

 Make sure you remove Jet Pro’s engine and battery 
before removing the lens. (See above.)

2. 

 There is a release tab at the center of Jet Pro’s frame. 

Using your fingernail, gently pull the release tab all the 
way back. This will open the lens release mechanism. 

3.   Hold the center of the frame with one hand. With your 

other hand, grip the nosepiece and nose bridge, then 

pull straight down to remove the lens from the frame. If 
you have trouble removing the lens, check the release 
tab to make sure it’s pulled all the way back.

5mm

Summary of Contents for JET PRO

Page 1: ...RECON JETTM PRO User Manual Assembled in USA ...

Page 2: ...n twilight or under condition of dull light or at night Jet Pro blocks part of your normal field of vision Do not use while driving If you use Jet Pro in the workplace to operate mobile equipment use Jet Pro with special care such as spotters and protected driving areas and be aware that your field of vision is partially blocked Lens filter category 4 lenses are not suitable for driving and road u...

Page 3: ...USTING THE EAR STEMS 3 ADJUSTING THE NOSEPIECE 3 ADJUSTING THE DISPLAY 3 PARTS ASSEMBLY 4 BATTERY 4 LENS 4 NOSEPIECE 5 MAINTENANCE 6 EYEWEAR AND COSMETIC SURFACES 6 STORING YOUR DEVICE 6 TECHNICAL SPECS 6 TROUBLESHOOTING 14 ADB 14 BATTERY 14 SUPPORT 15 WARRANTY 15 BATTERY DISPOSAL INFORMATION 16 COMPLIANCE INFORMATION 17 ...

Page 4: ...wn on the optical touchpad SELECT Button Use the SELECT button to interact with screens and menus BACK POWER Button Press and hold BACK POWER for 2 seconds to power on Jet Pro Hold for 5 seconds to power off Jet Pro Hold for 9 seconds to force shutdown not recom mended JET PRO SYSTEM FEATURES ENGINE Micro USB Port Open the port cover and use the included Micro USB cable to connect Jet Pro to a com...

Page 5: ...d Be sure to cover Jet Pro s Micro USB port after charging to prevent moisture from entering Jet Pro 6 POWER OFF JET PRO To power off Jet Pro press and hold the BACK POWER button until Shutting Down appears on the screen This should take about 5 seconds To force a shutdown not recommended press and hold BACK POWER for 9 seconds WARNING Do not attempt to remove Jet Pro s battery or engine prior to ...

Page 6: ...mfortably on your face with the display just below your line of sight If you find that Jet Pro is sitting too high or too low you can adjust the nosepiece accordingly ADJUSTING THE EAR STEMS The soft rubber ear stems on Jet Pro s frame can be adjusted to the contour of your head for a secure and comfortable fit WARNING Do not attempt to twist the display control column all the way around The displ...

Page 7: ...he engine or battery with one hand Hold the frame with your other hand 2 Line up the groove on the engine or battery with the corresponding lip on the frame 3 Gently swing the engine or battery outward until the release tab snaps into the corresponding slot on the frame LENS REMOVING THE LENS 1 Make sure you remove Jet Pro s engine and battery before removing the lens See above 2 There is a releas...

Page 8: ...e lens and then gently push it in The nosepiece should snap into place REPLACING THE LENS 1 Make sure the lens release tab is fully extended 2 Insert the lens into Jet Pro s frame starting with the side that s closer to you Insert only one side at a time and make sure the middle part of the lens is all the way in before you continue 3 Be careful not to unseat the electric circuit that runs along t...

Page 9: ...ing as well STORING YOUR DEVICE Before storing Jet Pro for an extended period of time make sure the battery is fully charged and detached from the frame This will help prolong the life of the battery Always store Jet Pro in a cool dry place The ideal long term storage temperature for Jet Pro is between 50 F and 68 F 10 C and 20 C WARNING Storing Jet Pro in suboptimal conditions may shorten the bat...

Page 10: ...eat This may cause thermal runway or explosions Do not charge Jet Pro in excessively hot or cold environments below 32 F 0 C or above 104 F 40 C After charging Jet Pro close the USB protection cap tightly to prevent water damage If the battery looks damaged or inflated stop using Jet Pro immediately CHARGING USING AN AC WALL CHARGER Alternatively you can charge Jet Pro using an AC wall charger wit...

Page 11: ... Intel Corporation Atn Corporate Quality 2200 Mission College Blvd Santa Clara CA 95054 USA ProductEcology intel com Industry Canada Compliance Jet Pro was certified with IC number 9717A 009 This digital apparatus does not exceed the Class B limits for radio noise emissions from digital apparatus set out in the interference causing equipment standard entitled Digital Apparatus ICES 003 of the Cana...

Page 12: ...iPhone may affect wireless performance iPhone is a trademark of Apple Inc registered in the U S and other countries ANDROID COPY RIGHT INFO Android is a trademark of Google Inc ANT CERTIFICATION This product is ANT TM certified BLUETOOTH SMART READY COPYRIGHT INFO The Bluetooth word mark and logos are registered trademarks owned by Bluetooth SIG Inc and any use of such marks by Recon Instruments i...

Reviews: