background image

My Dreamhouse Instructions - Assembly

page 8

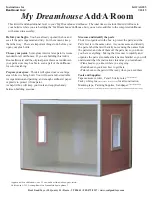
8C. Glue and tape the next fl oor's Horizontal Trim to the Side.
D. Glue and tape the front's Front Trim and the next fl oor's Floor 
Trim to this fl oor's Side and Ceiling Liner*

8A. Glue and tape the Floor Trim to the Foundation only*.  Two Packers, taped together so they are longer, 

8A. Glue and tape the Floor Trim to the Foundation only*.  Two Packers, taped together so they are longer, 
can be taped to the Floor if pressure is needed to pull the Floor Trim fl at.

can be taped to the Floor if pressure is needed to pull the Floor Trim fl at.
B. Glue and tape a Back Trim to the House Side, lined up in back, and a Front Trim lined up in front.  

B. Glue and tape a Back Trim to the House Side, lined up in back, and a Front Trim lined up in front.  
Let the glue dry.

Let the glue dry.

*gluing only to the lower level allows the house to 
be taken apart for transportation or wiring.

Horizontal T

rim

Floor

 Trim

Back Trim

Back Trim

Front Trim

Front Trim

Horizontal Trim

Horizontal Trim

Floor T

rim

Floor T

rim

Front Trim

Front Trim

Let the glue dry

9. Test the window parts before using glue - clean as necessary.

A. Glue the Window Sills into the cutout, centered side-to-side.
B. Glue the Window Sides into the cutout.  Push all the way out.
C. Press down on the top Window Sill to tighten the fi t.
Repeat for the other window

A. Window Sills

Centered

Centered

Sill

Sill

B. Window Sides

B. Window Sides

C. Tight

A

B

B

C

C

D

D

Summary of Contents for AG185

Page 1: ...ready when you need them Before you begin You have already opened the box and see all the parts organized and tidy For the moment keep them that way There are important things to do before you open yo...

Page 2: ...02 479 2217 AG185 Add A Room Kit for an additional story or two Light it Up Indirect lighting with ExtraBrite LEDs 30 LED P pure white or W warm white LED lights Light It Up kits E224 E225 and E226 68...

Page 3: ...o that with primer but its job of being an interface between different materials doesn t apply here In this application primer just adds steps and ex pense I don t use it here and don t recommend it P...

Page 4: ...oat already and have sanded thoroughly Inside 3 The Sides are Left or Right pick the one for the end of the assembly that is up Glue and tape a Side to the assembly tight in the back groove Step 2 Ste...

Page 5: ...ss in the joint Inspect for looseness in the joint Floor Floor Side Side Floor Floor Side Side A piece of Trim sitting on the Floor only not overlapping the Side T r i m T r i m A A B C Tape the Trim...

Page 6: ...touch can scorch the paint keep heating the knife and moving it along the glue joint Take it easy and keep at it you will triumph If a helper is available consider an iron and a hot air gun working t...

Page 7: ...ure The Packer puts pressure on the middle of the Trim on the middle of the Trim 7 Attach Trim Glue and tape the Horizontal Trim to the Foundation only lined up with the Floor on top and straight fron...

Page 8: ...e Side lined up in back and a Front Trim lined up in front B Glue and tape a Back Trim to the House Side lined up in back and a Front Trim lined up in front Let the glue dry Let the glue dry gluing on...

Page 9: ...Tool Real Good Toys Electrification Tool is the only tool recommended for is the only tool recommended for this kind of wiring and it s included this kind of wiring and it s included in the 6888 and 7...

Page 10: ...Duplicate this page to test your painting plan Also printable from the www RealGoodToys com website...

Reviews: