38
Cleaning the recovery tank
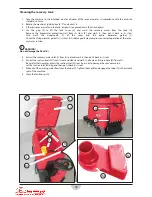
1. Take the machine to the intended area for disposal of the recovery water, in compliance with the emission
standards in force.
2. Rotate the machine's ignition key to “0” and extract it.
3. If there is recovery water in the tank, empty it (see procedure in the Use chapter).
4. Use the grip (F) to lift the tank cover (G) and wash the recovery water from the tank (H).
Remove the breakwater protection wall from its slots (P) and wash it, then put it back in its slots.
Also wash the underneath (I) of the cover and the entire perimeter gasket (J).
Check that the perimeter gasket (J) is intact: if it is damaged it may compromise correct operation of the recov-
ery water suction.
!
WARNING!
Do not damage the fl oat (K)
5. Extract the recovery water inlet (L) from its seat and wash it, then put it back in its seat.
6. Extract the suction inlet (M) from its seat and clean and wash it; also clean its drain hole (N) from dirt.
Be careful that no water enters the suction inlet (M) seat (so as not to damage the vacuum motor).
Let the suction inlet (M) drip and then put it back in its seat.
7.
Make all of the washing water fl ow from the tube (Q). Tighten the cap (R) and engage the tube (Q) in the relative
seat of the machine.
8. Close the tank cover (G).
G
F
J
I
H
P
M
K
L
N
M
R
Q
Summary of Contents for KILO
Page 2: ...2 KILO ...
Page 16: ...16 WIRING DIAGRAM 2 2 ...


