


28
STARTING AND STOPPING THE MACHINE
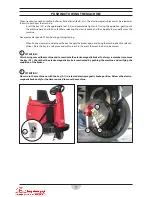
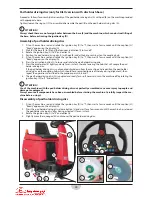
Starting the machine
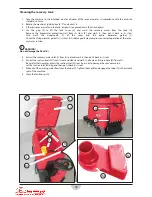
1. Prepare the machine as described in the previous paragraph.
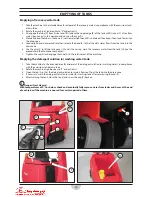
2. Sit on the machine seat (A).
3. Rotate the ignition key (B) to “I”, then wait a few seconds until the caption (D) “READY” appears on the display
(C).
!
ATTENTION!
Do not rotate the ignition key (B) without fi rst sitting on the seat (A) as a safety system allows the machine to
be used only when the operator is sitting on the seat (A).
It is strictly forbidden to tamper with the seat's safety system or to simulate in any way the operator sitting on
the seat.
If the ignition key (B) is rotated without sitting on the seat, the caption “SIT DOWN” appears in zone (D) on the display
and no other machine function is available.
When the display shows indications other than those described, an intervention is required from the RCM Service
Centre.
4. Check the battery charging status by observing the percentage (E) and relative graphic (F).
Charge the batteries if necessary; see the procedure in the Maintenance chapter.
!
ATTENTION!
The machine is not suitable for use on uneven fl oors.
5. Go to the work area by starting the machine with your hands on the steering wheel and pressing the pedal
(G). The forward speed is adjustable from zero to its maximum set value, based on the pressure exerted on the
pedal (G).
6. To activate reverse drive of the machine when required, release the pedal (G) and when the machine has
stopped press button (H).
7. If required, use buttons (I) to adjust the fl ow of the detergent solution (or washing water).
8. (Upon request) If required, use buttons (J) to adjust the percentage of the washing detergent.
9. To start washing the fl oor, press button (L) to activate the brush(es).
10. To start drying the fl oor, press button (M) to activate the vacuum.
11. To start washing and drying the fl oor, press button (N).
12. To start polishing the fl oor with the pad, press button (L).
13. Start cleaning/polishing by moving the steering wheel (P) and moving the machine forwards by pressing the
pedal (G).
A
B
G
P
I
J
K
L
M
N
F
C
D
E
H
Summary of Contents for KILO
Page 2: ...2 KILO ...
Page 16: ...16 WIRING DIAGRAM 2 2 ...


