


84
OPTIONAL - BATTERY CHARGER ON BOARD (ELECTRIC VERSION)
1
3
4
5
2
6
8
ON
DIP 8
DIP 7
DIP 6
DIP 5
DIP 4
DIP 3
DIP 2
DIP 1
ON
ON
ON
ON
ON
ON
ON
ON
OFF
OFF
OFF
OFF
OFF
OFF
OFF
OFF
8
9
7
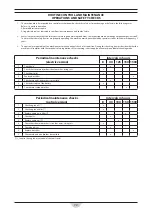
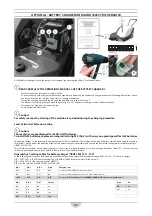
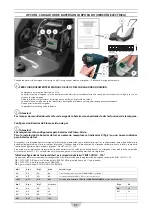
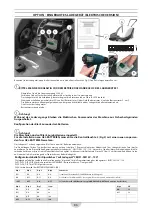
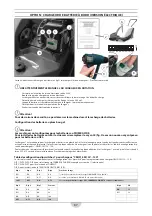
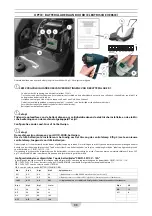
Use the battery charger 1 when the battery is discharged (see warning light 8 fi g.2) Proceed as belows:
!
READ CAREFULLY THE OPERATIONS MANUAL 2 OF THE BATTERY CHARGER 1.
•
Make sure that the electric power supply is 220V.
•
Connect the plug of the charger to the socket of the electric power supply, the battery charger makes a self-checking before start, subse-
quently switches on the red light 3 and starts to recharge the battery.
•
During the charging operation the leds coming from Red 3 to Yellow 4 to Green 5.
•
The battery is completely charged when the green light is “ON”, the battery charger switches off automatically.
•
Disconnect the plug from the power supply.
•
Check the battery electrolyte.
!
Caution!
For safety reasons the starting of the machine is excluded during the charging procedure.
Lead-Acid or Gel batteries setting
!
Caution!
The machines are predisposed for LEAD-ACID batteries.
To install GEL batteries, replace warning indicator light 8 (fi g.2) with a new one predisposed for GEL batteries
The battery charger 1 is predisposed to charge the Lead-Acid or Gel batteries. The settings for the type of battery must be done using the switches
(dipswitch) 7 placed under the adhesive plate 8 of the battery charger (see picture) and consult the “dipswitch setting tables for battery charger”-
CBHF1-SM 12V-12A.
To access the dipswitches on the battery charger, it is necessary to remove the bonnet 6, use a heat air gun blower 9 (max 50°C , 15 cm away from
surface) to heat the adhesive plate 8 and lift it then, proceed to set the dipswitches.
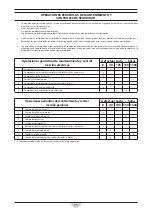
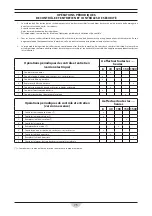
Dipswitches 7 setting tables for battery charger “CBHF1-SM 12V. - 12A”
In the following tables you can fi nd meaning of all diff erent position of dipswitch for programming CBHF1-SM 12V. - 12A. battery charger.
DIP 1, DIP 2, DIP 3, DIP 4 for the selection of the CHARGING CURVE (example with selected curve 11).
DIP 5, DIP 6, DIP 7 for the selection of the CURRENT.
DIP 8, for the selection of the BATTERY VOLTAGE (VB).
Dip 1
Dip 2
Dip 3
Dip 4
Charging curve
OFF
ON
ON
ON
1 (curve for LEAD-ACID [Wet] traction batteries)
ON
OFF
OFF
ON
6 (curve for AGM and GEL batteries and other manufacturers)
> OFF
OFF
ON
OFF
11 (curve for GEL batteries from SONNENSCHEIN, DETA and other manufacturers)
Dip 5
Dip 6
Dip 7
Current
Dip 8
VB
ON
ON
ON
4A
ON
12
OFF
ON
ON
8A
OFF
24
ON
OFF
ON
10A
OFF
OFF
ON
12A
Summary of Contents for ALFA
Page 2: ...2 ...


