12
QUICK GUIDE (example)
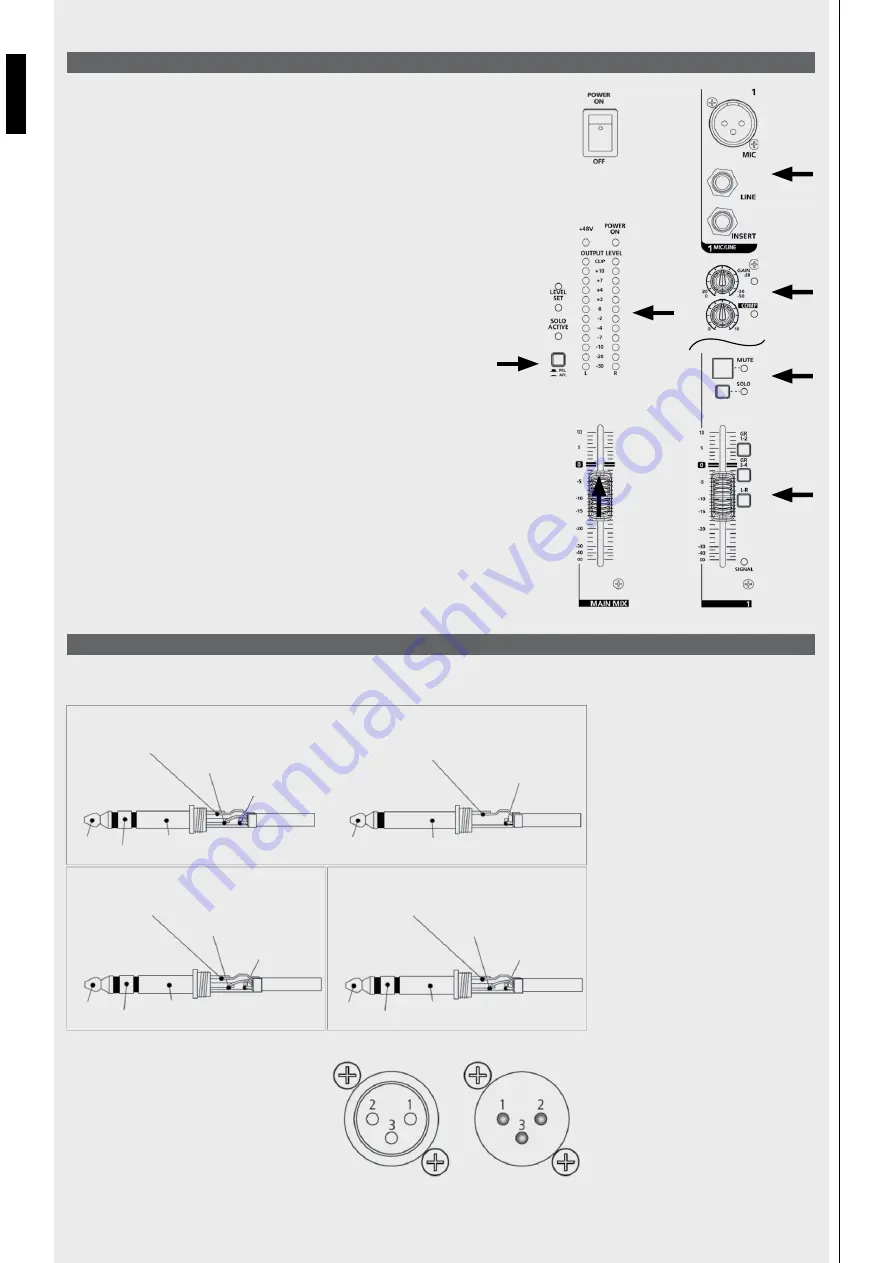
FOR THE FIRST USE OF THE MIXER.
•
With the mixer turned off, connect active speakers (or a stereo amplifier) to
the MAIN MIX
[24]
outputs on the rear panel.
•
Make sure that all the level controls of the mixer (the „faders“) are set to –
∞
.
•
In sequence, turn the mixer on (using the POWER ON
[31]
switch), followed
by the active speakers connected.
•
Connect a dynamic microphone (using a balanced cable) to the XLR connector
(
MIC
input) of channel 1. If you are using a condenser or electret microphone,
you must also enable the „Phantom“ power using the +48V switch
[30]
).
•
Press the SOLO key of the channel and make sure that the
PFL / AFL
key (next
to the OUTPUT LEVEL LED bar) is set to PFL.
•
Speak or sing into the microphone, and at the same time increase the level of
the
GAIN
control of the channel so that the
OUTPUT LEVEL
LED bar indicates
a value of about 0 dB.
•
Release the
SOLO
key of the channel.
•
Make sure that the
MUTE
key of the channel is released and press the
L-R
key.
•
Raise the level control (the „fader“) of the channel up to a value of 0 dB.
•
Carefully raise the level control (the „fader“) of the
MAIN MIX
main outputs
[14]
until you reach the desired volume of the speakers.
1/4” JACK CONNECTOR
XLR CONNECTOR
XLR connector pinout:
1 = earth
2 = audio signal (+ or „hot“)
3 = audio signal (– or „cold“)
WIRING THE CONNECTORS
ENGLISH
XLR Connector (F)
XLR Connector (M)
Sleeve
Ring
Tip
Sleeve = Ground
Ring = Right Channel
Tip=Left Channel
PHONES (TRS)
Sleeve
Ring
Tip
Sleeve = Ground
Sleeve = Ground
Sleeve = Ground
Ring = Signal Return
Tip = Signal Send
INSERT (TRS)
Sleeve
Sleeve
Tip
Tip
Ring
Tip = Hot
Ring = Cold
BALANCED (TRS)
UNBALANCED (TS)
Tip = Hot
Summary of Contents for L-PAD16CXusb
Page 59: ...59 BLOCK DIAGRAM...


