AC/DC
ADAPTER
AUDIO
CORD
CHARGE
CORD
DC IN
WIRELESS TRANSMITTER
900 MHz
POWER
GREEN
LED
RED
LED
TUNING
CHARGE
3
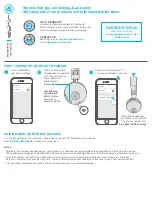
INSTALLATION
Note that when the audio device is on, the green “SIGNAL
INDICATOR” LED light will glow (green). This indicates that the
transmitter is receiving an adequate audio signal. If the LED is not on,
you must increase the volume until the green LED is lit. If you
increase the volume and the LED still does not illuminate, then check
all your connections and make sure that the power is on for both the
device and the transmitter. Refer to the section titled
“Troubleshooting” located on page 8 of this instruction book for
assistance.
TRANSMITTER
1. Slip the antenna tube over the antenna wire located on the back.
2. Plug the AC power adapter into the DC jack located on the rear of
the transmitter.
3. Connect the AC power adapter to an electrical wall outlet.
4. The audio cord on the rear of the transmitter can be connected to
the audio output jack (R & L) of the TV, stereo receiver, VCR, DVD
or radio.
•Use a Y Splitter for R & L type RCA connections.
5. Turn on the component device.
90
0 M
Hz
W
IRE
LE
SS T
RA
NS
M
ITT
ER
WHP160/WHP160T_IB 11/5/01 10:09 AM Page 3