background image

23

Hooking Up the TV/VCR 

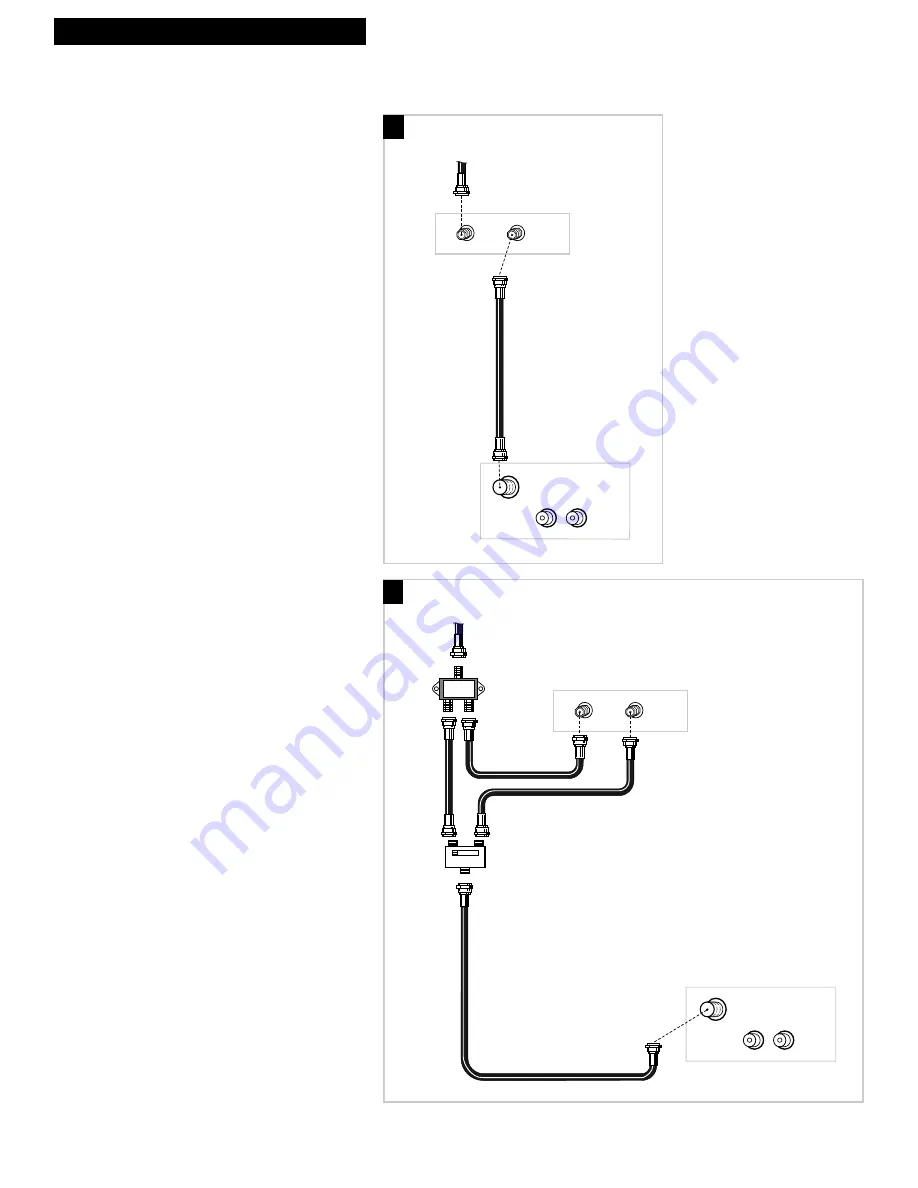
Connect a Cable System With a Cable Box

VHF/UHF

VIDEO

AUDIO

IN

OUT

IN

Cable

VHF/UHF

VIDEO

AUDIO

IN

B

A

OUT

IN

A. Cable Box Required to 

Unscramble all Channels

1

. Connect as shown.

This connection may require additional
accessories not provided.

2

. Plug in power cords of TV/VCR and

cable box.

3

. Turn to page 2 for “Setting Up the

TV/VCR.” 

B. Cable Box Required to 

Unscramble Only Premium 
Channels

1

. Connect as shown.

This connection requires additional accessories
not provided.

2

. Plug in power cords of TV/VCR and

cable box.

3

. Operation

Place the A-B switch in the 

B

position to watch

premium channels.  Place the A-B switch in the

A

position to watch other channels when cable

box is not needed.  

4

. Turn to page 2 for “Setting Up the

TV/VCR.” 

A

B

Cable Box

Coaxial
Cable 

Cable from

Cable System

Cable Box

Antenna

Splitter

A-B

Switch

Coaxial

Cables

Coaxial Cable

Back of TV/VCR

Back of TV/VCR

Cable from

Cable System

Summary of Contents for T13017

Page 1: ...USER S GUIDE T13017WH TV VCR COMBINATION ...

Page 2: ...ention to Article 820 40 of the National Electrical Code Section 54 of the Canadian Electrical Code Part 1 which provides guidelines for proper grounding and in particular specifies that the cable ground shall be connected to the grounding system of the building as close to the point of cable entry as practical Product Registration Please fill out the product registration card and return it immedi...

Page 3: ...he Playback Features Pause____________________________ 12 Picture Search ____________________ 12 Automatic Tracking _______________ 12 Manual Tracking__________________ 12 Time Counter_____________________ 13 Auto Play Feature _________________ 14 Auto Repeat Feature_______________ 14 Recording a Program Recording Features Recording Speeds _________________ 15 Recording Pause __________________ 15...

Page 4: ...Y CLEAR MUTE PREV CH 1 2 3 4 5 6 7 8 0 9 RESET TRACK TRACK SPEED V O L V O L CHAN VHF UHF Dipole Antenna Stock No 221193 Four 4 Screws Stock No 221349 Recipe Cards Stock No 221381 Antenna Adapter 300 75 Ohm Stock No 221192 Cooking Tape Stock No 221377 Swivel Base Stock No 221375 2 AA Batteries Startup Videotape Catalog Stock No 221376 Hook Stock No 221379 2 Insert batteries in remote ...

Page 5: ...en it is not in use 5 Connect antenna or cable TV system Connect the supplied dipole antenna a different home antenna or a cable TV system Details on pages 21 23 6 Swivel the TV VCR into position Swivel the TV VCR into the viewing position Moving the TV VCR while it is operating may cause a rainbow effect from the Earth s magnetic field or nearby appliances 7 Turn on the TV VCR Press POWER on the ...

Page 6: ...r press 2 if it does not If you do not know press 3 C Press MENU on the remote if all antenna or cable connections are completed The AUTO CHANNEL SEARCH will be performed followed by automatic clock set If The Auto Clock Set was unsuccessful message appears then set the clock manually The clock must be set before you can use the timer recording or wake up timer features If you change your cable or...

Page 7: ...splay the LANGUAGE IDIOMA menu The bullet indicates the language selected C Press 1 to display the menus in English Press 2 to display the menus in Spanish 11 Select a channel and adjust the volume A Press CHAN up or down or two number buttons on the remote to select a channel Example Press 0 then 2 for channel 2 The channel number is displayed For cable channels over 99 press and hold 1 until 1 a...

Page 8: ...AR Allows you to change menu entries or clear a timer recording Resets time counter to 0 00 00 when it is displayed DISPLAY Displays TV VCR s current status Displays time counter when a tape is inserted Removes displays Advances to next program during program review FF Fast forward Fast forwards the tape when the TV VCR is stopped Searches the picture in forward motion during playback MENU Display...

Page 9: ...g playback VOL Volume or Raises and lowers sound Numbers 0 through 9 Select a channel up to 99 by pressing two numbers Select a cable channel over 99 by pressing and holding 1 until 1 appears on the screen Then press the other two numbers Press 00 to select the line input VIDEO PAUSE Pauses the tape during playback Pauses recording to prevent recording of unwanted scenes PLAY Plays a tape POWER Tu...

Page 10: ...ntr Brite Sharp Use CH and VOL to adjust Press MENU to exit Press DISPLAY again with no tape inserted Press DISPLAY Time Counter Only Remains on Screen Press DISPLAY again to remove Normal Screen No Displays Press DISPLAY again with tape inserted Adjust the Video Use the PICTURE QUALITY menu to adjust the picture for your personal preference The TV VCR will remember the settings you select To Adju...

Page 11: ...n mode The bullet indicates the mode selected Press 1 or 2 to select Caption 1 or 2 Captions will appear on the screen if they are broadcast Press 3 or 4 to select Text 1 or 2 Text information will appear on the screen if it is broadcast CC DISPLAY 1 On 2 Off 3 On when TV is muted CC MODE Choose a closed captioning mode 1 Caption 1 2 Caption 2 3 Text 1 4 Text 2 Closed Captions Closed captioning di...

Page 12: ...f 5 07PM Press CLEAR to correct an entry or RESET to cancel the timer 5 Press MENU to set the timer The wake up timer will turn on the TV VCR every day The WAKE UP indicator lights on the front when the wake up timer has turned on the TV VCR Press any button on the remote or TV VCR to turn off the WAKE UP indicator If you do not press a button the TV VCR turns off after 60 minutes To Cancel the Wa...

Page 13: ...up or down on the remote or CH up or down on the TV VCR to remove any streaks from the picture Details are on page 14 4 Press STOP on the remote or STOP EJECT on the TV VCR to stop playback 5 Press REW The TV VCR will automatically rewind the tape if it reaches the end of the tape during playback While rewinding you can press POWER and the TV VCR will still rewind the tape 6 Press STOP EJECT on th...

Page 14: ...oximately eight seconds 2 Press FF or REW again or press PLAY to return to playback Automatic Tracking The TV VCR has automatic tracking which adjusts the picture when playing a tape that was recorded on another VCR Automatic tracking is turned on whenever a tape is inserted or the TV VCR s power is turned on Manual Tracking Occasionally you may need to manually adjust tracking on a tape recorded ...

Page 15: ...pe is inserted or you can press CLEAR when the time counter is displayed For example if a 30 minute program was recorded at the beginning of the tape and you wanted to record another program after it you would 1 Insert the pre recorded tape Press STOP Make sure the tape is rewound 2 Press DISPLAY twice to display the time counter 0 30 00 0 00 00 Hours Seconds Minutes 3 Press FF to fast forward the...

Page 16: ...at ON AUTO PLAY Choose an auto play mode 1 Auto play OFF 2 Auto play ON 4 Press 1 or 2 to select Auto play OFF or ON The bullet indicates the one selected Select OFF if you do not want the tape with its safety tab removed to start playing automatically Select ON to have a tape with its safety tab removed start playing automatically Auto Repeat Feature This feature tells the TV VCR to play a tape o...

Page 17: ... These types are explained in the following sections Basic Recording Operating Instructions Recording While You re Away Timer Recording Express Recording Copying and Editing Tapes Basic Recording Operating Instructions To Make a Recording 1 Insert a tape with safety tab in place 2 Press SPEED to select a recording speed The tape speed indicator appears 3 Select the channel to be recorded If record...

Page 18: ...tead of a channel Press CLEAR to correct an entry 6 Press SPEED to select a recording speed 7 Press MENU to save your program 8 Repeat steps 3 6 for additional programs 9 Insert a tape with safety tab intact before the recording is to begin The TIMER indicator lights in the TV VCR s front panel If you turn the TV VCR off the TIMER indicator will flash if there is no cassette in the TV VCR or the s...

Page 19: ...TOP on the remote A timer program in progress will be stopped Only today s recording of a daily weekdays or weekly program is cancelled The daily weekdays or weekly program remains in the timer CHAN REC REW STOP PLAY PAUSE FF MENU POWER DISPLAY CLEAR MUTE PREV CH 1 2 3 4 5 6 7 8 0 9 RESET TRACK TRACK SPEED V O L V O L CHAN Kitchen Vi TV VCR MAIN MENU 1 Programming PROGRAMMING 1 Create a new progra...

Page 20: ...ing speed You can also change the speed of an express recording in progress 4 Press REC to activate recording 5 Press REC repeatedly until the desired amount of recording time is displayed Each press of REC increases the time 30 minutes up to tape end Display Press Recording REC Time 0 30 30 Min 1 00 1 Hr 1 30 1 Hr 30 Min 2 00 2 Hrs 3 00 3 Hrs 4 00 4 Hrs Tape end Tape end 0 00 Turns Off The TIMER ...

Page 21: ...you want to begin copying place the playback VCR or camcorder in play pause 5 Press REC then PAUSE on the TV VCR s remote 6 Press PAUSE on both the VCR or camcorder and the TV VCR s remote at the same time to begin copying the tape 7 Edit out segments that you do not want to copy by pressing PAUSE on the TV VCR s remote to stop copying the tape Then locate the next segment you want to copy on the ...

Page 22: ...tte inserted a cassette with no safety tab inserted or there has been a power interruption TIMER REPEAT REW PLAY FF REC POWER STOP EJECT CH VOL VOL CH TIMER REPEAT REW PLAY FF REC POWER STOP EJECT CH VOL VOL CH WAKE UP WAKE UP Remote Sensor Tape Compartment REPEAT Indicator Indicator is lit during auto repeat REW Rewind Rewinds the tape when the TV VCR is stopped Searches the picture in reverse du...

Page 23: ... box Turn to page 22 B Cable box to unscramble all channels Turn to page 23 C Cable box to unscramble only premium channels such as HBO Showtime Cinemax etc Turn to page 23 You may need to contact your local cable company for assistance Optional Hookup To hook up a VCR or camcorder for copying tapes Turn to page 24 Location of Controls Back Panel VHF UHF Antenna Connector Receives the signal from ...

Page 24: ...r 3 Connect the antenna adapter to the VHF UHF connector on the back of the TV VCR 4 Plug in the TV VCR s power cord 5 Turn to page 2 for Setting Up the TV VCR Adjust the length and position of the antenna rods for the best reception For viewing VHF channels extend the rods fully For UHF viewing shorten the rods B Antenna or Cable System Without a Cable Box 1 Connect as shown This connection may r...

Page 25: ...le Box Required to Unscramble Only Premium Channels 1 Connect as shown This connection requires additional accessories not provided 2 Plug in power cords of TV VCR and cable box 3 Operation Place the A B switch in the B position to watch premium channels Place the A B switch in the A position to watch other channels when cable box is not needed 4 Turn to page 2 for Setting Up the TV VCR A B Cable ...

Page 26: ...jack labeled MONO If neither jack is labeled MONO you may need a Y adapter to hear both channels B Camcorder for Copying Tapes 1 Connect as shown This connection requires additional accessories not provided 2 Plug in TV VCR s power cord 3 Turn to page 19 for Copying and Editing Tapes Press 00 on the remote to select the line audio video input on the TV VCR to receive the signal from the camcorder ...

Page 27: ...Dimensions 15 8 inches high 403 mm 14 8 inches wide 376 mm 17 inches deep 432 mm Weight 28 pounds 12 7 kg Operating Temperature Range 41 F to 104 F Operating Humidity Range 10 to 75 Check your cable company s compatibility requirements Cleaning the TV VCR Use a soft cloth or dusting attachment of your vacuum cleaner to dust your TV VCR Remove dust from the ventilation holes of the cabinet Plastic ...

Page 28: ...ttons on the remote or CH up or down on the TV VCR to move the streaks up or down and out of the picture No cassette in TV VCR Eject and re insert cassette Broken tape try another cassette Safety tab removed from cassette TV VCR will not record TV VCR is in pause mode Press PAUSE on the remote Insert cassette with window facing up and safety tab facing out To remove cassette TV VCR must be connect...

Page 29: ...4 TV VCR is removing tape from heads This is normal The head cylinder inside the TV VCR will continue to rotate for a few minutes after you put the VCR in the stop mode Check antenna or cable connections Closed caption function must be set to on See page 9 Station may not be broadcasting closed captions A text feature has been selected See page 9 Power interruption Check clock See page 4 Timer pro...

Page 30: ... Owner s Manual clearly describes how to install adjust and operate your TV VCR Any additional information should be obtained from your Dealer Installation and related adjustments Signal reception problems not caused by your TV VCR Damage from misuse or neglect Cleaning of video audio heads Remote control batteries A TV VCR that has been modified or incorporated into other products or is used for ...

Page 31: ...ry Programming 4 Channel Selecting 5 Checking a Timer Recording 17 Choosing a Hookup 21 Cleaning the TV VCR 25 CLEAR Button 4 6 10 13 17 Clearing a Timer Recording 17 Clock Setting Automatic or Manual 4 CLOSED CAPTIONING Menu 9 Closed Captions 9 Color Function 8 Contents 1 Contr Contrast Function 8 Controls Back Panel 21 Controls Front Panel 20 Controls Remote 6 7 Copying Tapes 19 Daily Programs R...

Page 32: ...rton This will only add delays in service for your product For your nearest Authorized Servicenter call toll free in the U S A 1 800 336 1900 Canadian Consumers Your toll free numbers are English 1 800 522 0338 French 1 800 522 0445 10330 N Meridian Street Indianapolis IN 46290 1995 Thomson Consumer Electronics Inc Trademark s Registered Marca s Registrada s Printed in Japan Part Number 95 T13017 ...

Reviews: