RCA Scenium RT2660 User Manual Download Page 12

PHONES

VIDEO

S-VIDEO

AUDIO

R

L

OPEN/CLOSE

BASS/TREBLE

VOLUME

LEVEL

MUTE

H O M E   T H E A T E R   A U D I O   V I D E O   R E C E I V E R

V-AUX 

FM/AM

TUNING

OK

MEMORY

SETUP

TEST TONE

EQ

DIGITAL INPUT

ST/M

SOURCE

SURR. MODE 

DSP MODE 

ON / STANDBY

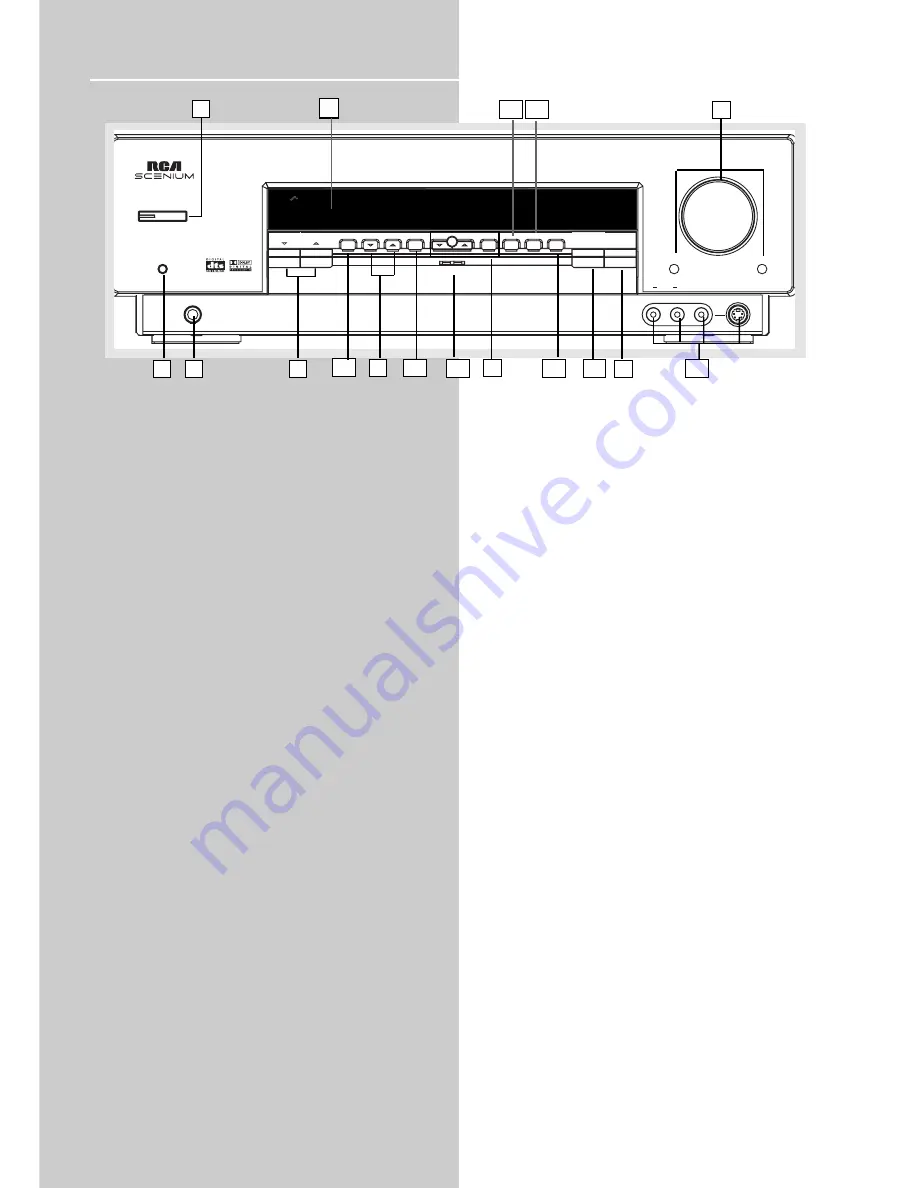
Operating Your Receiver

Receiver Controls 

1. ON/STANDBY 

Press to enter Standby mode or to power off the unit.

2. MUTE

To mute speakers and headphone out.

3. PHONES

Plug your headphones (not supplied) into it  for your private
enjoyment. Speakers will be off when phones are inserted. 

4. Source Buttons 

•  Pressing SOURCE Up or Down in Standby mode exits the
Standby mode and start up the unit for normal operations.  
•  These keys change to the previous/next source (DVD, SAT,6
CH, etc...) as indicated on the display.

5.  Display 

To display current status of the receiver.

6.  Sound Control 

Let you adjust the sound – volume, treble, bass & level. 
•  Rotate the VOLUME knob to control the master audio vol-
ume output of the unit.  Volume is adjusted within the range
of 0-80.  This button can be used in junction with some setting
modes to vary setting values. 
•  To change the volume of individual speaker, press LEVEL but-
ton repeatedly to select the speaker, then turn the knob to
adjust the level. 
•  To adjust TREBLE or BASS, press relevant button and turn the
knob. 

•  Bass/Treble can only be activated under stereo mode.
Bass/Treble effects are only active when there is no custom EQ
effect. When pressing BASS/TREBLE, the unit will automatically
go to EQ OFF mode.

7.  DSP MODE (Digital Sound Processor)

Press this button to select the DSP mode 
(STADIUM/THEATRE/CONCERT/CLUB/CHURCH/ARENA/DSP OFF)
you want.  DSP modes will not produce effects only with
PCM/analog stereo audio source.

8.  SETUP FUNCTION

• These buttons are used to adjust the speaker size, speaker
distance, subwoofer phase, night mode, sleep, display dimmer
and DPLII Music. Press SETUP to enter Setup menu.
• Pressing OK button in these modes confirms settings and
exits the menu.  Up and Down keys are used to change to the
other available options within a menu. 
• In order to enter the next level of the selected option, press
OK. Settings are affirmed by OK and cancelled by pressing the
SETUP button.  Up and DOWN keys are used to change to
another available option within a menu.
• After pressing OK to enter SLEEP setting in the setup menu,
use the arrow keys to select the receiver to turn off from 5 to
120 minutes. Press OK to confirm setting.

• Press OK when DIMMER is displayed when scrolling the Setup
menu to set display brightness. Use the arrow keys to select
among 4 dimmer levels. Press ok to confirm your setting.

9. TUNING

Press for about 2 seconds to search previous / next station in
descending / ascending frequency direction.
In Preset mode, press to review all preset stations.
In Tuner mode, press to increase/decrease tuner frequencies.

10.  SURR. MODE 

This button selects DOLBY SURROUND modes (i.e. PL

II

MOVIE,

PL

II

MUSIC, Pro Logic) for Dolby Digital 2CH / PCM stereo /

Analog inputs.  With 5.1 Dolby Digital or DTS inputs, this but-
ton toggles output between 2 -channel down-mix mode and
5.1 mode respectively.  This button does not response with
other audio input configurations other than the ones men-
tioned above. Press repeatedly to select the surround mode
you want. ( refer to “Advanced Sound Control” on page 21)

11. MEMORY

Press to toggle between manual tuning mode and preset sta-
tion mode, Press and hold to manually store tuner station in
preset mode. (Refer to pg 17 for details)

12. FM/AM

•  Pressing the FM/AM button directly changes the active AVR
mode to tuner mode.  
•  Press to choose between FM/AM in TUNER mode. 
•  Holding this button continuously starts auto preset station
programming that tunes from FM to the lowest frequency
radio band and stores any tuned frequencies to the preset sta-
tion location until either all radio bands are scanned or all pre-
set station locations are stored.

13.  TEST TONE

When pressing it briefly, a short noise (test tone) will be gener-
ated in the speakers one by one so that you can adjust the vol-
ume of individual speaker. (See page 24 for details)

14. EQ 

•  With down-mixed 2 CH / PCM stereo / Analog inputs and 2
channels output only, this button allows the selection of differ-
ent equalizer to be applied to the audio output.
•  Press repeatedly to select the desirable EQ mode (music style)
– FLAT, ROCK, POP, JAZZ, CLASSIC, VOCAL. Your choice will be
saved automatically.(Only available in Stereo mode)

15. DIGITAL INPUT/  ST / M

Press repeatedly to select the input device (analog / optical /
optical 2 / optical 3 / coaxial). In FM mode, press to toggle
between stereo and mono.

16. V-AUX Input  and S-VIDEO

For convenient use of your digital camera, family game
machines, second VCR, etc.

17. OPEN/CLOSE 

Shows and hides the control panel when the unit is powered
on.

1

2

3

4

7

6

8

9

10

11

12

13 14

15

16

5

10

17

Summary of Contents for Scenium RT2660

Page 1: ...660R Audio Video Receiver User s Guide It is important to read this instruction book prior to using your new product for the first time Es importante leer este manual antes de usar por vez primera su euipo ...

Page 2: ...Digital Audio video receiver Brand RCA Model RT2660R Electrical current consumption Power Supply 120V 60Hz Power consumption 290 Watts IMPORTER Comercializadora Thomson de Mexico S A de C V Miguel de Cervantes Saavedra No 57 Col Ampliación Granada C P 11529 Mexico D F Telefono 55 25 81 53 20 RFC CTM 980723 KS5 For Your Safety The AC power plug is polar ized one blade is wider than the other and on...

Page 3: ... your Receiver Receiver Controls 10 Your Remote Control 11 Display 12 Switching On Off 13 Show and Hide Control Panel 13 Selection of Audio Video Source 13 Using the Remote to Control Additional Components 14 Using the receiver to play a Source 15 Operating the Radio 16 Advanced Sound Control Sound Enhancement Systems 19 Fine Setting of Components 21 Speaker Configurations 22 Fine Setting of the S...

Page 4: ... U D I O V I D E O R E C E I V E R V AUX SURR MODE DSP MODE SOURCE One receiver unit One pair of AA batteries One external FM Dipole Antenna One external AM loop antenna one audio cable two wires with red and white RCA connectors One Thomson Universal Remote Control one video cable single wire with yellow RCA connectors one instruction book one safety leaflet one Quick Connection Guide ...

Page 5: ...tions are completed Do not use your set immediately after transferring it from a cold place to a warm place there is risk of condensation Do not expose your set to water and excessively high temperatures After having disconnected your set clean the case with a soft cloth or with a slightly damp leather chamois Never use strong solvents Protect your Components from Overheating Do not block ventilat...

Page 6: ...l Composite video yellow RCA connector can also be used It is important that the same type of cable S video or composite that is connected from the Home Theater to the TV is used to connect the SAT receiver or DVD player to the Home Theater S VIDEO If your video component has a S Video jack included you can make use of it to enjoy enhanced video quality by connecting it to the relevant S Video jac...

Page 7: ...hey must be hooked up in order to receive clear reception AM Loop Antenna and FM Indoor Antenna 1 Uncoil the Antenna wire and locate the base end of the AM antenna and snap into place as shown below in AM Loop Antenna 2 Press down on the Antenna tab to open the termi nal SAT DVD CD Player TV COAXIAL DIGITAL IN AUDIO Connect to coaxial digital output of DVD CD SAT or other compatible devices OPTICA...

Page 8: ...nsert the speaker wire into the terminal Secure the wire in place by turning the speaker jack clockwise Speaker Polarity When connecting the speakers make sure the polari ties speaker wire to on the receiver of speaker wires and terminals are matched If the wires are reversed the sound will be distorted and will lack bass out of phase effect Connecting the Subwoofer Adding a Subwoofer will increas...

Page 9: ...akers placed less than two feet from the TV set must be magnetically shielded in order to prevent picture distortion It is not recommended to place the rear speakers near the TV set Front Speaker Placement Even if you can t duplicate this ideal home theater setup exactly the suggestions for speaker placement that follow will help you get good results Alignment Align the center speaker evenly with ...

Page 10: ...ll mounting is the only choice aim the speakers at each other A towards the front B or even towards the sidewalls C D Experiment with placement until surround sounds seem to envelop you rather than coming from behind you No adjacent walls Surrounds can go on stands facing each other to approximate the preferred sidewall mounting A or to the sides or rear of the viewing area aimed upwards In the la...

Page 11: ...HANNEL will scroll on display This feature automatically converts multi channel speaker outputs to 2 channel stereo for your listening pleas ure Hearing Comfort Well Being Do not play your headset at a high volume Hearing experts advise against continuous extended play If you experience a ringing in your ears reduce volume or discontinue use Factory Setting The unit is preset to the following sett...

Page 12: ...tup menu use the arrow keys to select the receiver to turn off from 5 to 120 minutes Press OK to confirm setting Press OK when DIMMER is displayed when scrolling the Setup menu to set display brightness Use the arrow keys to select among 4 dimmer levels Press ok to confirm your setting 9 TUNING Press for about 2 seconds to search previous next station in descending ascending frequency direction In...

Page 13: ...ration Buttons In TUNER mode press AM FM on the remote Press REVERSE and FORWARD keys to tune down or up the radio frequency PLAY RECORD STOP and PAUSE keys are only for easy control of external devices that are connected to your receiver such as CD VCR DVD TAPE etc The remote con trol currently operates most Thomson RCA and GE prod ucts but it can be programmed to operate devices from other manuf...

Page 14: ...t is in Dolby Pro Logic II mode Audio output is in dts mode MEMORY Unit in Memory or Preset mode FM AM The respective tuner icon will lite showing current radio frequency OPT 123 Optical 1 2 or 3 digital Input selected COAX Coaxial digital input selected STEREO Tuner stereo signal detected TUNED Tuner station detected SLEEP Unit in Sleep mode EQ EQ effect activated KHz MHz Tuner frequency unit Spe...

Page 15: ... into it Press SOURCE or on the main unit or one of the source buttons on the remote control to access the desired source Example 1 If you connect a DVD player to the DVD input audio video on the receiver and press the SOURCE or button repeatedly on the main unit until DVD is selected or press DVD but ton on the remote control You will be able to have the sound and image transmitted by the DVD Exa...

Page 16: ...onent to be programmed 2 Look up the brand and corresponding code num ber in the code list from page 27 to 29 3 Press and hold the corresponding Source Button like VCR TV DVD on the remote while entering the code from the code list using the Number Buttons 4 Release the compo nent button then press ON OFF to see if the component will turn off 5 If this does not work repeat steps 3 and 4 by try ing...

Page 17: ...e the digital sur round enabled providing that the disc is encoded with Dolby Digital 5 1 please refer to the DVD player and DVD disc instruction Example 3 LD You may need to select a different Audio Channel on your LD refer to your LD player manu al 8 Adjust volume knob accordingly EN 15 NOTE To play Dolby Digital or DTS sound the source must be connected to the receiver via the opti cal or coaxi...

Page 18: ... found Alternatively you can press and hold the respective buttons for about one second to activate the automatic SEARCH function In this mode the receiver will automatically tune frequencies until it finds a station Select sound effect if needed by pressing Preset EQ or DSP sound see Advance sound section for details Selecting Mono or Stereo Sound Press ST M on the main unit or the DIGITAL button...

Page 19: ...r AM band by pressing FM AM on the main unit or AM FM on the remote control repeatedly 2 Tune to the radio station to be stored see Manual tuning on page 16 above for details 3 Press and hold the MEMORY button on the front panel or MENU on the remote control MEMORY will flash and a preset number will show on the display 4 Press TUNING UP DOWN on the main unit while MEMORY is still flashing to sele...

Page 20: ...DVD player TV can be connected to the 6CH input It is therefore possible to play any future 6 Channels coding For example SACD DVD Audio thanks to this connection The external decoder device will send the separated audio information to the receiver that will then amplify the signal and send to appropriate speakers To activate 6 Channel external input press the SOURCE or on the receiver until 6 CH ...

Page 21: ...gital surround sound Being different from Dolby Pro Logic in which only four channels Front Left Front Right Centre and Rear are used the new system provides stereo separation of the rear speakers Rear Right Rear Left These 5 channels together with the subwoofer channel for bass sounds counted as 0 1 channel constitute as 5 1 Channel or 6 Channels Input for Dolby Digital that brings you the most s...

Page 22: ...setting EQ Mode Sound can be adjusted to resemble various music types Bass and treble levels vary between the differ ent music styles Press EQ on the main unit to select the desirable music style FLAT ROCK POP JAZZ CLASSIC and VOCAL When using the remote control press SETUP key to access the setup menu Use the Left and Right arrow setup keys until EQ MODE is displayed Press OK to enter EQ menu Use...

Page 23: ...og to match your connec tion Your selection will be stored automatically The selected source and input source will be dis played on the display as long as they are active except for some temporary change of display e g adjusting volume Digital Input Select this setting to play digital signals from a DVD CD SAT or TV Analog Input Select this setting to play analog signals from a cas sette deck or V...

Page 24: ...r SUR 10 ft Available Setup Selections Press SETUP button once to access setup menu Use the Up or Down setup arrows to select among SLEEP DIMMER NIGHT SPK SETUP SUBW PHASE PLII MUSIC SETUP DELAY SETUP and EXIT MENU Press OK to enter selected category 22 Advanced Sound Control Front Speaker selection Large Small Center Speaker selection Large Small None Surround Speaker selection Large Small None S...

Page 25: ...ting of the Speakers and the letters inside the speaker icons show which channel is present in the source information For example the diagram shown means you have all the five speakers and subwoofer enabled and the digital sources you played have five channels plus LFE complemented LFE stands for Low Frequency Effect The indication LFE appears if the digital source contains LFE infor mation In thi...

Page 26: ... the relative loudness of the individual speakers by the TEST TONE button 1 In Surround Dolby Digital Pro Logic DTS modes press TEST TONE briefly A short noise will be heard in the speakers one by one The speaker having the noise at that moment will be shown in the display 2 To adjust the volume level of the test tone turn up down the VOLUME knob or press vol key on the remote control 3 To adjust ...

Page 27: ... or ana log is correct Check that the headphone is not inserted No audio from one channel Check the speaker level setting Check the speaker wire or external source cable con nections Noise occurs when the TV is turned on The TV is too close to the audio system Specific instruments sound displaced Check the connections between the receiver and the speakers if the sound does not match the video Chec...

Page 28: ...y by a trained technician Never operate this product with the cabinet removed Do not touch the player with wet hands If any liquid enters the player cabinet take the player to a trained tech nician for inspection The apparatus shall not be exposed to dripping or splashing and that no objects filled with liquids such as vases shall be placed on the apparatus Headset safety Do not play your headset ...

Page 29: ...ICAN HIGH 2021 ASHA 2013 AUDIO DYNAMICS 2009 2010 AUDIOVOX 2014 BELL HOWELL 2011 BEAUMARK 2013 BROKSONIC 2012 2025 CALIX 2014 CANDLE 2013 2014 2015 2016 2017 2018 2019 CANON 2021 2022 2114 CAPEHART 2020 2110 CARVER 2062 CCE 2027 2061 CITIZEN 2013 2014 2015 2016 2017 2018 2019 2027 COLORTYME 2009 COLT 2061 CRAIG 2013 2014 2023 2061 CURTIS MATHES 2000 2002 2009 2013 2016 2018 2021 2022 2024 2115 CYB...

Page 30: ...EVSION 2013 2014 UNITECH 2013 VECTOR RESEARCH 2009 2010 2015 2016 VICTOR 2010 VIDEO CONCEPTS 2009 2010 2015 2016 2113 VIDEOSONIC 2013 WARDS 2002 2013 2014 2015 2021 2023 2026 2029 2055 2056 2061 2096 2101 2102 2103 2107 2116 2131 XR 1000 2021 2026 2061 YAMAHA 2009 2010 2011 2018 2058 2111 ZENITH 2004 2098 2104 2119 2128 TV CODES ABEX 1172 ADMIRAL 1001 1173 ADVENTURA 1174 AIKO 1016 AKAI 1002 ALLERO...

Page 31: ...1006 1171 1172 1175 SAMSUNG 1004 1005 1006 1012 1015 1019 1104 1105 1106 1171 1172 SAMSUX 1171 SANSUI 1191 SANYO 1004 1048 1049 1050 1080 1107 1108 1162 1169 1180 1189 SCOTCH 1006 SCOTT 1004 1006 1012 1024 1035 1038 1046 SEARS 1000 1004 1006 1013 1019 1046 1048 1049 1050 1051 1066 1071 1072 1109 1110 1162 1180 1181 1189 SHARP 1004 1006 1012 1029 1095 1111 1112 1113 1122 1171 1173 SHOGUN 1004 SIGNA...

Page 32: ...oduct Registration Please complete and mail the Product Registration Card packed with your product It will make it easier to contact you should it ever be necessary The return of the card is not required for warranty coverage Limitation of Warranty THE WARRANTY STATED ABOVE IS THE ONLY WAR RANTY APPLICABLE TO THIS PRODUCT ALL OTHER WARRANTIES EXPRESS OR IMPLIED INCLUDING ALL IMPLIED WARRANTIES OF ...

Page 33: ... of audio heads Batteries A unit that has been modified or incorporated into other products or is used for institutional or other commercial purposes A unit purchased or serviced outside Canada Acts of nature such as but not limited to lightning dam age Product Registration Please complete and mail the Product Registration Card packed with your product It will make it easier to contact you should ...

Page 34: ...ered Marca s Registrada s Marque s Deposée 55534520 EN F E www rcascenium com www rca com LatinAmerica Printed in China Impreso en China IMPORTADOR Comercializadora Thomson de Mexico S A de C V Miguel de Cervantes Saavedra 57 Col Ampliacion Granada C P 11529 Mexico D F Telefono 55 25 81 53 20 R F C CTM 980723 KS5 0151 ...

Reviews: