background image

7

EN

Settings

Setting the Clock

1. Press and hold 

CLOCK

on the unit or remote

control until the hour flashes on the display.

2. Press 

or

to set the hour and then 

press 

CLOCK

to shift to minute digits.

3. Press 

or

to set the minute.

4. Press 

CLOCK

to save settings or 

to quit setting without saving.

Note:

When system is ON, you can press 

CLOCK

to display the current time for about 4

seconds.

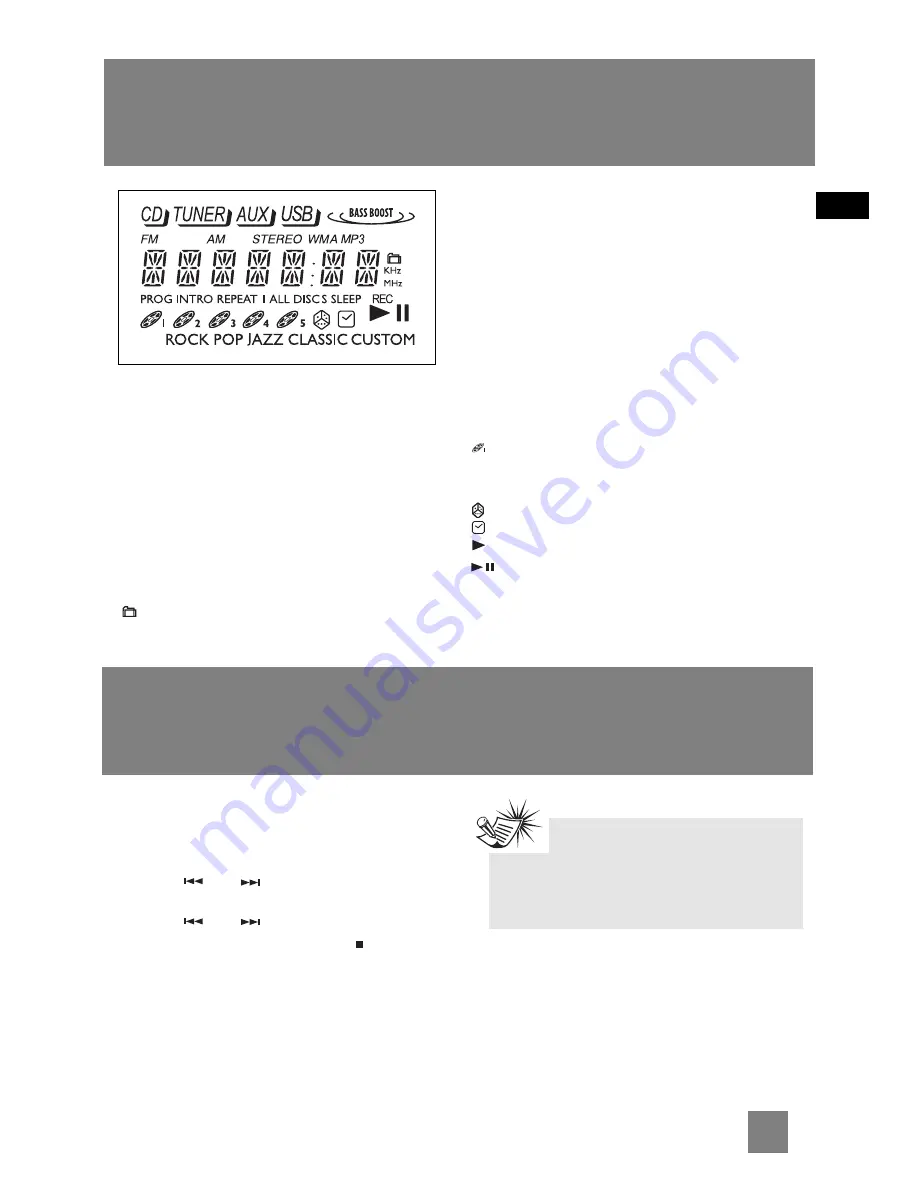
Display

CD/TUNER/AUX/USB

- Indicates CD, Tuner, AUX

and USB modes.

BASS BOOST

- Bass Boost is activated.

FM

- FM tuner mode activated.

AM

- AM tuner mode activated.

STEREO

- In FM tuner mode, indicates stereo

sound is selected.

WMA

- Current disc is a WMA disc.

MP3

- Current disc is a MP3 disc.

- Folder in navigation mode.

PROG

- In program mode.

INTRO

- Intro mode is activated so the first 10

seconds of each CD track will be played.

REPEAT 1 / REPEAT 1 DISC / REPEAT ALL DISCS
/ ALL DISCS

- In CD mode, indicates the repeat

option that is activated.

REPEAT 1

- Repeat track.

REPEAT 1 DISC

- Repeat current disc.

REPEAT ALL DISCS

- Repeat all discs.

ALL DISCS

- Play all discs once.

SLEEP

- Sleep mode is activated.

REC

- In recording mode.

- The corresponding disc icon lights to show

which disc compartment is loaded. The current
playing disc will flash.

- Random playback is activated.
- Timer is activated.
- In CD playback mode.

- In CD pause mode.

ROCK / POP / JAZZ / CLASSIC / CUSTOM

-

Indicates the preset equalizer selected.


Summary of Contents for RS2657

Page 1: ...ase consult your dealer or an experienced radio television technician for additional suggestions Also the Federal Communications Commission has prepared a helpful booklet How To Identify and Resolve Radio TV Interference Problems This booklet is available from the U S Government Printing Office Washington DC 20402 Please specify stock number 004 000 00345 4 when ordering copies This product compli...

Page 2: ...e of Purchase Place of Purchase Serial No Service Information This product should be serviced only by those specially trained in appropriate servicing techniques For instructions on how to obtain service refer to the warranty included in this Guide WARNING TO PREVENT FIRE OR ELECTRICAL SHOCK HAZARD DO NOT EXPOSETHIS PRODUCT TO RAIN OR MOISTURE SEE MARKING ON BOTTOM BACK OF PRODUCT CAUTION RISKOFEL...

Page 3: ...t be impeded by covering the ventilation opening with items such as newspaper table cloths curtains etc No naked flame sources such as lighted candles should be placed on the apparatus Attention should be drawn to the environmental aspects of battery disposal Important Battery Information Remove the batteries to avoid leakage if you do not use your remote control for more than one month Discard le...

Page 4: ...d Load Simultaneously 10 USB Playback 10 Memory Usage 10 Radio 11 Selecting Tuner Band 11 Tuning to a Station 11 Using Presets 11 Auto Preset Programming FM only 11 Manually Setting Presets 11 Suppressing Stereo Signal 11 Recording 12 Recording CD to USB device 12 Deleting Files from USB device 12 Deleting All Files 12 Advanced Playback Controls 13 Sampling Tracks 13 Repeat 13 Random Playback 13 V...

Page 5: ... unit if you listen to AM stations Rotate the AM loop antenna for better reception Connecting the Main Speakers Each speaker has a black red wire and a black purple wire When connecting the speakers match the red purple wires to the red purple jacks and the black wires to the black jacks on the main unit Subwoofer Connection Connect the green wire on your subwoofer to the green terminal and the bl...

Page 6: ...ward through track In Tuner mode Tunes down radio frequency In Clock or Timer mode Decreases hour and minute digit In CD USB mode or simple MP3 WMA mode Goes to the next track searches forward through track In Tuner mode Tunes up radio frequency In Clock or Timer mode Increases hour and minute digit BACK In navigation mode Returns to the previous navigation menu level In Tuner mode Selects the pre...

Page 7: ...to USB device USB socket Connects USB device Mass Storage Class MSC devices are supported Phone and AUX In Open the compartment door at the bottom of the main unit to reveal the jacks inside PHONE Jack for connecting headphones AUX IN Jacks for external sound input Installing Batteries to the Remote Control The remote control must be inserted with 2 AAA or UM 4 or R03 batteries prior to use Follow...

Page 8: ...de Goes to the previous track searches backward through track In Tuner mode Tunes down radio frequency selects the next preset station and preset number in preset mode In Clock or Timer mode Decreases hour and minute digit In CD USB mode or simple MP3 WMA mode Starts and pauses playback In CD USB mode or simple MP3 WMA mode Goes to the next track searches forward through track In Tuner mode Tunes ...

Page 9: ...e the navigation buttons to navigate through menu In USB or simple MP3 WMA mode Enters navigation mode In navigation mode Moves down one navigation menu level enters current folder and shows the first file folder from current folder In tuner mode Tunes up radio frequency In rename mode Confirms the current alphabet and move to the next alphabet In navigation mode Returns to the previous navigation...

Page 10: ...s stereo sound is selected WMA Current disc is a WMA disc MP3 Current disc is a MP3 disc Folder in navigation mode PROG In program mode INTRO Intro mode is activated so the first 10 seconds of each CD track will be played REPEAT 1 REPEAT 1 DISC REPEAT ALL DISCS ALL DISCS In CD mode indicates the repeat option that is activated REPEAT 1 Repeat track REPEAT 1 DISC Repeat current disc REPEAT ALL DISC...

Page 11: ... time 2 For setting time press or to set the hour and then press TIMER to shift to minute digits 3 Press or to set the minute 4 Press TIMER to change to OF timer off time with clock time flashing Repeat steps 2 3 for timer off time setting 5 Press TIMER to select source Press or to select between TUNER DISC USB 6 Press TIMER to set volume Adjust VOLUME on the main unit or press VOL on the remote c...

Page 12: ...isc Notes on MP3 WMA Disc Use mp3 as the extension when converting audio files into MP3 for saving onto CD R RW e g Abc08 mp3 Do not use any other extension e g doc pdf Do not use the mp3 extension for other text or non audio data files as this may result in serious malfunction and harmful noise interference For better quality in MP3 WMA disc playback the CD quality should be recorded 128kbps or a...

Page 13: ...r to skip to the previous or next file Press and hold or to search through a file while it is playing 5 Press to stop playback operations The unit enters navigation mode for 10 seconds before entering stop mode 6 Unplug the device to disconnect Memory Usage Press BAND CD INFO on the main unit or INFO on remote to view used U and free F memory on the USB device Note Be sure to remove all discs from...

Page 14: ...ed as preset channels A maximum of 32 stations can be stored Beware of your preset channels being erased accidentally because the scanning and storing process is automatic upon pressing the button You can stop the automatic scan by pressing any button but the erased stations cannot be recovered Manually Setting Presets 1 Press or to access the desired frequency 2 Press the PROG button once 3 The m...

Page 15: ... from USB device 1 In navigation mode select the file to delete using the navigation buttons Refer to Navigation Buttons on page 6 for details 2 Press DEL on the remote control 3 Press or on the main unit or press or on the remote control to select Yes to delete or No to cancel 4 Press SELECT on the main unit or on the remote control to confirm selection Deleting All Files In navigation mode press...

Page 16: ...back Press on the remote control to turn on off random playback The icon is displayed when it is activated All the tracks on one disc will be shuffled and played once before shuffling and playing tracks from the next disc Viewing Track Information Press BAND INFO on the main unit or INFO on the remote repeatedly during playback to show the ID3 tag information e g song title artist album In full st...

Page 17: ... press 2 Press or repeatedly to view each track assignment in the program list Deleting from Program List 1 While in PROGRAM mode press or to select the program to delete 2 Press DEL 3 Press or to select Yes to delete or No to cancel 4 Press to confirm selection Deleting the Entire Program List 1 While in PROGRAM mode press or to select the program to delete 2 Press and hold DEL Renaming Tracks Yo...

Page 18: ...the total number of files on the disc or USB device 2 Press SELECT on the main unit or navigation buttons on the remote control 3 Use navigation keys on the remote control or SELECT or BACK on the main unit to navigate through folders and files Refer to the following for quick reference BACK Goes back up one level SELECT Enters selected folder begins playback of the selected file and confirms sele...

Page 19: ...VEL 2 LEVEL 3 LEVEL 4 Song 4 Song 5 1 2 14 15 Note Folder playback sequence is indicated by the letters A to G Song playback sequence is indicated by the numbers 1 to 15 in front of the song name Tips on Playback Sequence of Disc Check that the mp3 WMA disc is created with a single folder structure Refer to the diagram below for playback sequence details on multi level folder structure For example...

Page 20: ...lens cleaner Clean the disc Try another CD Problem System does not turn on There is no sound Poor radio reception CD does not play Problem CD sound skips CD button does not respond or does not change discs when you press DISC SKIP Remote control does not work Solution Clean the disc Check disc for warping scratches or other damages Check if something is causing the system to vibrate If so move the...

Page 21: ...h from the inner edge toward the outer perimeter If a CD becomes dirty wipe it clean gently with a wet soft cloth Then wipe dry with a dry cloth Do not use record cleaning sprays or antistatic agents on CDs Also never clean CDs with benzene thinner or other volatile solvents which may cause damage to disc surface CD Lens Care When your CD lens gets dirty it can also cause the system to output poor...

Page 22: ...tning damage Product Registration Please complete and mail the Product Registration Card packed with your product It will make it easier to contact you should it ever be necessary The return of the card is not required for warranty coverage Limitation of Warranty THE WARRANTY STATED ABOVE IS THE ONLY WARRANTY APPLICABLE TO THIS PRODUCT ALL OTHER WARRANTIES EXPRESS OR IMPLIED INCLUDING ALL IMPLIED ...

Page 23: ... A unit that has been modified or incorporated into other products or is used for institutional or other commercial purposes A unit purchased or serviced outside Canada Acts of nature such as but not limited to lightning damage Product Registration Please complete and mail the Product Registration Card packed with your product It will make it easier to contact you should it ever be necessary The r...

Reviews: