background image

26

30

29

31

24
25

27

28

20

22

23

21

11

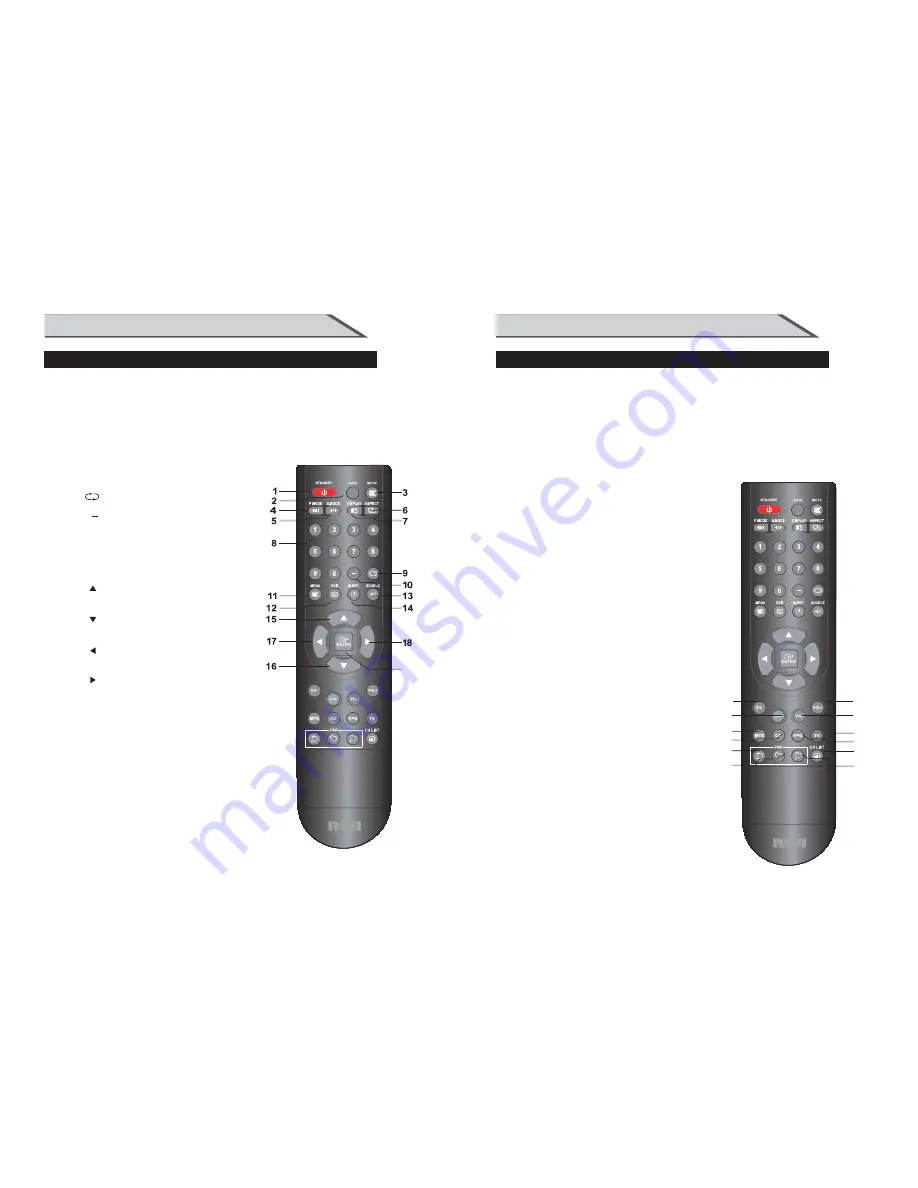
(1) Bouton STANDBY: Brancher la TV de l'alimentation puissance ou à l'extérieur au pouvoir.

(2)

Bouton AUTO:Appuyez sur pc image source 

à réglage automatique.

(3) Bouton MUET: Pressez à éliminer ou à rétablir le son de la TV.
(4) Bouton MODE d'image: Appuyez sur pour sélectionner l'image en mode preset. 
(5) Bouton MODE de son: Appuyez sur ce bouton pour sélectionner le mode de son bouton. 
(6) Bouton ASPECT: Appuyez sur ce bouton pour sélectionner l'image en mode 4:3, 16:9 etc 
(7) Bouton DISPLAY: Appuyez sur ce bouton pour afficher l'état 

actuel, la chaîne TV, la source d'entrée. 

(8) Boutons numériques: Appuyez sur les boutons pour l'accès 

direct aux chaînes de télévision. 

(9) Boutons        : Appuyez sur ce bouton pour 

revenir au canal précédent. 

(10) Boutons 

: appuyez sur le bouton pour l'entrée directe 

       dans le  programme à chiffres 2 ou chiffre 3. 
(11) Bouton MENU: LCD menu. 
(12) Sortie: Quitter le menu OSD (sur l'écran d'affichage ). 
(13) Bouton SOURCE: Appuyez sur bouton pour afficher toutes 

les sources d'entrée 

(14) Bouton SOMMEIL: mettez la durée du sommeil. 
(15) Bouton “     ”: lorsque le menu OSD est en marche, 
        appuyez sur ce bouton pour faire marcher le foyer de 
        sélection en haut ou changer la disposition.
(16) Bouton "     ": lorsque le menu OSD est en marche, 
        appuyez sur ce bouton pour faire marcher le foyer de 
        sélection en bas ou changer la disposition.
(17) Bouton "     ": Lorsque l'OSD menu est en marche, 

appuyez sur ce bouton pour déplacer la sélection à 

        gauche ou à confirmer les paramètres. 
(18) Bouton "     ": Lorsque l'OSD menu est en marche, 
       appuyez sur ce bouton pour déplacer la sélection à 
       droite ou à confirmer les paramètres. 
(19) Bouton « entrée » appuyez sur ce bouton pour confirmer l'opération.

10

FONCTIONS PRINCIPLES DE LA TELECOMMANDE

INTRODUCTION

FONCTIONS PRINCIPLES DE LA TELECOMMANDE

INTRODUCTION

(20) Bouton CH-: Changez la chaîne en avant. 
(21) Bouton CH +: Changez la chaîne en arrière. 
(22) Bouton VOL-: Permet d'augmenter le volume. 
(23) Bouton VOL +: Permet d'atténuer le volume.
(24) Bouton MTS: Appuyez sur ce bouton  pour sélectionner les chaînes audio. 

(25) Bouton CC: Appuyez sur ce bouton pour afficher le sous-titrage. 

(26) Bouton EPG: Entrer un guide électronique des programmes.

(27) Bouton TV: Appuyez sur ce bouton pour sélectionner l'entréeTV.

(28) FAV- bouton: Changements à la Favorite canaux; 
(29) FAV bouton: Fonction d’Ajouter / Effacer pour le favori.
(30) FAV + bouton: Permet de changer la place des chaînes favorites; 
(31) CH LIST bouton: TÉLÉVISION Channel List bouton.

19

Summary of Contents for RLC4036A

Page 1: ...RLC4036A 40 ATSC TUNER LCD TV READ CAREFULLY BEFORE OPERATION ...

Page 2: ... TURNING THE TV ON VOLUME ADJUSTMENT PROGRAM SELECTION SLEEP TIMER RETURN FUNCTION SOURCE INPUT SWITCH MAIN MENU PICTURE MENU OPTIONS SOUND MENU OPTIONS CHANNEL MENU OPTIONS PARENTAL MENU OPTIONS SETUP MENU OPTIONS OTHERS MENU OPTIONS MEDIA MENU OPTIONS STAND INSTALLATION NOTES OF WALL INSTALLATION ARD INSTRUCTION CONNECTIONS SETUP BASIC OPERATION OSD OPERATION INSTALLATION CONTENTS CONTENTS ACCES...

Page 3: ...dy No Entry of Liquid or Object There might be fire or electrical shock if liquid or other object get inside the appliance Please pay more attention to your children If it happens please unplug the TV set make sure there is no smoke or smell and get contact with the dealer This is a WARNING symbol If the users ignore this warning there might be personal damage or even death due to incorrect operat...

Page 4: ...sun or near heaters Ƶ Don t set the TV where the difference in temperature is great Remove the power plug from the socket on occasions when you will not be using the set for an extended period Ƶ Before cleaning please turn off the TV and unplug the power cord Or there might be fire or electrical shock 4 Don t Remove or Rejigger the TV Set There is high voltage subassembly inside the TV set which m...

Page 5: ...creen with a soft cloth after cleaning SAFETY INSTRUCTION 7 SAFETY INTRODUCTIONS Notes of Cable Connection Ƶ Make sure that all cables including connector plugs extend lines and connecting cables between equipments are specify by the manufacturer Before changing the connection please turn off the power and unplug the power cord Ƶ The power cord should not be the same one as other equipments Ƶ Use ...

Page 6: ...R Press this button to standby mode Indicator Remote control sensor window Right Side Panel Control Rear Connection Panel 07 08 USB Input USB device input 06 HDMI1 Input Connect HDMI signal HDMI2 Input Connect HDMI signal HDMI3 Input Connect HDMI signal 09 YPBPR Y GREEN PB BLUE PR RED Connect the component image output of your AV devices here Then Connect audio output of your AV devices to R and L...

Page 7: ...S MODE button Press to select Sound mode button 6 ASPECT button Press to select picture mode 4 3 16 9 etc 7 DISPLAY button Press to display current status TV channel input source 8 Numerical buttons Press number buttons for direct access TV channels 9 button Press to return to previous channel 10 button Select sub channel of each channel in DTV mode 11 MENU button LCD menu selection 12 EXIT button...

Page 8: ...atteries compartment Different types of batteries have different characteristics Do not mix different types Do not mix old and new batteries Mixing old and new batteries will shorten battery life and or cause chemical leaks from the old batteries When batteries fail to function replace them immediately Chemicals which leak from batteries may cause skin irritation If any chemical matter seeps out o...

Page 9: ...earth ground wire to prevent possible electric shock If grounding methods are not possible have a qualified electrician install a separate circuit breaker Do not try to ground the unit by connecting it to telephone wires lightening rods or gas pipes a Desktop Pedestal Installation ƵThe TV can be installed in various ways such as on a wall or on a desktop etc ƵThe TV is designed to be mounted horiz...

Page 10: ... Game Set PHILIPS DRIVE TURBO Camcorder AV USB CONNECTION USB Note Can only support MP3 format of music 16 CONNECTIONS SETUP ANTENNA CONNECTION For optimum picture quality adjust antenna direction An antenna cable and converter are not supplied you have finished connecting all equipment To prevent the equipment damage never plug in any power cords until In poor signal areas to get better picture q...

Page 11: ...le VGA 18 CONNECTIONS SETUP 1 Connect the VGA output of the PC to the PC VGA Input jack on the set 2 Connect the audio outputs of the PC to the PC Audio Input jack on the set 3 Turn on the PC and the set 4 Select PC source with using the SOURCE button on the remote control 5 Refer to the PC manual for operating instructions PC CONNECTION When connecting with a D sub 15 pin cable VGA PC 1 Connect t...

Page 12: ... Main Menu 20 BASIC OPERATION If your TV will be turned on you will be able to use its features Turning on the TV When the indicator illuminates red is standby mode Press the STANDBY button on the remote control after the TV initialization finished the indicator turns to green It means the TV is in power mode When you press the STANDBY button on the remote control once again the power stand by Ind...

Page 13: ...ginal input pixels size AV YPbPr HDMI TV Normal Wide Cinema Zoom Zoom is suitable to view the analog TV which has wide 16 9 content on the 16 9panel Generally each aspect ratio is suitable for one input format For example Normal is suitable to watch common TV program Wide will do horizontal scaling on the wide panel Cinema is for the 2 39 1 perhaps marked as 2 40 1 on the disc film 22 OSD OPERATIO...

Page 14: ... will be accepted by most people Cool means a high color temperature that will feel cool Warm means a low color temperature that will feel warm 24 OSD OPERATION PC SETTINGS Auto Adjust Automatically adjust Clock Phase H Position and V Position settings In order to get a good result you should open a filling the screen picture before executing Auto Adjust Horizontal Position Shift the screen slight...

Page 15: ...et Mode to User 2 Press to select the first 100Hz item then press Ż Ź to select the band to be turned 3 Press V to adjust the value Adjust Equalizer Settings Based on your favorites about which frequency band need to be adjusted make small adjustment with certain frequency band at a time Suggest NOT making too large changes 26 OSD OPERATION SOUND MENU Sound Mode Standard Dynamic Soft User Only in ...

Page 16: ... channels Favorite Set the channel to your favorite list Label Rename label of the channel H SIGNAL TYPE AUTO CHANNEL SEARCH It will search analog channels first then digital channels Before execute auto channel search please confirm your antenna type is Air or Cable Wrong setting of Signal Type maybe cause finding no channel Found numbers do not include encryption programs 28 OSD OPERATION CHANNE...

Page 17: ...ng options Movie Rating TV Rating MOVIE RATING 30 OSD OPERATION PARENTAL CONTROL Note The default user password is 0000 Keypad Lock Set to prevent it from being used by young children or other unexpected usage Source Lock Set to lock the using of specified source Lock Parental Control The following items are only available if the password input is correct V CHIP Include below settings US V Chip Ca...

Page 18: ...ngs are for programs which are using French rating system 32 OSD OPERATION TV RATING The TV rating compose of two aspects age based and content based Age Define TV Y TV Y7 TV G TV PG TV 14 TV MA General audience Parental guidance suggested Parents strongly cautioned Retricted No one 17 and under admitted Adult audience only Content Define FV D L S V Fantasy violence Suggestive dialogue Strong lang...

Page 19: ...hannels with closed caption Service1 2 3 4 5 6 These are different service data channels Digital CC Preset Default Custom If set to Custom Digital CC Style is available Digital CC Style Menu Language Set the menu language English French Spanish Clock Set the Time Zone Auto Clock Day of time Daylight Saving 35 34 OSD OPERATION CHANGE PASSWORD At first you should enter the correct old password then ...

Page 20: ...ill calculate current day of week according to the time Daylight Saving Time When Auto Clock set to ON this item is available to enable daynight saving option or not 37 36 OSD OPERATION DIGITAL CC STYLE CC Size Small Standard Large Default CC Font Style0 7 Default CC Opacity Flashing Default Solid Translucent Transparent Default Text Color Blue Yellow Red Black White Green Magenta Cyan Default CC ...

Page 21: ... noise will display if this option is cleared No Signal Power Off If it is set TV will automatically enter standby after 10 minutes without signal input No Operation Power Off If it is set TV will automatically enter standby after 3 hours without any operation All Reset When you highlight the item the system will note you that Attention If All Reset was executed TV system is reset and if you are s...

Page 22: ...sic Play Repeat On Off Music Auto Play On Off Media Setting 40 Select one and press ENTER to view the photo and you will see the detail information for this photo at the lower left corner Such as name size and other information Zoom in out and move the photo 1 Press ENTER and the moving icon appears on the photo 2 Press ENTER again and the photo will zoom out then you can move the photo controllin...

Page 23: ... when you watch TV The picture is doubled or tripled but sound is good Disturb Intermittent No picture No sound 1 The antenna cables may be disconnected 2 The antenna cables may be disconnected or cankered 3 The antenna cables may be weak 4 The weather is bad 5 The transmitter is wrong 1 The antenna cables may be weak 2 The television could not tune correctly 3 The weather is bad 4 The transmitter...

Page 24: ...00X600 60Hz 1024X768 60Hz 1920X1080 60Hz Audio L R Input impedance 20Kȍ Audio L R Input range 500mVrms RLC4036A 1920 X 1080 178 H X 178 V 1920 X 1080 60Hz 10W 10W 8 ζ200W ζ1W AC100 240V 50 60HZ YPbPr input Y PB CB PR CR Input impedance Y PB CB PR CR Input range Y 1 0 3 Vp p PB PR CB CR 0 7 0 3 Vp p Audio L R Input impedance 20kȍ Audio L R Input range 500mVrms Input supported format 480i 480p 576i ...

Page 25: ...40 LCD RLC4036A ...

Page 26: ...PTIONS DE MENU D IMAGE 22 25 OPTIONS DE MENU DE SON 26 27 OPTIONS DE MENU DE CANAL 28 29 OPTIONS DE MENU PARENTAL 30 34 OPTIONS DE MENU DE CONFIGURATION 35 37 AUTRES OPTIONS DE MENU 38 OPTIONS DE MENU DE MEDIA 39 41 42 43 44 ...

Page 27: ...LCD ...

Page 28: ... pour la télécommande ...

Page 29: ......

Page 30: ... 11 L R AV IN AUDIO OUT L R L R 12 13 AC 100 240V 50 60HZ PC AUDIO 1 2 3 1 AC Power In Entrer courant AC 00 240v ON OFF AUDIO OUT Un Audio out alog Interrupteur principal Puissance allumer éteindre COAX RF VGA PC AUDIO HDMI1 HDMI2 HDMI3 USB Pb Pr Y R L R L AUDIO OUT VIDEO R L AV IN COMPONENT AC 100 240V 50 60HZ POWER ON OFF Se connecter à la sortie audio du PC sur l ordinateur ...

Page 31: ...r ce bouton pour faire marcher le foyer de sélection en haut ou changer la disposition 16 Bouton lorsque le menu OSD est en marche appuyez sur ce bouton pour faire marcher le foyer de sélection en bas ou changer la disposition 17 Bouton Lorsque l OSD menu est en marche appuyez sur ce bouton pour déplacer la sélection à gauche ou à confirmer les paramètres 18 Bouton Lorsque l OSD menu est en marche...

Page 32: ...LCD ...

Page 33: ...400mm 200mm 5 ...

Page 34: ...que USB à l entrée USB 2 Sélectionnez la source de Média à l utilisation du bouton SOURCE sur la télécommande 3 Sélectionnez le mode Mp3 PHOTO pour mettre en marche USB USB Note il ne peut en charge du format MP3 de la musique ...

Page 35: ......

Page 36: ...TANDBY 1 Tout d abord vous branchez le cordon d alimentation dans la prise électrique assurez vous que le cordon d alimentation est complètement inséré dans la presse unit Then la puissance interrupteur ON OFF sur ON comme indiqué ...

Page 37: ...z en surbrillance l élément et appuyez sur et une barre de progression s affiche puis appuyez sur pour ajuster la valeur La teinte est disponible lorsque la TV analogique ou AV de système NTSC Appuyez sur MENU pour retourner au menu de Configurations d Image REGLAGE DES VALEURS Taille de l écran Appuyer sur pour sélectionner le format d image jusqu à ce que la photo s adapte à l écran Les options ...

Page 38: ...Faible ...

Page 39: ...Sortie audio digitale PCM original et Sortie audio digitale Sortie audio digitale PCM ...

Page 40: ...aux Favoris Réglez le canal dans votre liste de favoris Label Rename label of the channel TYPE DE SIGNAL Balayage automatique de canal Il va chercher les canaux analogiques en premier puis les canaux numériques Avant d exécuter le balayage automatique de canal confirmez que votre type d antenne est Air ou Câble Si le type de signal est incorrect il risque de ne pas trouver le canal Les numéros tro...

Page 41: ...s enfants moins de 17 ans nécessitant l accompagnement d un parent ou d un tuteur adulte pour l affichage dans les cinémas Nul enfant de 17 ans ou moins admis en salle de cinéma Pour les États Unis le réglage comprend essentiellement les options suivantes Film Rating Rating TV 31 30 Contrôle Parental de Verrouillage Les éléments suivants ne sont disponibles que si le mot de passe entré est correct...

Page 42: ... V violence peut contenir une violence intense Alors le verrouillage d une option de niveau supérieur entraînera automatiquement les options de blocage qui a un niveau plus sensible V CHIP Canadian Pour le Canada le réglage de rating comprend les options suivantes Rating anglais Rating français Rating en anglais Ces ratings sont pour les programmes qui utilisent le système de rating en anglais Rat...

Page 43: ...1 2 3 ...

Page 44: ...NUTERIE Zone de Minuterie Hawaii Alaska Pacifique Central Montagne Est Samoa Terre neuve Atlantique Horloge Automatique Si elle est activée la TV se synchronise l horloge locale en fonction du temps de diffusion numérique automatiquement Sinon vous pouvez régler l heure manuellement Configuration de l heure Réglez l horloge automatique en arrêt vous pouvez régler l heure manuellement Note Dans le ...

Page 45: ...ialisation appuyez sur ENTRER pour réinitialiser Audio unique Lorsque vous sélectionnez l élément le système vous noter que Attention Appuyez sur le bouton marche arrêt pendant 3 secondes pour rétablir la vidéo et si vous n avez pas besoin d afficher le voyant de fond est éteint appuyez sur ENTRER pour confirmer Comme l attention si vous voulez vous réveiller la vidéo maintenez sur le bouton d ali...

Page 46: ...rrêt Music Auto Play Marche Arrêt Réglage du Media Sélectionnez l une des photos et appuyez sur ENTRER pour afficher la photo et vous verrez les informations détaillées sur cette photo en bas à coin gauche comme le nom µ la taille et d autres informations Zoom avant arrière et déplacement de la photo 1 Appuyez sur ENTRER et le déplacement icône apparaît sur la photo 2 Appuyez de nouveau sur ENTRER...

Page 47: ...43 42 LCD LCD ...

Page 48: ...44 1920 X 1080 178 H X 178 V 1920 X 1080 60Hz 10W 10W 8 ζ200W ζ1W RLC4036A 1920X1080 60Hz AC100 240V 50 60HZ ...

Reviews: