background image

+

BRIGHT

_

SPEAKER

VOLUME

MIN

MAX

PUSH
OPEN

PUSH

CASSETTE EJECT

EJECT

FAR

PROG.AE/ 

EFFECT

MENU

EIS

DISPLAY

FADE/

WIPE

NEAR

+

_

Viewing What You Are Recording Using the LCD Monitor
or Viewfinder

You can watch what you are recording on the color LCD monitor or in the
black-and-white viewfinder.  When the LCD monitor is open more than 60º
in CAMERA, the viewfinder is automatically turned off.  When you close the
LCD monitor, the viewfinder is automatically turned on.

Use the LCD Monitor

24

Recording

Viewfinder

Eyepiece
Focus
Control

BRIGHT Dial

PUSH/OPEN Button

LCD Monitor

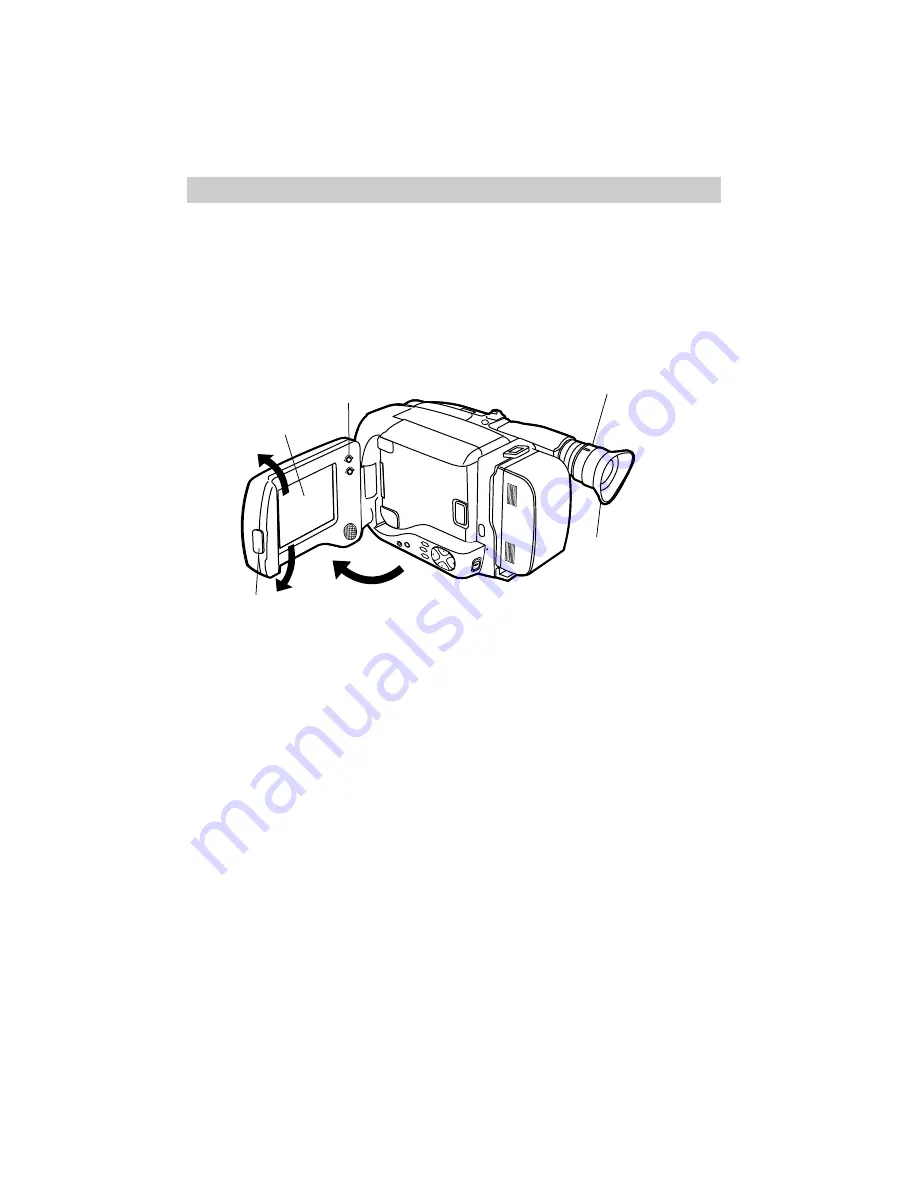
1. Press the PUSH/OPEN button and

open the LCD monitor.

Make sure the monitor is open at
least 60º.  The viewfinder will be
automatically turned off.

2. You can tilt the monitor up or down

45º for convenient viewing.

• Tilt the monitor down to record

from a high angle, such as over a
crowd.

• Tilt the monitor up to record

from a low angle, such as when
you are kneeling.

3. Adjust the brightness of the image

by turning the BRIGHT dial.  This
does not effect the brightness of
the recording you are making.

• Turn the dial toward “+” to

brighten the image.

• Turn the dial toward “–” to

darken the image.

4. When you are finished, close the

monitor and lock it into place.

Note:  When recording on a bright sunny
day, the LCD monitor may be hard to see.
Use the viewfinder.

Summary of Contents for ProV800C

Page 1: ...USER S GUIDE ProV800C C A M C O R D E R ...

Page 2: ...this card allows us to contact you if needed Keep your sales receipt for proof of purchase to obtain warranty parts and service and attach it here Record the serial and model numbers located on the bottom of the camcorder Model No _____________________________________ Serial No _____________________________________ Purchase Date _____________________________________ Purchased From ________________...

Page 3: ...urn off the Camcorder 8 Close Lens Cover and LCD Monitor 8 Review Camcorder s Operating Controls 9 11 Powering Your Camcorder Using Adapter Charger 12 Using Rechargeable Battery 13 15 Using Optional Car Cord Adapter 16 Recording Tips 17 Video Cassettes 18 19 Recording Making a Recording 20 23 Viewing What You Record Using the LCD Monitor or Viewfinder 24 25 LCD Monitor or Viewfinder Displays 26 29...

Page 4: ...50 51 Sub Menu 52 Tally Light 53 JLIP ID NO 53 Self Timer Recording 54 55 Animation Recording 56 57 Time Lapse Recording 58 59 Fading or Wiping In and Out 60 61 Production Effects 62 63 Attaching the Shoulder Strap 64 Traveling Tips 65 Playback Using the Cassette Adapter 66 67 Playback Using the LCD Monitor or Viewfinder 68 Playback Features Visual Searching 69 Tape Positioning 69 Stop Action Paus...

Page 5: ...tery pack or supplying power to the camcorder Cautions Lithium cell battery Must be disposed of properly Never handle punctured or leaking cell May cause burns or personal injury Keep out of the hands of children Can cause death or injury if swallowed If swallowed consult a physician immediately for emergency treatment The lithium cell used in this device may explode resulting in a fire or chemica...

Page 6: ...ch the adapter charger Since the battery must be charged before it can be used the first time attach the adapter charger to the camcorder Handstrap Flap Handstrap Velcro Strip Under Flap LENS COVER Control A Connect one end of the DC cable to the DC OUT jack on the adapter charger B Connect the other end of the DC cable to the DC IN jack on the camcorder as shown above C Plug the adapter charger s...

Page 7: ...itor at least 60º before opening the cassette compartment Press EJECT to open the cassette compartment Turn the tape wheel on the cassette to remove any slack from the tape Insert the cassette with the tape wheel facing up and the tape window facing out Press the PUSH button to lock the cassette compartment closed The power indicator will light and the camcorder will enter record pause appears in ...

Page 8: ...f the tape you are using must be selected in the recording menu for the camcorder to correctly calculate the recording time remaining on the tape Details are on page 44 Repeatedly press the SP EP switch to select a recording speed The indicator for the speed selected appears in the viewfinder and LCD panel Select SP or EP recording speed SP Standard play provides the best picture but the shortest ...

Page 9: ...er is automatically turned off When you close the LCD monitor the viewfinder is automatically turned on Use the LCD Monitor Make sure the monitor is open at least 60º The viewfinder will be automatically turned off Tilt the LCD monitor up to 45º up or down Adjust the brightness of the image by turning the BRIGHT control Note When recording on a bright sunny day the LCD monitor may be hard to see U...

Page 10: ... VCR Press REW to rewind the tape PAUSE REC REC Press PLAY PAUSE to play back the tape on the LCD monitor or in the viewfinder Press STOP when you are finished playing back the tape Details on viewfinder and LCD monitor playback are on page 68 12 Place the POWER switch in OFF to turn off the camcorder The power indicator will turn off 13 Close the lens cover and close and lock the LCD monitor BATT...

Page 11: ... FADE WIPE NEAR _ PUSH 9 First Time Operation Lens LCD Monitor Speaker 14 Review camcorder s operating controls Tally Light PUSH Button EJECT Button SPEAKER VOLUME Control PUSH OPEN Button BRIGHT Control Viewfinder Eyepiece Focus Control Eyepiece Microphone continued on next page FULL AUTO PRESET Switch ...

Page 12: ...cks Under Cover BATT RELEASE Button JLIP Connector Shoulder Strap Attachment Ring Clock Cell Compartment Shoulder Strap Attachment Ring Attach Battery Here DC In Jack Attach AC Adapter Charger Here POWER VCR OFF CAMERA Switch and Indicator First Time Operation 14 Review camcorder s operating controls Continued LENS COVER Control QUICK REC Button Power Zoom Lever W Wide Angle T Telephoto ...

Page 13: ... V E R CAMERA VCR POWER OFF SP EP TRACKING UNTER R M W BAL PLAY PAUSE STOP FF REW JLIP FF Fast Forward Button Also EDIT SEARCH Button REW Rewind Button Also EDIT SEARCH Button SP EP Button Also COUNTER R M Reset Memory Button MAN W BAL Manual White Balance Button PLAY PAUSE Button STOP Button TRACKING Buttons 14 Review camcorder s operating controls MENU Button and 4 4Button FADE WIPE Button PROG ...

Page 14: ...apter charger s plug into the AC plug adapter 2 Plug the AC plug adapter into the AC outlet AC Plug Optional AC Plug Adapter AC 100 240V Caution Do not use this adapter charger for any other purpose other than charging the 236130 FB1260 or FB120 battery pack or supplying power to the camcorder Using the Adapter Charger to Power Your Camcorder The adapter charger attaches to the camcorder and lets ...

Page 15: ...he battery There are no user serviceable parts inside Use the battery only with specified adapter chargers and camcorders Throwing the battery into a fire or exposing it to excessive heat over 149ºF 65ºC could be hazardous The battery must be charged as described on the next page before it can be used the first time Initial charging will take approximately 100 minutes When fully charged the batter...

Page 16: ... to the camcorder POWER CHG END REFRESH Adapter Charger POWER Indicator Hold Battery Flush and Reference Marks CHG Indicator END Indicator REFRESH Indicator REFRESH Button To AC Wall Outlet 100 240 Volts 50 60 Hz Caution When a battery is attached to the adapter charger do not turn them upside down The battery may fall off and be damaged or cause injury Use the REFRESH Button The battery will prov...

Page 17: ...re attaching it to the adapter charger The battery will provide better service if its power is completely drained before storing it for long periods of time 30 days or more The battery should be charged in the temperature range of 50 95 F 10 35ºC to prevent damage Do not operate the battery at temperatures below 32 F 0 C or above 104 F 40 C The battery may be damaged if operated at temperatures ab...

Page 18: ...8 is designed to be used only with vehicles having negative ground electrical systems Use only car cord adapter DCC08 with this camcorder Use of any other car cord adapter may damage the camcorder and void your warranty Optional Car Cord Adapter The optional DCC08 car cord shown on page 76 allows you to power your camcorder from the cigarette lighter socket of a car truck or RV It converts 12 volt...

Page 19: ...is sound will be recorded Include close ups of individuals when taping family outings or group functions Fading in and out of scenes will make your videos appear more professional Learn to use the special effects available with your camcorder to add variety to your recordings Be aware of video and audio backgrounds Background details barely noticed while you are taping may show up as visual clutte...

Page 20: ...mizes the need for accessory cleaners or cleaning by a Servicenter This system is activated whenever you insert or remove a cassette Erase Protection Safety Tab Recording and Playback Speeds and Times The camcorder records and plays back in standard speed SP or extended play EP Select the recording speed using the SP EP switch The selected speed will be displayed on the LCD monitor or in the viewf...

Page 21: ...der s recording or playback heads Do not use cassettes with damaged or spliced tape Do not use a cassette if it has been damaged or exposed to moisture The tape may jam and or damage your camcorder 1 Press PUSH OPEN to open the LCD monitor Open the monitor at least 60º before opening the cassette compartment Cautions Open monitor at least 60º before opening cassette compartment Insert the cassette...

Page 22: ...of the recording features Each feature is described in detail on the following pages SP EP Switch Eyepiece Focus Control LENS COVER Control POWER Switch Tape Wheel Tape Window PUSH OPEN Button EJECT Button PUSH Button Caution Open monitor at least 60º before opening cassette compartment BRIGH T _ SPEAKER VOLUME MIN MAX PUSH OPEN CASSETTE EJECT EJECT FAR PROG AE EFFECT MENU EIS DISPL AY FADE WIPE N...

Page 23: ...tor or viewfinder to view what you are recording Use the LCD Monitor Make sure the monitor is open at least 60º The viewfinder will be automatically turned off Tilt the LCD monitor up to 45º up or down Adjust the brightness of the image by turning the BRIGHT dial PAUSE Use the Viewfinder Make sure the monitor is closed and locked The viewfinder will be automatically turned on Adjust the viewfinder...

Page 24: ... MIN MAX PUSH OPEN CASSETTE EJECT EJECT FAR PROG AE EFFECT MENU EIS DISPLAY FADE WIPE NEAR _ PUSH FAR PROG AE EFFECT MENU FADE WIPE _ NEAR Recording 22 EDIT SEARCH Button EDIT SEARCH Button LENS COVER Control Power Zoom Lever POWER Switch Tally Light FULL AUTO PRESET Switch PROG AE EFFECT Button FADE WIPE Button Making a Recording Continued 4 4Button 3 3Button ...

Page 25: ...you are finished place POWER switch in OFF close and lock the LCD monitor and close the lens cover PAUSE REC REC 7 Select a production special effect to add variety to your recordings A Make sure the FULL AUTO PRESET switch is in PRESET B Press PROG AE EFFECT to display the production effects menu in the viewfinder or on the LCD monitor C Press PROG AE EFFECT again to select the effect you want Th...

Page 26: ...utton LCD Monitor 1 Press the PUSH OPEN button and open the LCD monitor Make sure the monitor is open at least 60º The viewfinder will be automatically turned off 2 You can tilt the monitor up or down 45º for convenient viewing Tilt the monitor down to record from a high angle such as over a crowd Tilt the monitor up to record from a low angle such as when you are kneeling 3 Adjust the brightness ...

Page 27: ...om the camcorder and rotate it up and down Eyepiece Focus Control The eyepiece focus control lets you set the focus of the viewfinder for your personal vision If you wear eyeglasses Use the Viewfinder The camcorder s viewfinder is a miniature monitor that displays the picture seen by the camcorder when recording When the LCD monitor is open more than 60º the viewfinder is automatically turned off ...

Page 28: ... in PRESET to select the other effects 3 PAUSE REC REC 2 1 LCD Monitor or Viewfinder Displays appears when you select Cinema to letterbox record with black bars so you can play back your recordings on a 16X9 TV appears when you select Sepia to give your recordings a brown tone like old photographs appears when you select Twilight to record scenes at dusk and twilight appears when you select Sports...

Page 29: ...nge Indicator This indicator will appear to let you know that an item in the recording menu has been changed from the original factory setting 5 C BK 4 Title The preset title you select or the title you create will appear in this area The title will be recorded on your tape when it appears Details are on pages 45 47 Date or Date and Time The date time or date and time appears in this area when you...

Page 30: ...ion or time lapse recording 1 4S 1 2S 1S or 5S appears here Details are on pages 56 57 and 58 59 12 11 Electronic Image Stabilizer This indicator appears when the electronic image stabilizer is turned on with the EIS button See page 38 for details Dew Warning The dew indicator appears when excessive moisture condensation has entered the camcorder The camcorder will not operate when this indicator ...

Page 31: ...ND appears when the end of the tape is reached during recording or a cassette is inserted with its tape already at the end Tape Length The tape length T20 T30 or T40 selected with the Tape Length feature on the recording menu appears here Details are on page 44 Cassette Warning The indicator appears when a cassette is in the camcorder The indicator flashes when the POWER switch is set to CAMERA an...

Page 32: ...Fading does not operate when you use the QUICK REC button to record Quick recording cannot be used during animation or time lapse recording Microphone QUICK REC Button Tally Light Microphone The microphone picks up the sound during a recording It is more sensitive to sounds coming from the direction the lens is pointed Flying Erase Head A separate erase head is mounted on the spinning headwheel he...

Page 33: ...witch must be in CAMERA The camcorder will play back the last few seconds of the recording return the tape to its previous position and return to record pause Camera Edit Feature The camera edit feature allows you to position the tape when the camcorder is in record pause Place VCR OFF CAMERA switch in CAMERA Press and hold EDIT SEARCH to visually search the recorded tape in reverse Press and hold...

Page 34: ...ger to start recording The camcorder will control the focus exposure and white balance for you PAUSE Electronic Indexing An index mark is automatically recorded at the beginning of a recording after the date advances and a cassette is inserted When you play back the indexed tape in a VCR that has a compatible indexing feature called VHS Index Search System the invisible marks can be located automa...

Page 35: ...he POWER switch in CAMERA The power indicator will light and the camcorder will enter record pause appears in the viewfinder or on the LCD monitor 2 Place the FULL AUTO PRESET switch in PRESET Press to brighten the image Press to darken the image The exposure level indicator 01 to 06 appears in the viewfinder PAUSE To Turn Off Manual Exposure Press both and at the same time or place the FULL AUTO ...

Page 36: ...ou may want to adjust white balance manually Auto White Balance During auto white balance the camcorder will automatically adjust the white balance 1 Place the POWER switch in CAMERA 2 Place the FULL AUTO PRESET switch in FULL AUTO Manual White Balance 1 Place the POWER switch in CAMERA 2 Place the FULL AUTO PRESET switch in PRESET MAN W BAL Button FULL AUTO PRESET Switch 3 Press the MAN W BAL man...

Page 37: ... to record Note To change the tint for special recording substitute colored paper for white The white balance is adjusted based on the color Red paper deeper green Blue paper orange Yellow paper deeper purple Select when recording outdoors on a sunny day Select when recording outdoors on a cloudy day Select when recording using halogen or tungsten lighting 4 To have camcorder automatically control...

Page 38: ... NEAR to focus on the main subject The focus is locked on the subject and appears on the LCD monitor or in the viewfinder 4 Press FAR and NEAR together or place FULL AUTO PRESET switch in FULL AUTO to turn auto focus back on Auto Focus During auto focus the camcorder will focus automatically on the object located in the center area of the viewfinder or LCD monitor Place the FULL AUTO PRESET switch...

Page 39: ...hout the zoom range you must zoom in on the subject before adjusting the focus 3 Press NEAR or FAR to display a clear picture in the center of the viewfinder The indicators appear in the viewfinder The 5or 6indicator will flash When the focus cannot be When the subject is not in the center of the viewfinder When recording in low light situations When recording a scene with fast motions like a tenn...

Page 40: ...e walking EIS Indicator in Viewfinder or on LCD Monitor To Turn On EIS 1 Place the POWER switch in CAMERA 2 Press the EIS button The EIS indicator appears in the viewfinder or on the LCD monitor Turn off EIS when using a tripod Stabilization may not be possible if hand shake is excessive or when shooting the following Subjects with vertical or horizontal stripes Low contrast subjects or background...

Page 41: ...W The zoom level indicator appears in the viewfinder or on the LCD monitor Note If you are trying to zoom in very close to a subject and the camcorder zooms out try using Tele Macro zooming See page 41 Power Zoom Lever T Telephoto W Wide Angle Zoom Level Indicator in Viewfinder or on LCD Monitor Digital Zooming Digital zooming doubles the maximum 14X normal optical zooming The zoom indicator does ...

Page 42: ...Time Sub Menu OFF AGC NOR T20 Recording Menu in Viewfinder or on LCD Monitor To Display the Recording Menu 1 Make sure the FULL AUTO PRESET switch is in PRESET 2 Press the MENU button The recording menu will appear in the viewfinder or on the LCD monitor 4 If you select Tele Macro Gain Up Color Filter or Tape Length press 5 or 6to select the option you want for that feature If you select Date Time...

Page 43: ...5 5to select OFF or ON Select ON if you want to record a small subject within approximately 23 inches Select OFF for normal zooming 5 Press MENU to exit the menu Note Depending on the position of the zoom the lens may go out of focus Tele Macro Gain Up Color Filter Tape Length Title Date Time Sub Menu OFF AGC NOR T20 3 Make sure Tele Macro is highlighted or press 4 4or 3 3to highlight it BRIGH T _...

Page 44: ...F when lighting is not a problem Select AGC to record a subject in a dark environment The picture will be brighter with slightly more video noise 5 Press MENU to exit the menu Recording Menu Gain Up The gain up feature allows you to take bright and natural recordings even in areas with low or poor lighting BRIGH T _ SPEAKER VOLUME MIN MAX PUSH OPEN CASSETTE EJECT EJECT FAR PROG AE EFFEC T MENU EIS...

Page 45: ...olor Filter This feature allows you to add a red or blue tint to the recording 4 Press 5 5 or 6 6to select NOR RED or BLUE Select NOR for normal recording Select RED to add a reddish tint to your recording Select BLUE to add a bluish tint to your recording 5 Press MENU to exit the menu BRIGH T _ SPEAKER VOLUME MIN MAX PUSH OPEN CASSETTE EJECT EJECT FAR PROG AE EFFEC T MENU EIS DISPL AY FADE WIPE N...

Page 46: ... menu will appear in the viewfinder or on the LCD monitor Select T20 if you are using a tape with 20 minutes recording time in SP speed Select T30 if you are using a tape with 30 minutes recording time in SP speed Select T40 if you are using a tape with 40 minutes recording time in SP speed 5 Press MENU to exit the menu Notes The time remaining indicator will start flashing when the remaining tape...

Page 47: ...te Time Sub Menu OFF AGC NOR T20 OFF Happy Birthday Our Vacation Merry Christmas A Special Day Happy Holidays Our New Baby Wedding Day Congratulations Set Character 4 Press 6 6to display the title menu 3 Press4 4or 3 3on the mode select dial to highlight Title 5 Press 4 4or 3 3to highlight the preset title you wish to use 6 Press MENU to display the title in the viewfinder or on the LCD monitor It...

Page 48: ...AGC NOR T20 OFF Happy Birthday Our Vacation Merry Christmas A Special Day Happy Holidays Our New Baby Wedding Day Congratulations Set Character 4 Press 6 6 to display the title menu 5 Press 4 4or 3 3to highlight Set Character Recording Menu Title Continued BRIGH T _ SPEAKER VOLUME MIN MAX PUSH OPEN CASSETTE EJECT EJECT FAR PROG AE EFFEC T MENU EIS DISPL AY FADE WIPE NEAR _ PUSH FAR PROG AE EFFECT ...

Page 49: ... 7 Press 4 4 3 3 6 6 or 5 5to highlight the character you wish to use 8 Press MENU to enter the character in your title 9 Repeat steps 7 and 8 until you have completed your title up to 18 characters Note If you wish to erase a previous title highlight Clear and press MENU 6 Press 6 6to display the set character menu 1 Display the title menu use 4 4or 3 3to highlight OFF and press MENU 2 Press MENU...

Page 50: ... to be replaced Cautions Lithium cell battery Replace only with 3 volt lithium cell such as CR2025 Use of other cell presents a risk of fire or explosion Must be disposed of properly Never handle punctured or leaking cell May cause burns or personal injury Keep out of the hands of children Can cause death or injury if swallowed If swallowed consult a physician immediately for emergency treatment T...

Page 51: ... 5 and 6 to set the year hour including AM and PM and minutes Note If you want to return the date and time to the previous setting press 6 6 or 5 5 to highlight Cancel and press MENU 8 Press 4 4or 3 3to highlight Set 9 Press the MENU button The camcorder s internal clock will start and you will return to the recording menu Notes Press MENU twice to start the clock and remove all the menus from the...

Page 52: ...dicator will light 2 Repeatedly press DISPLAY to select the date time or date and time you want to record Date Time Display The clock cell must be installed and the date and time set before the date and or time can be selected and recorded on your tape To Select the Date Time or Date and Time You Want to Record On Your Tape BRIGH T _ SPEAKER VOLUME MIN MAX PUSH OPEN CASSETTE EJECT EJECT FAR PROG A...

Page 53: ...button to display the date time or date and time you have previously stored 3 Begin recording 4 Press the DISPLAY button to remove the display from the viewfinder when you are finished recording it PM 1 59 43 NOV 18 97 NOV 18 97 NOV 18 97 PM 1 59 56 Time Display Return to Date Display Viewfinder or LCD Monitor Displays Date and Time Display Date Display Date and Time Off Display The mode selected ...

Page 54: ...Time Sub Menu OFF AGC NOR T20 Tally Interval Timer Rec Time OFF JLIP ID NO 0 7 ON OFF 3 Press 4 4or 3 3to highlight Sub Menu 4 Press 6 6 to display the sub menu 5 Press 4 4or 3 3to highlight the item you want to adjust 6 Press 6 6 to start the highlighted item flashing 7 Press 4 4or 3 3to adjust the highlighted item Note If you want to change another feature repeat steps 5 6 and 7 8 Press 5 5 to r...

Page 55: ... a device such as a home computer To Select a JLIP ID NO 1 Follow steps 1 4 on the previous page 2 Press 4 4or 3 3to highlight JLIP ID NO Tally Interval Timer Rec Time OFF JLIP ID NO 0 7 ON OFF 3 Press 6 6 to start JLIP ID NO flashing 4 Press 4 4or 3 3to select a number from 01 to 99 5 Press 5 5 to stop JLIP ID NO flashing and return to the recording menu or press MENU to exit both menus JLIP Conn...

Page 56: ...A The power indicator will light 2 Place FULL AUTO PRESET switch in PRESET 3 Press the MENU button The recording menu will appear in the viewfinder or on the LCD monitor 4 Press 4 4or 3 3to highlight Sub Menu 5 Press 6 6 to display the sub menu BRIGH T _ SPEAKER VOLUME MIN MAX PUSH OPEN CASSETTE EJECT EJECT FAR PROG AE EFFEC T MENU EIS DISPL AY FADE WIPE NEAR _ PUSH FAR PROG AE EFFECT MENU FADE WI...

Page 57: ...ger to start self timer recording The camcorder will start recording after the amount of time you have set It will continue recording until you press the thumb trigger to stop recording Notes If the tally light is turned on it starts flashing About five seconds before recording begins the tally light will start flashing faster It will stop flashing when recording begins To stop self timer recordin...

Page 58: ...ht 2 Place FULL AUTO PRESET switch in PRESET 3 Make sure the recording speed is set to SP 4 Press the MENU button The recording menu will appear in the viewfinder or on the LCD monitor Tele Macro Gain Up Color Filter Tape Length Title Date Time Sub Menu OFF AGC NOR T20 BRIGH T _ SPEAKER VOLUME MIN MAX PUSH OPEN CASSETTE EJECT EJECT FAR PROG AE EFFEC T MENU EIS DISPL AY FADE WIPE NEAR _ PUSH FAR PR...

Page 59: ...g Tally Interval Timer Rec Time OFF JLIP ID NO 0 7 ON OFF 1 4S 1 2S 1S 5S OFF 10 Press MENU to select a recording time 11 Press MENU to exit the menu and the amount of recording time appear in the viewfinder or on the LCD monitor 12 Press the thumb trigger to start recording Note The recording stops automatically after the selected period of recording time You may want to take two to five shots of...

Page 60: ...ace FULL AUTO PRESET switch in PRESET 3 Make sure the recording speed is set to SP 4 Press the MENU button The recording menu will appear in the viewfinder or on the LCD monitor 5 Press 4 4or 3 3to highlight Sub Menu Tele Macro Gain Up Color Filter Tape Length Title Date Time Sub Menu OFF AGC NOR T20 BRIGH T _ SPEAKER VOLUME MIN MAX PUSH OPEN CASSETTE EJECT EJECT FAR PROG AE EFFEC T MENU EIS DISPL...

Page 61: ...ote Fades and wipes do not operate during time lapse recording 6 Press 6 6 to display the Sub Menu Tally Interval Timer Rec Time OFF JLIP ID NO 0 7 ON OFF 15S 30S 1min 5min 1 4S 1 2S 1S 5S OFF OFF 7 Press 4 4or 3 3to highlight Rec Time 8 Press 6 6 to start Rec Time flashing 9 Press 4 4or 3 3to select the amount of time you want the camcorder to record Select 1 4S 1 2S 1S or 5S to have the camcorde...

Page 62: ...effect Wipes in with a black screen from the top and bottom Wipes out from the center towards the top and bottom leaving a black screen Wipes in with a black screen from the left Wipes out with the image moving from right to left leaving a black screen Indicator Menu Function BK C Recording Fading or Wiping In and Out You can add a professional touch to your recordings when you use the fade or wip...

Page 63: ...ipe Slide Wipe C BK OFF 1 2 3 4 5 Black Fader Blue Fader Mosaic Fader Shutter Wipe Slide Wipe C BK Note This is the only fade you can use in the full auto mode FULL AUTO PRESET Switch in PRESET Press the FADE WIPE button to display the fade wipe menu BK 3 Press FADE WIPE to highlight the fade or wipe you want to select Note The fade or wipe you select is automatically activated and the fade wipe m...

Page 64: ...e at dusk or twilight Also used to record fireworks for a more natural and dramatic look Auto gain is turned off and white balance is set to outdoors Use to clearly capture fast moving action with less blurring Use when playing back the recording on a VCR featuring special effects such as pause or slow motion Sets shutter speed to 1 2000 Use to record fast moving action with less blurring Can capt...

Page 65: ...nder or on the LCD monitor To Use a Production Effect OFF 1 2 3 4 5 Cinema Sepia Twilight Sports HI S 1 2000 OFF 1 2 3 4 5 Cinema Sepia Twilight Sports HI S 1 2000 Note This is the only production effect you can use in FULL AUTO FULL AUTO PRESET in PRESET Press the PROG AE EFFECT button to display the production effect menu 3 Press PROG AE EFFECT to highlight the effect you want to select Note The...

Page 66: ...e camcorder to shooting position in one quick movement Cautions When carrying the camcorder with the shoulder strap close and lock the LCD monitor and rotate the viewfinder down and slide it to the front This helps prevent possible damage from bumping against your body as you move Make sure the shoulder strap is firmly attached before using it to carry the camcorder To Attach the Shoulder Strap 4 ...

Page 67: ...our lens has been exposed to the elements clean it only with proper lens cleaning supplies Make sure you have any plug adapters that you may need before taking your camcorder to other countries Consult your dealer for advice Carry your camcorder in a carrying case when traveling See page 76 for a case designed especially for this camcorder An ordinary suitcase or carry bag does not offer the prote...

Page 68: ...ttery compartment 3 Replace battery compartment cover Notes Replace the battery when the load time becomes much longer than normal Remove the battery from the cassette adapter if it will not be used for a month or more This will prevent possible damage from battery leakage If leakage occurs wipe up the liquid inside the compartment and replace the battery with a new one 1 Before inserting the cass...

Page 69: ...again Attempting to insert the cassette adapter into a VCR with the load detector extending may cause damage to the adapter and or VCR Caution Do not touch the reels during loading or unloading It could cause injury or damage the cassette adapter and or tape Remove Cassette from Cassette Adapter 1 Slide the adapter s EJECT switch to the right The load detector will extend from the side and the whi...

Page 70: ...D Monitor or Viewfinder You can view tapes in color using the LCD monitor or black and white using the viewfinder You can hear the sound from the tapes on the built in speaker when you use the monitor Use the LCD Monitor Make sure the monitor is open at least 60º The viewfinder will be automatically turned off Tilt the LCD monitor up to 45º up or down Adjust the brightness of the image by turning ...

Page 71: ... PLAY PAUSE to stop the action and view one frame of the tape Press PLAY PAUSE on the camcorder to return to normal playback Tape Positioning Place POWER switch in VCR and press STOP Press REW or FF to rewind or fast forward the tape Press STOP to stop the tape Visual Searching During playback press and release FF or REW if you want to search the tape visually in forward or reverse Press PLAY PAUS...

Page 72: ...r reaches M 0 00 00 To Use the Memory Stop Feature 1 Place the POWER switch in VCR locate the place on the tape you want to return to and press COUNTER R M for more than two seconds to reset the counter to 0 00 00 2 Press COUNTER R M again to turn on memory stop An M appears before the time counter 3 Continue to play the tape When you want to return to the place you marked press the STOP button 4 ...

Page 73: ...yback picture Press either TRACKING button to move the streaks up or down and out of the picture TRACKING Buttons During stop action playback pressing one of the TRACKING buttons may reduce picture jitter picture bouncing up and down Some jitter is normal Simultaneously press both TRACKING buttons to return tracking to its preset center Note The TRACKING buttons may have no effect on tapes recorde...

Page 74: ...on page 78 If your TV is already connected to a VCR you can attach the camcorder to the VCR and watch what the camcorder is recording or playing on the TV 2 Attach the yellow plug to the VIDEO IN jack on the TV or VCR 3 Attach the white plug on the other end of the audio video cable to the AUDIO jack located under the small cover on the back of the camcorder 4 Attach the yellow plug to the yellow ...

Page 75: ...scribed on page 71 4 To copy what the camcorder is playing place a blank cassette in the VCR and press the VCR s RECORD button Make sure the memory stop feature is turned off press COUNTER R M or the camcorder will enter play pause when the counter reaches M 0 00 00 5 Press STOP when you are finished 1 A Camcorder connected directly to TV Turn on the TV and tune it to the video input channel B Cam...

Page 76: ... optional 300 75 ohm transformer 2 Attach one end of the optional coaxial RF cable to the OUT TO TV connector on the adapter and attach the other end to the VHF input on your TV as shown Note If your TV has 300 ohm screw terminals you will need a 75 300 ohm transformer such as VH54 shown on page 78 3 Attach the RF output adapter s plug to the AUDIO RF DC OUT and VIDEO jacks located under the small...

Page 77: ...rt I that provides guidelines for proper grounding and in particular specifies that the cable ground shall be connected to the grounding system of the building as close to the point of cable entry as practical 1 Turn on the TV and tune it to channel 3 or 4 2 Set the CH3 CH4 switch on the RF output adapter to the same channel you selected on the TV 3 Place adapter s VCR TV switch in VCR 4 Place POW...

Page 78: ...2 volt battery to a 6 volt output We invite you to take a look at some great ideas for sparking creativity and adding to the fun of using your compact VHS camcorder The following pages have a selection of accessories to help make your memorable moments look and sound even better These accessories are designed to make the process of recording and watching your videos more enjoyable To order accesso...

Page 79: ...ge the mounting hole on the bottom of the camcorder Using the Optional AC088 Tripod FB1260 and FB120 Rechargeable Batteries These rechargeable nickel cadmium batteries are designed specifically for long life The FB1260 is a 1 hour battery The FB120 powers your camcorder approximately twice as long as the FB1260 depending on how much you use the LCD monitor zoom and pause Both can be recharged with...

Page 80: ...ne without audio video inputs for playback If your antenna cable is the flat twin lead type attached by two screws you will also need a 300 to 75 ohm transformer If your TV has 300 ohm antenna screw terminals you will need an optional 75 to 300 ohm transformer such as VH54 Coaxial RF Cables These RF cables are used with the RF output adapter to connect your camcorder to a standard TV one without a...

Page 81: ...al RF Cable VH82 6 95 Audio Video Cable VH83 5 95 Coaxial RF Cable VH90 7 95 RF Output Adapter 1CVA147C 59 95 Shoulder Strap 218858 12 95 AC Adapter Charger 236689 96 45 and DC Cable 233087 27 80 Cassette Adapter 237583 71 35 Prices are subject to change without notice Total Merchandise __________ Sales Tax __________ We are required by law to collect the appropriate sales tax for each individual ...

Page 82: ...opy Number above your name on MasterCard AUTHORIZED SIGNATURE Prices are subject to change without notice Name Street Apt City State Zip Print or type your name and address clearly This will be your mailing label Please make sure that both sides of this form have been filled out completely Allow 4 weeks for delivery All accessories are subject to availability A complete and correct order will save...

Page 83: ...ready and call the toll free number listed below between 8AM and 8PM EST Monday through Friday or between 9AM and 5PM EST Saturday Use this number only to place an order for accessory items listed on this order form 1 800 338 0376 To place your order by mail detach and mail the completed order form with credit card information money order or check in U S currency made payable to Thomson Consumer E...

Page 84: ...may damage the camcorder Caution Do not touch the lens with your fingers The oil from your skin can damage the lens Lens Reference Marks LCD Monitor Cleaning the Camcorder s Viewfinder The viewfinder eyepiece can be removed for cleaning 1 Turn the eyepiece counterclockwise and pull it out 2 Remove dust using a blower brush 3 Reattach the eyepiece by aligning the reference marks and then turn the e...

Page 85: ...tain the original carton for future storage or shipping purposes Proper Care and Storage Keep dust and grit from entering the camcorder s cassette door Dust and grit are abrasive and will cause excessive wear to both the camcorder s recording playback heads and cassettes Always close the lens cover and LCD monitor when the camcorder is not in use Before handling your camcorder make sure your hands...

Page 86: ...ed If using AC adapter charger make sure it is plugged into a working outlet If using AC adapter charger make sure it is plugged into a working outlet If the dew indicator flashes on the LCD monitor or in the viewfinder there is moisture in the camcorder Wait until the dew indicator no longer appears before operating the camcorder Make sure POWER switch is in correct position for desired operation...

Page 87: ...ere is moisture in the camcorder Wait until this indicator no longer appears before operating the camcorder Subject is dark or behind glass Auto focus may not work under these conditions Place the FULL AUTO PRESET switch in PRESET and focus manually See pages 36 37 Subject is not in center of LCD monitor or viewfinder or two subjects are at different distances Place FULL AUTO PRESET switch in PRES...

Page 88: ...er is set to the Cinema mode Press PROG AE EFFECT to turn off Cinema See pages 62 63 Title is recorded whenever it appears in viewfinder or on LCD monitor Remove the title See pages 45 47 Displays will be recorded on tape whenever they appear Press DISPLAY to remove them from viewfinder when recording See pages 50 51 Clock lithium cell battery may need replacing See page 48 Date or time may need t...

Page 89: ...rom viewfinder consult your Authorized RCA Camcorder Servicenter LCD monitor requires more battery power to operate than the viewfinder If camcorder has not been used for some time charge the battery using the REFRESH feature on the adapter charger Battery run times are measured when the camcorder is recording continuously You can check your battery by first fully charging it and then aiming the c...

Page 90: ...respecte toutes les exigences du Réglement sur le matériel brouilleur du Canada This equipment has been tested and found to comply with the limits for a Class B digital device and RF lighting device pursuant to Part 15 and part 18 of the FCC Rules These limits are designed to provide reasonable protection against harmful interference in a residential installation This equipment generates uses and ...

Page 91: ... loss of your unit Returning equipment to Thomson for repair or exchange Important information to customers who ship defective equipment to Thomson Consumer Electronics The Thomson representative who authorized the return of your equipment will give you an RA number over the phone They will also provide you with instructions on where and how to return your camcorder Write the number in large clear...

Page 92: ... the continental USA 2 The exchange location will notify you of its arrival 3 Take your unit including all accessories and your evidence of purchase date such as a bill of sale to the exchange location and you will be provided the new or refurbished unit 4 If the repairs were covered by your warranty you will not be billed If you are not located near an exchange point 1 Provide your Discover Maste...

Page 93: ...ceipt of your product a new or refurbished unit will be shipped to you next day delivery in the continental USA To have your Camcorder repaired by an Authorized RCA Camcorder Servicenter Check with your dealer or call 1 800 336 1900 for the Authorized RCA Camcorder Servicenter nearest you Take your unit to the Authorized RCA Camcorder Servicenter of your choice Show the Authorized RCA Camcorder Se...

Page 94: ...Display 26 27 48 49 Date and Time Record on Tape 50 51 Date and Time Set 49 DC IN Jack Camcorder 4 10 12 Design Specifications 88 Dew Warning Indicator 28 Digital Zooming 39 DISPLAY Button 11 50 51 Displays Viewfinder and LCD Monitor 26 29 EDIT SEARCH and Buttons 11 22 23 31 EIS Electronic Image Stabilizer Button 11 38 EIS Indicator 28 38 EJECT Button 5 9 19 20 21 68 Electronic Image Stabilizer 38...

Page 95: ...Shutter Wipe 60 61 Slide Wipe 60 61 Solving Problems 84 87 SPEAKER VOLUME Control 9 68 Specifications 88 Speeds Recording and Playback 6 18 Sports Feature 62 63 SP EP Switch 6 11 18 20 21 26 44 Status Displays 26 STOP Button 8 11 31 68 69 73 75 Stop Action Pause 69 Sub Menu of Recording Menu 52 59 Table of Contents 1 2 Tally Light 8 22 23 30 53 Tally Light Feature 53 Tape Copying 72 73 TAPE END Wa...

Page 96: ... the carton This will only add delays in service for your product 1996 Thomson Consumer Electronics Inc Trademark s Registered Marca s Registrada s Printed in Japan Part Number 96 ProV800C 1 10330 N Meridian Street Indianapolis IN 46290 Need Assistance We want to help U S Consumers Customer Service 800 336 1900 Accessories 800 338 0376 Canadian Consumers English 800 522 0338 French 800 522 0445 ...

Reviews: