background image

6

Setup and Connections

Advanced Connections

Advanced connections give you better sound and video by separating
the audio and video signals and enabling you to connect multiple
components.

This section describes the types of inputs available on the back of your
TV and suggests ways you can use them for optimum performance.

Back of the TV

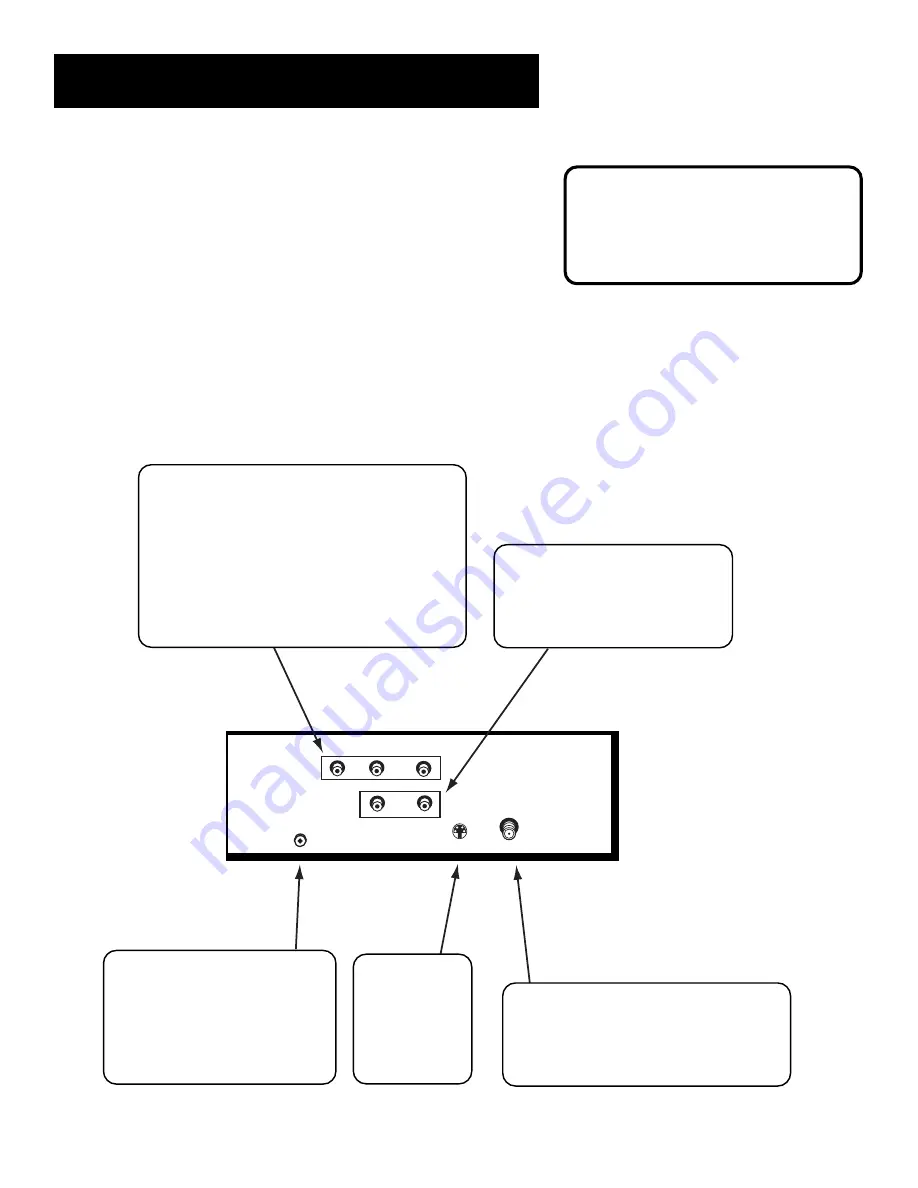
The diagram below describes each of the back panel jacks. When
connecting A/V cables, be sure to connect corresponding OUT and IN
jacks (Video to Video, Right Audio to Right Audio, etc.).

Once you have made your connections
you will need to program the TV to tune
to the correct Video INPUT channel in
order to see and hear audio and video
from the component. You will program
this later in the 

Interactive Setup.

 VIDEO

R

L / MONO

S-VIDEO

AUDIO

R

L

CABLE/
ANTENNA

VCR

CONTROL

IN

OUT

Cable/Antenna

Takes the signal input from a cable,
cable box, or an off-air antenna. Can also
be used for basic component connections.

The 

VCR Control

 jack is for a

feature not available in your
market at the time of this
printing. The circuitry that
would allow this feature to
work has been disabled in
your TV.

S-Video

This optional
connection can
be used for
better video
quality picture.

VIDEO and Audio Inputs

Connect any one of the following components:
• VCR

• Internet Access Device

• Laserdisc Player

• DVD Player

• Satellite Receiver

To view the component connected to VIDEO,
use the INPUT button on the remote.

Audio Outputs

Connect to an audio receiver or
amplifier for variable controlled
or fixed level stereo output.

Summary of Contents for MR27555

Page 1: ...evisioncolortelevisioncolo rtelevisioncolortelevisioncolort elevisioncolortelevisioncolortel evisioncolortelevisioncolortelev isioncolortelevisioncolortelevisi oncolortelevisioncolortelevision colortelevisioncolortelevisionco lortelevisioncolortelevisioncolo rtelevisioncolortelevisioncolort elevisioncolortelevisioncolortel evisioncolortelevisioncolortelev isioncolortelevisioncolortelevisi oncolort...

Page 2: ... shock match wide blade of plug to wide slot fully insert POWER CONSUMPTION 120V 60 Hz A C 125 Watts Models MR27555 MR29315 140 Watts Models MR32555 MR32575 If fixed non moving images are left on the screen for long periods they may be permanently imprinted on the screen Such images include network logos phone numbers and video games Extended viewing of channels displaying these images should be a...

Page 3: ...tup 11 Using Point and Select NavIgation 12 Entering Setup 12 Selecting a Language 13 Auto Channel Search 13 Setting the Time 14 Setting the VCR1 Channel Auto Tuning 15 Setting the VCR2 Channel Auto Tuning 16 Setting the DVD Channel Auto Tuning 17 Setting the SAT CABLE Channel Auto Tuning 17 Labeling the Channels 18 Using the Remote 19 Remote Buttons 20 Using the INPUT Button 21 Programming the Re...

Page 4: ...reen Menu 30 Using Closed Captioning 30 Channel Menu 32 Time Menu 33 Parental Controls Menu 34 Channel Block 34 Front Panel Block 34 Lock Unlock Parental Controls 34 Setup Menu 35 Channel Marker 35 PIP Picture in Picture Operation 36 PIP Problems 37 Reference 39 Troubleshooting 39 Care and Cleaning 40 Index 41 ...

Page 5: ...tures and controls of your TV The Reference section in the back of the book contains troubleshooting tips as well as care and cleaning instructions Well if your TV s out of the box let s get started Check out the notes that have been added throughout the manual in these Tip Boxes There are some important tips that will help you get the most from your TV Setup and connections Interactive Setup 1 2 ...

Page 6: ...O R L CABLE ANTENNA VCR CONTROL IN OUT Once you have completed this connection you may skip to Step 3 Important Stand Information CAUTION Choose the location for your TV carefully Take precautions that the stand or other furniture on which the TV is placed is properly located see Important Safeguards sheet and of adequate size and strength to prevent the TV from accidentally being tipped over push...

Page 7: ...1 TV AUDIO VIDEO OUT IN FROM ANT OUT TO TV CH3 CH4 CABLE CABLE BOX OR ANTENNA CABLE CABLE BOX OR ANTENNA VIDEO R L MONO S VIDEO AUDIO R L CABLE ANTENNA VCR CONTROL IN OUT Once you have completed this connection you may skip to Step 3 How to View the VCR To watch the VCR in this connection tune TV to Channel 3 or 4 Later in the Interactive Setup section you will program the TV to automatically tune...

Page 8: ... and video from the component You will program this later in the Interactive Setup VIDEO R L MONO S VIDEO AUDIO R L CABLE ANTENNA VCR CONTROL IN OUT Cable Antenna Takes the signal input from a cable cable box or an off air antenna Can also be used for basic component connections The VCR Control jack is for a feature not available in your market at the time of this printing The circuitry that would...

Page 9: ... back panel instead of straight down the middle Try not to coil any twin lead cables and keep them away from the audio video cables Protect your components from Overheating Do not block ventilation holes in any of the components Arrange the components so that air can circulate freely Do not stack components Allow adequate ventilation when placing your components in a stand Place your amplifier on ...

Page 10: ... the VCR in this connection enter 03 to tune to the VCR channel In the Interactive Setup you can program the TV to automatically tune to the correct input channel when you turn on your component TV VCR and Satellite Receiver SATELLITE RECEIVER VCR 1 TV S VIDEO L R VIDEO OUT IN FROM ANT OUT TO TV SATELLITE IN CH3 CH4 IN FROM ANT OUT TO TV CH3 CH4 VIDEO R L MONO S VIDEO AUDIO R L CABLE ANTENNA VCR C...

Page 11: ...the cover Step 5 Turn On the TV Press TV on the remote or press POWER on the TV itself Pressing the TV button not only turns on the TV but puts the remote into TV mode so that the buttons on the remote will control TV functions Step 6 Program the TV Proceed to the next section Interactive Setup The interactive setup routine walks you through the steps needed to fully configure the TV The first ste...

Page 12: ...This page left blank intentionally ...

Page 13: ...gh the steps needed to configure the TV Select a menu language Search for available channels Set the time Set the VCR1 channel Set the VCR2 channel Set the SAT CABLE channel Make the channel list and labels Setup and connections Interactive Setup 1 2 Menus and features Using the remote 3 4 REFERENCE 5 ...

Page 14: ...egin setup or CLEAR to exit SETUP When first used or after a power outage your television needs to be set up Would you like to begin now Press MENU to begin setup or Press CLEAR to exit You can also access the Interactive Setup through the Main menu 1 Press MENU PROG to bring up the Main menu TV MAIN MENU 1 Audio 2 Picture Quality 3 Screen 4 Channel 5 Time 6 Parental Control 7 Setup 0 Exit 2 Point...

Page 15: ... select that language Auto Channel Search The next part of the setup routine asks you if you want the TV to search for all channels viewable through your antenna or cable TV system This is sometimes called auto programming SETUP Would you like the TV to search for all available channels 1 Search for channels 2 Skip this step 1 Press MENU PROG to tell the TV to begin searching for channels The disp...

Page 16: ...ime on the TV 1 Set time 2 Skip this step 1 Press MENU PROG to bring up the Set Time control panel SET TIME AM Enter01to12forthehour Press MENU to exit 2 Use the left and right arrows to point to the hour and minutes spaces Use the digits to enter the numbers and the up and down arrows to change from AM to PM 3 Press MENU PROG to continue ...

Page 17: ...f you don t have a VCR1 component connected to the TV skip this step or select Not Connected from the VCR1 Channel choice list For more see Auto Tuning in the Menus and Features section SETUP Would you like to use a VCR with your TV 1 Use TV with a VCR 2 Skip this step 1 Press MENU PROG to bring up the VCR1 choice list 1 Not connected 2 Channel 3 3 Channel 4 4 Video Input SET VCR1 CHANNEL 2 Point ...

Page 18: ...r or Laserdisc player connected to the TV skip this step or select Not Connected from the VCR2 Channel choice list For more see Auto Tuning in the Menus and Features section SETUP Would you like to use a second VCR with your TV 1 Use TV with VCR 2 2 Skip this step 1 Press MENU PROG to bring up the VCR2 choice list 1 Not connected 2 Channel 3 3 Channel 4 4 Video 1 Input 5 Video 2 Input SET VCR2 CHA...

Page 19: ...elling the TV what channel to tune to when you press the SAT CABLE button on the remote Indicate which input you used to connect a satellite receiver or a cable box If you don t have a satellite receiver or cable box connected to the TV skip this step or select Not Connected from the SAT CABLE Channel choice list For more see Auto Tuning in the Menus and Features section SETUP Would you like to us...

Page 20: ...1 Press MENU PROG to bring up the List and Labels control panel LIST AND LABELS Chan Normal Chan List Label 59 Yes U s e o r v k e y p a d o r C H v t o s e t c h a n n e l M E N U t o e x i t 2 Use the left and right arrows to point to the three different areas of the control panel called fields 3 Use the up and down arrows to scroll through the numbers and letters and select Yes or No in the Nor...

Page 21: ...GE or PROSCAN component you probably don t need to program it at all Setup and connections Interactive Setup 1 2 Menus and features Using the remote 3 4 REFERENCE 5 Modes of Operation Because this universal remote can control several different components Laserdisc player VCR Cable Box etc it uses operational modes triggered by the component buttons For example if you want the remote to control the...

Page 22: ...channels and the TV will wait 30 seconds before returning you to the original channel Press repeatedly to add more time each press adds another 30 seconds CHAN or CHAN Scans up or down through the current channel list Press once to change the channel up or down press and hold to continue changing channels VOL or VOL Decreases or increases the TV s volume MUTE Reduces the TV s volume to its minimum...

Page 23: ...e with the PIP window MOVE PIP and FREEZE These buttons are for an earlier model of your TV The MOVE PIP function has been replaced by the MOVE arrows The FREEZE button is not functional for the MR27555 MR29315 MR32555 MR32575 Using the INPUT Button Use the INPUT button to toggle through the available input sources VID SVID and the current channel and view the component you have connected to the T...

Page 24: ...te you want to program 4 Enter the code from the code list 5 Release button and then press POWER to see if the component responds to the remote commands If it doesn t try pressing the component button and then POWER again 6 If you get no response repeat these steps using the next code listed for your brand until the component responds to the remote commands Programming the Remote to Control an RCA...

Page 25: ...panel of your TV to operate many of the TV s features MENU Brings up the Main menu When in the menu system it selects highlighted items Also returns you to the previous menu CH Scans down through the current channel list In the menu system it points down to items and adjusts menu controls CH Scans up through the channel list In the menu system it points up to items and adjusts menu controls VOL De...

Page 26: ...2088 2089 2090 2091 2107 2115 2120 2125 Radioshack Realistic 2002 2011 2013 2014 2021 2022 2023 2026 2029 2049 2050 2096 2131 Radix 2014 Randex 2014 Ricoh 2128 Runco 2104 Samsung 2005 2013 2015 2033 2053 2112 Sanky 2131 2104 Sansui 2010 2092 2111 2123 Sanyo 2011 2013 2023 Scott 2012 2015 2025 2032 2035 2038 2065 2093 2116 Sears 2011 2014 2021 2023 2048 2049 2050 2051 2055 2056 2107 2118 Sharp 2002...

Page 27: ...n using menus and control panels Each menu is then outlined and special features are detailed to help you get the most from your TV The last two pages of this section show you how to set up and use the Picture In Picture PIP feature of your TV Setup and connections Interactive Setup 1 2 Menus and features Using the remote 3 4 REFERENCE 5 ...

Page 28: ... MENU 1 Audio 2 Picture Quality 3 Screen 4 Channel 5 Time 6 Parental Controls 7 Setup 0 Exit Menus take you to another menu or a control panel There are two ways to select a choice in a menu Point with the arrows and then select with MENU PROG Press a number button on the remote For example in the Main menu press 3 to go straight to the Screen menu Exiting a menu There are three ways to exit a men...

Page 29: ...or line on the slider BASIC PICTURE CONTROLS Contrast Color Tint Black Level Sharpness Press MENU to exit Numeric Entry A numeric entry control panel is used to enter numbers or letters A pointer appears underneath the column you are changing SET TIME AM Enter01to12forthehour Press MENU to exit 1 Use the digits to enter a number in the column above the pointer 2 Press the right arrow to move to th...

Page 30: ...ain to restore the volume Tone Controls Displays the slider controls for adjusting the TV s treble bass and balance Audio Processor Displays a choice list of available audio modes which control the way the sound comes through your speakers Mono Plays the sound in mono only Use this setting when receiving broadcasts with weak stereo signals Stereo Splits the incoming stereo audio signal into left a...

Page 31: ...ween the red and green levels Black Level Adjusts the brightness of the picture Sharpness Adjusts the crispness of edges in the picture When exiting this menu the Save Personal Picture Preset choice list will appear You can choose either Yes or No If you save the settings as a Personal Picture Preset the TV will store the settings so you can reselect them easily if someone changes the settings Pic...

Page 32: ...ot displayed when the sound is not muted Closed Caption Mode Displays a choice list that lets you choose which captioning mode is used for displaying captioning information PIP Closed Caption Display Displays a choice list that lets you choose the way closed captioning information is shown in the PIP window Off No captioning information is displayed On Captioning information is shown always when a...

Page 33: ...ed Captioning Mode 1 Select Screen from the Main menu 2 Point to Closed Caption Mode and press MENU PROG A choice list displays CLOSED CAPTION MODE 1 CC1 2 CC2 3 CC3 4 CC4 5 Text 1 6 Text 2 7 Text 3 8 Text 4 3 Point to your choice and press MENU PROG to select it and return to the Screen menu Turning off Closed Captioning 1 Select Screen from the Main menu 2 Press MENU PROG to select Closed Captio...

Page 34: ...luded Yes or is not included No in the Normal channel list Chan Label Use the up and down arrows to enter a six character label for each channel Hold the button down to scroll quickly through the characters Press RESET to clear a label The TV can store up to 27 labels in memory Auto Tuning Displays a choice list that lets you set up the TV to automatically tune to the correct input channel when yo...

Page 35: ...d component button Reminder Make sure the component s Ch 3 4 switch is set to channel 4 Video Input Choose this if your component is connected to the VIDEO jack on the back of the TV and you want the TV to tune to VID S VID if you used an S Video cable input channel when you press the specified component button TV MAIN MENU 1 Audio 2 Picture Quality 3 Screen 4 Channel 5 Time 6 Parental Controls 7 ...

Page 36: ...us of Channel Block If you do not the channel block will not take effect Front Panel Block Selecting this option lets you block disable or unblock enable the TV s front panel The remote still tunes to any channel Front Panel Block can Keep children from watching TV when the parent is not present Keep small children from playing with the buttons When using this as a Parental Control method you shou...

Page 37: ...e Parental Controls are locked Sleep Displayed when the Sleep Timer has been set 00 00 Displayed to count down time left on the commercial skip SKIP timer Sample displays on a Channel Marker 12 01 CC ESPN 60 Mute SAP PIP 59 Locked Sleep 00 00 Setup Menu The setup routine is detailed earlier in the manual in the Interactive Setup section The first screen of the Interactive Setup appears automatical...

Page 38: ...ture Using the PIP Feature While you may use PIP in different ways this basic PIP scenario should get you started While watching the TV follow these steps to use your VCR to supply the picture for PIP 1 Press the PIP button on the remote The PIP window appears on the screen 2 Turn on the VCR 3 Press the TV button then press INPUT until you see the VCR signal displayed in the PIP window The PIP win...

Page 39: ... on the front of the component Tip If programmed to control your VCR the ANTENNA button on the remote acts as a TV VCR button Check the connections PIP requires a second video source like a VCR or satellite receiver connected to your TV with audio video cables If you use a cable box you may need extra equipment Contact your cable company for more information To see a different picture in the PIP w...

Page 40: ...This page left blank intentionally ...

Page 41: ...sor Maybe the remote is not aimed directly at the component TV or VCR you are trying to control Maybe remote is not in TV Mode Press the TV button so remote will control TV Maybe batteries in remote are weak dead or installed incorrectly Try replacing batteries Note if you remove the batteries you may have to reprogram the remote to control other components Remove batteries and hold number 1 for a...

Page 42: ...oning may be turned on Check the Closed Caption Display control panel in the Channel menu Care and Cleaning CAUTION Turn OFF your TV before cleaning You can clean the TV as required using a soft lint free cloth Be sure to occasionally dust the ventilation slots in the cabinet to help assure adequate ventilation The TV s screen may be cleaned with a soft lint free cloth as well Take care not to scr...

Page 43: ...Block 34 Front panel buttons 23 I INPUT1 33 Interactive Setup 12 L Labels 18 32 Language 13 30 Selecting 13 M Main Menu 12 Memory 32 MENU button 12 Menu Language 13 30 Menus 26 Mono 28 Mute 28 N Normal List 32 P Parental Controls Channel Block 34 Front Panel Block 34 Locking Unlocking 34 Menu 34 Picture Presets 29 Picture Quality menu 29 Picture Tilt 30 PIP Picture in Picture 4 Buttons 36 Closed c...

Page 44: ...NOTES ...

Page 45: ...NOTES ...

Page 46: ...NOTES ...

Page 47: ...NOTES ...

Page 48: ... TOCOM 1542505D Please do not send any products to the Indianapolis address listed in this manual or on the carton This will only add delays in service for your product IMPORTED BY Comercializadora Thomson de México S A de C V Miguel de Cervantes Saavedra 57 Col Ampliación Granada C P 11529 México D F Telephone 55 25 81 53 20 R F C CTM 980723 KS5 EXPORTED BY ...

Reviews: