12
Chapter 1
Connections & Setup
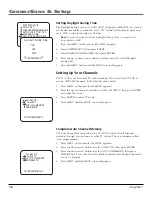
Setting Daylight Saving Time
The Daylight Saving Time is set to the
AUTO
position by default. If you want to
set the time manually you need to set it
“ON”
on the first Sunday in April, and
set it
“OFF”
on the last Sunday in October.
Note:
If your area does not have Daylight Saving Time, you need to set
the position to OFF.
1.
Press the MENU on the remote (the
MENU
appears).
2.
Select
SYSTEM SET-UP
, then press ENTER.
3.
Select
DAYLIGHT SAVING TIME
, then press ENTER.
4.
Press the up or down arrow button to either turn
ON
or
OFF
Daylight
Saving Time.
5.
Press the MENU button until the
MENU
screen disappears.
Setting Up Your Channels
The TV/VCR is set to receive TV cable channels. If you want the TV/VCR to
receive UHF/VHF channels, follow the directions below.
1.
Press MENU on the remote (the
MENU
appears).
2.
Press the up or down arrow button to select
CH SET-UP
, then press ENTER
to display the screen.
3.
Press ENTER to select
TV
mode.
4.
Press MENU until the
MENU
screen disappears.
SYSTEM SET-UP
CLOCK SET
LANGUAGE/IDIOMA/LANGUE
AUTO CLOCK ON OFF
STANDARD TIME
DAYLIGHT SAVING TIME
〈
+/–/ENTER/MENU
〉
ON
OFF
AUTO
〈
+/–/ENTER/MENU
〉
DAYLIGHT SAVING TIME
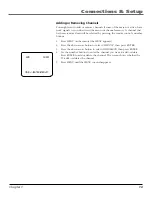
Complete Auto Channel Memory
The Auto Channel Memory allows the TV/VCR to search for all channels
viewable through your antenna or cable TV system. This is sometimes called
“auto programming.”
1.
Press MENU on the remote (the
MENU
appears).
2.
Press the down arrow button to select
CH SET-UP
, then press ENTER.
3.
Press the down arrow button to select
AUTO CH MEMORY
, then press
ENTER. The TV searches for all available channels and will place them into
your TV’s memory.
4.
Press MENU until the
MENU
screen disappears.
CH SET-UP
TV CATV
AUTO CH MEMORY
ADD/DELETE
〈
+/–/ENTER/MENU
〉
〈
+/–/ENTER/MENU
〉
CH SET-UP
TV CATV
AUTO CH MEMORY
ADD/DELETE


