RCA A3600 User Manual Download Page 6

Before you Begin

EN

2

Unpacking the system

Unpack your new mini audio system and locate all the
accessories. You should have:
• one main unit (with 2 speakers);
• one remote control;
• one AM loop antenna;
• one FM wire antenna;
• one guarantee card;
• one user’s guide.

For Thomson model, you should also have;
• one audio cable;
• Thomson Multimedia Pack including MusicMatch
Music Management software (CD-Rom) and a patch
cable to connect your PC. (Refer to the page
“Thomson Multimedia Pack” for details)
• one subwoofer speaker for A3800.

Check for Moisture

Just as moisture can form on the inside of windows
on a cold day, it can also form on the inside of your
audio system causing it to malfunction. 

If there is any moisture inside the system, the system
may not operate properly. In this case, you are sug-
gested to disconnect the power to the unit and wait
for about 30 minutes for the moisture to evaporate. 

Choosing System Location

It is recommanded to follow these guidelines when
setting up your system:
• Choose a solid, level surface. Don’t place on surfaces
like carpet or foam rubber. 
• Choose a location away from direct sunlight, radia-
tor, air ducts and sources of heat.
• Avoid locations subject to moisture, mechanical
vibration, shock or excessive dust. 
• Ensure that the lcoation is adequately ventilated, as
it is essential to protect the unit from internal heat
build-up.

Inserting Batteries into Remote
Control

Open the battery compartment door on the back of
the remote unit and insert correctly 2 AAA batteries
with + or - signs matching with indications.

To use the remote control, point it directly at the unit.
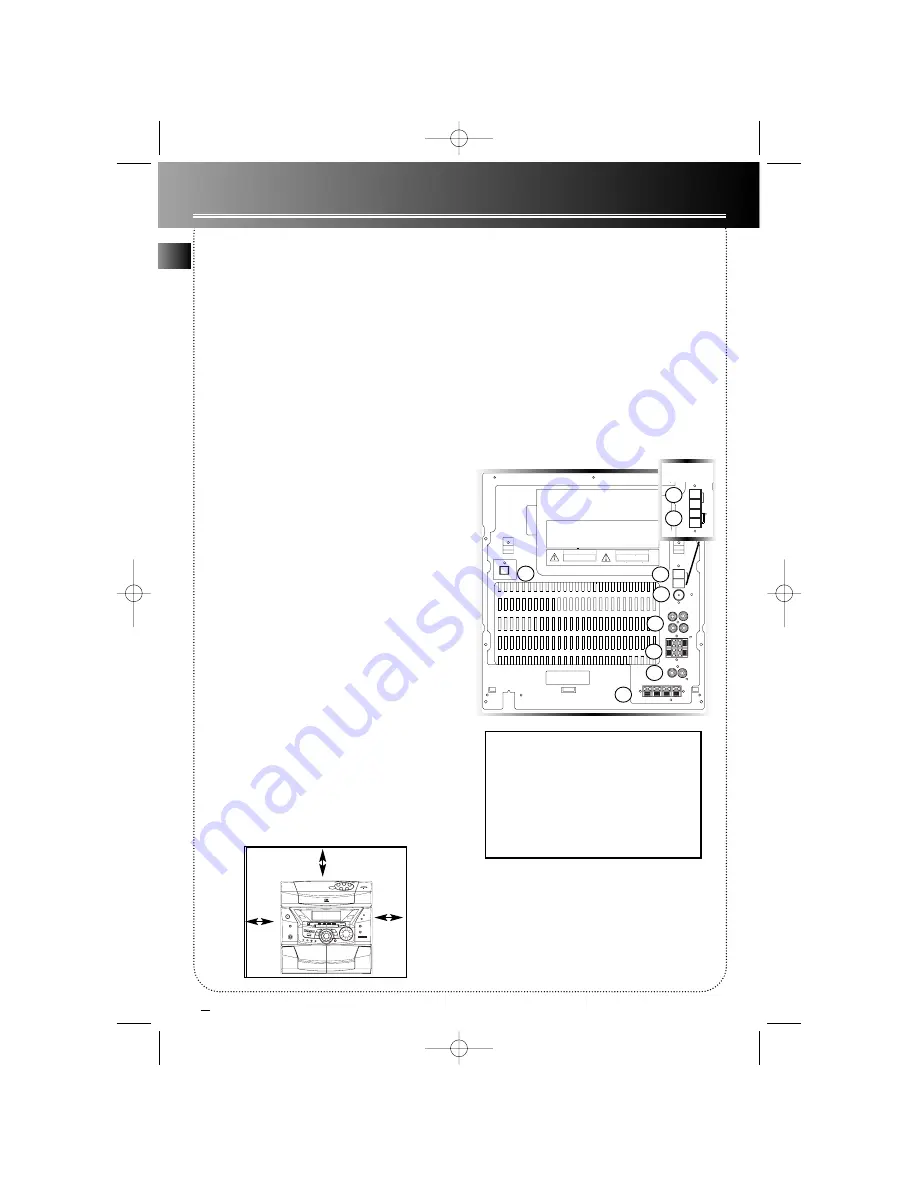
Cable Connections

Refer to the following for connections on the back
panel:

Power Connections

Plug the power supply cord into an AC power outlet. 

Note: 

For the sake of safety, complete all cable con-

nections before you plug for power. 

1. AM Loop Antenna Connector
2. FM Antenna Jack
3. Auxillary Input Jacks  
4. Surround Speaker Jacks
5. Main Speaker Jacks
6. Subwoofer Speaker Jacks
7. Optical Output 

(only available for Thomson Model)

10 cm

10 cm

10 cm

CAUTION

DO NOT EXPOSE TO RAIN OR MOISTURE

DO NOT OPEN

RISK OF ELECTRIC SHOCK

RISQUE DE CHOC ELECTRIQUE

 NE PAS EXPOSER A LA PLUIE NI A L HUMIDITE

NE PAS ENLEVER

ATTENTION

R                  L

+          +

SURROUND SPEAKERS  8

MAIN SPEAKERS 6

R                    L

+     R    -        -      L    +

WOOFER SPEAKERS 6

AM LOOP

 ANTENNA

FM

75

IN

OUT


R         L

@ AUX 

IN

THIS DEVICE COMPLIES WITH PART 15 OF THE FCC

 RULES. OPERATION IS SUBJECT TO THE FOLLOWING TWO
 CONDITIONS: (1) THIS DEVICE MAY NOT CAUSE

 HARMFUL INTERFERENCE, AND (2) THIS DEVICE MUST
 ACCEPT ANY INTERFERENCE RECEIVED, INCLUDING

 INTERFERENCE WHICH MAY CAUSE UNDESIRED OPERATION.

OPTICAL OUT

1

2

6

4

3

5

B. BOOST

X-SURR.

S I M U L T A N E O U S P L A Y A N D L O A D S Y S T E M

5

D I S C  

C H A N G E R

-

M

U

LT

I J O

G S TA

T I

O

N

STOP

REWIND PLAY

/STOP

F.FWD

REPEAT

INTRO

SHUFFLE

ATS

B.BOOST

RECORD

APP
DECK 1/2

EQ

EQ

CUSTOM

BAND

EQ

SOURCE

X-SURROUND

CD

TAPE

TUNER

AUX

DIMMER/DEMO

CD DISPLAY

POWER

FM ST/SCAN

TIMER

CLOCK

BAND/AUTO PROG.

PHONES

S O U N D   S Y S T E M

KEVLAR

S E T

HELP MODE

VOLUME

OPEN/CLOSE

TEXT

DISC

1

DISC

2

DISC

4

DISC

5

DISC

3

D I G I T A L   P L L


SYNTHESIZED TUNER


PUSH OPEN

RECORD/PLAYBACK

PLAYBACK

DECK 1 

DECK 2 

PUSH OPEN

DIGITAL FULL LOGIC DECK

DIGITAL FULL LOGIC DECK

+

-s

URROUND

X

X

DISC SKIP

7

AM LOOP

 ANTENNA

FM

75


1

2

RCA Model

RS2523 US ENG  4/24/00  3:41 PM  Page 6

Summary of Contents for A3600

Page 1: ...No film output on this page RS2523 US ENG 4 24 00 3 41 PM Page 1 ...

Page 2: ...D SUPER W O O F E R S E P A R A T E E N C L O S U R E S P E A K E R S Y S T E M S E P A R A T E E N C L O S U R E S P E A K E R S Y S T E M 3 WAY SPEAKER SYSTEM THOMSON CONSUMER ELECTRONICS 10330 N Meridian St Indianapolis IN46290 2000 Thomson Consumer Electronics Inc Trademark s Registered Marca s Registrada s Marque s Déposée s 55081420 Rev 0 EN F E www rca com RS2523 US ENG 4 24 00 3 41 PM Page...

Page 3: ...DE VOLUME OPEN CLOSE TEXT DISC1 DISC 2 DISC4 DISC 5 DISC3 DIGITAL PLL SYNTHESIZED TUNER PLAYBACK DECK 2 PUSH OPEN L LOGIC DECK DIGITAL FULL LOGIC DECK DISC SKIP P O W ERED SUPER W O O F E R S E P A R A T E E N C L O S U R E S P E A K E R S Y S T E M S E P A R A T E E N C L O S U R E S P E A K E R S Y S T E M 3 WAY SPEAKER SYSTEM u s e r m a n u a l RS2523 T2600 A3600 A3800 RS2523 US ENG 4 24 00 3 ...

Page 4: ...e Move the unit away from the equipment that is receiving interference Plug the unit into a different wall outlet so that the unit and the equipment receiving interference are on different branch circuits If these measures do not eliminate the interference please consult your dealer or an experienced radio television technician for additional sugges tions Also the Federal Communications Commission...

Page 5: ...g Changing Discs 6 Disc Playback 6 Repeat 7 Random Playback 7 Introductory Playback 7 Program 7 Editing Program 7 Clearing the Whole Program 7 Automatic Tracks Skipping 8 Displaying Disc Details 8 Tuner Selecting Tuner 8 Tuning to a Station 8 Setting Preset Station 8 Automatic Tuner Programming 8 FM ST SCAN Button 8 Tuning to an RDS Station 9 Displaying RDS Station Information 9 Replacing with RDS...

Page 6: ...se the remote control point it directly at the unit Cable Connections Refer to the following for connections on the back panel Power Connections Plug the power supply cord into an AC power outlet Note For the sake of safety complete all cable con nections before you plug for power 1 AM Loop Antenna Connector 2 FM Antenna Jack 3 Auxillary Input Jacks 4 Surround Speaker Jacks 5 Main Speaker Jacks 6 ...

Page 7: ...repeat modes ATS Sets up an automatic track skip program MULTI JOG STATION Increases or decreases numerical values for clock timer setting tuner preset station selection track selection etc Remote Control You can control most of the func tion keys as those are present on the main until through the remote control However the fol lowing keys are present on the remote control only AUX TUNER CD TAPE s...

Page 8: ...yback time radio fre quency preset tuner station reference messages etc AM PM STEREO FM MW LW HELP SURROUND MHz kHz VMAx BASS BOOST MIX REPEAT 1 INTRO SHUFFLE ATS ALL PROG REC 100Hz 1kHz 10kHz 1kHz 1 2 TRACK TAPE AUX C D TUNER DISC 1 3 2 5 4 The Display Bass Boost Help mode Recording Selected tape deck 1 2 Introductory playback Selected mode Volume level Automatic track skip mode AM PM time Displa...

Page 9: ...ting the Timer TIMER 4 Shift to minute digits 5 Repeat step 3 to set the minute Activating the Timer Press TIMER to turn on off the timer You can select the time interval in minutes before the unit turns off automatically Press SLEEP on the remote repeatedly to select among 120 90 60 45 30 15 and 5 min utes Press once to see remaining SLEEP time when sleep mode is active Sleep Mode 1 Select sound ...

Page 10: ...c on other trays simultaneously by following steps 2 4 Disc Playback 1 Start playback Press again to pause and repeat again to resume it Note PAUSE PLAY are separate keys on remote control 2 Change disc tray 3 Select track 4 Press and hold for quick search through a track PLAY PAUSE PLAY PAUSE F FWD TRACK FWD TRACK REV REWIND 5 Stop playback STOP STOP DISC SKIP DISC1 DIS C2 DISC4 DIS C5 DISC3 DISC...

Page 11: ...e so that you see PR 01 on display 2 Select disc tray 3 Select disc track 4 Confirm selection 5 Repeat steps 2 4 for further programming 6 Start program playback Editing Program 1 Press repeatedly to review your previous ly saved program Clearing the Whole Program Press and hold until CLEAR shows on display STOP STOP 2 Change selected track 3 Repeat steps 2 4 in the section Program to pro gram add...

Page 12: ...ns can be stored Beware of your preset channels being erased acci dentally because the scanning and storing process is automatic upon pressing the button You can stop the automatic scan by pressing any but ton but the erased stations cannot be recovered FM ST SCAN Button Press to select between FM mono and stereo sound for stereo FM stations Press and hold to search for next available radio statio...

Page 13: ...station quick search 3 If RDS station found RDS icon lights on display Displaying RDS Information Press repeatedly to display the fre quency station name station type clock time and radio text RDS REPEAT REPEAT RDS MODE Replacing with RDS clock time No trouble in setting the clock time by yourself Simply press CT INTRO to replace the clock time with the RDS clock time Note if your clock has never ...

Page 14: ...om auxillary input you have to start playback on the auxillary unit e g MD player 5 Pause recording Press again to resume recording 6 Stop recording STOP STOP PLAY PAUSE PAUSE RECORD RECORD Tips read More Information for care and maintenance on casette player RECORD icon shows on display during recording RECORD button cannot be activated without inserting cassette tape Make sure the tab on the sid...

Page 15: ... weak batteries Check the system is plugged in to power source Point the remote directly at the system s front panel Move closer to the system Remove any obstacles between the remote and the system Inspect the tape heads Clean and demag netize if necessary Disconnect the audio system from the power source before performing any maintenance Cleaning Clean the exterior of the system using a soft dust...

Page 16: ...ick up lens which is located inside the disc compartment Also to keep dust from collecting on the pick up lens and do not leave the compartment door open for an extended period of time If the lens becomes dirty clean it with a soft brush or use an air blower brush designed for camera lenses Important Batteries Information Remove the batteries to avoid leakage if you do not use your remote control ...

Page 17: ... covered by the warranty Insure your shipment in case of loss of damage Thomson accepts no liability in case of damage orloss A new or refurbished unit will be shipped to you prepaid freight What your warranty does not cover Customer instruction Your Owner s Manual provides information regarding operating instructions and user controls For additional information ask your dealer Installation and se...

Page 18: ...cs Canada Inc Distribution Centre 6200 Edwards Blvd Mississauga Ontario L5T 2V7 Canada The provisions of this written warranty are in addition to and not a modification of or subtraction from the statutory warranties and other rights and remedies contained in any applicable legislation and to the extent that any such provisions purport to disclaim exclude or limit any such statutory warranties and...

Reviews: