background image

Go Back 

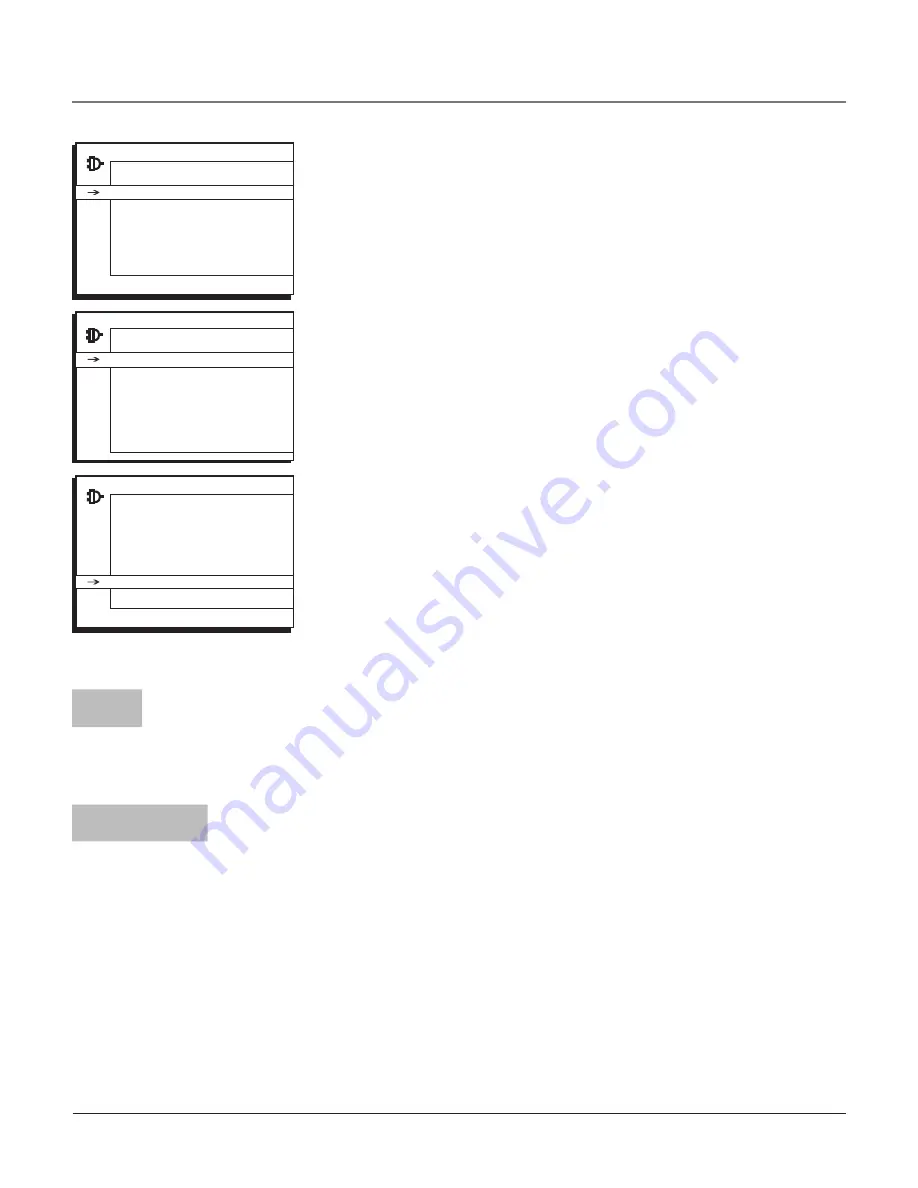
Auto Ch. Search 

...

List & Labels 

...

Closed Caption 

...

Favorite CH 

...

Language 

English...

Auto. format 

4:3 


SETUP

< >


Go Back

Signal Source 

Both... 

Analog Sig. Type 

Cable...

Digital Sig. Type 

Antenna...

Start 

Running...

Search percent 

10

Analog Channel 

0

Digital Channel 


AUTO CHANNEL SEARCH

Tuning to a Channel

Analog station numbers display on your TV in a rectangle as you enter the numbers. You can 
enter digits to access a channel. In the example below, you can enter 12 or 012 to get the 
same channel. To enter a one-digit channel, such as channel 8, just press 8. After entering the 
channel, press OK. The CLEAR button on the remote clears all entries.

Digital channels can have both primary channels (like the analog channel number) and 
subchannels. Digital station numbers display in a larger rectangle that can contain up to eight 
numbers. Numbers to the left of the - (dash) are the main channel number; numbers to the 
right are the subchannel numbers for stations that broadcast more than one signal. 

In the example to the left, press “1”, press “2” (although 012 is shown in the example, 
pressing “0” isn’t required) and then press the right arrow button to move to the subchannel. 
Press “1” and then “OK.” The TV tunes to channel 12-1. If channel 12 is broadcasting 
subchannel signals, you would enter numbers that would access the other signals. (Example: 
12-1, 12-2, 12-3). If the selection times out, you must start over. Once you’ve made all entries, 
press OK.


The CLEAR button on the remote clears all entries.

Notes:

 You may experience a delay of several seconds before digital pictures appear, 

both when you first turn on the digital signals and when you change channels. This is 
normal. Digital channels sometimes take longer to tune. 

Complete the Initial Setup

AUTO CHANNEL SEARCH

 is the first menu you should see when you turn on 

the TV. (It is located from this path 

Main Menu/Setup/Auto Ch Search

). It allows 

the TV to search for all channels viewable through your digital and analog 
connections. This is sometimes called auto programming.

1.  From the Auto Channel Search menu press the right arrow button to choose  

the 

Signal Source

 (

Digital, Analog, 

or

 Both

). The default is 

Both.

2.  With the 

Signal Source

 chosen, press the down arrow button to select 

Start


and press OK. 

AUTO CHANNEL SEARCH

 runs as it finds all the available 

channels. (This step might take 10-15 minutes depending on your content 
provider).  

3.  Once the search is complete, you can begin watching TV. For information 

on customizing your channels or menu options, go to Chapter 3.

Note:

 After you complete the Auto Channel Search you may see an 

additional screen. “Time stored in the TV may be incorrect after a loss of 
power. Please check the time in the Time menu” may appear, reminding 
you that the time setting is incorrect. Go to page 35 for more information.

Choose the Menu Language

To set the language, use the arrow buttons to highlight 

Language

. The default 

language is 

English

. To choose another language, press the right arrow button 

on the remote, choose the language and press OK.

Go Back 

Auto Ch. Search 

...

List & Labels 

...

Closed Caption 

...

Favorite CH 

...

Language 

English...

Auto. format 

4:3 


SETUP

< >

_12

Analog channel  
example entry

012-1_ _

Digital channel  
example entry

Continues on next page...

Chapter 1 

11

Connections & Setup

Summary of Contents for 32v434t

Page 1: ...a com television User s Guide Changing Entertainment Again Model 27F634T is pictured here Find Inside Connecting page 5 Remote Control page 10 KidPass page 24 Favorite Channel page 33 Troubleshooting page 39 ...

Page 2: ...ng system of the building as close to the point of cable entry as practical Important Stand and Base Safety Information Choose the location for your TV carefully Place the TV on a stand or base that is of adequate size and strength to prevent the TV from being accidentally tipped over pushed off or pulled off This could cause personal injury and or damage the TV Refer to the Important Safety Instr...

Page 3: ...tability All televisions must comply with recommended international global safety standards for tilt and stability proper ties of its cabinet design Do not compromise these design standards by applying excessive pull force to the front or top of the cabinet which could ultimately overturn the product Also do not endanger yourself or children by placing electronic equipment toys on the top of the c...

Page 4: ...plete the Initial Setup 10 Turn on the TV 10 Complete the Initial Setup 11 Choose the Menu Language 11 Tuning to a Channel 11 Watching TV 12 Remote Buttons 13 Using the INPUT Button 14 Explanation of Jacks 15 The Front of Your TV 16 Front Buttons 17 Side View Buttons 17 Chapter 2 Using the TV Features Channel Banner 18 Parental Controls and V Chip 19 How V Chip Works 19 Activate Parental Control 1...

Page 5: ... Menu 26 Picture Menu 28 Setup Menu 29 Parental Control Menu 34 Time Menu 35 Notepad Menu 36 Chapter 4 Other Information USA V Chip Rating System 37 Canadian English V Chip Rating System 37 Canadian French V Chip Rating System 38 Troubleshooting 39 Limited Warranty 42 Care and Cleaning 44 FCC Information 44 ...

Page 6: ...ices so that air can circulate freely Don t stack devices If you place devices in a stand make sure you allow adequate ventilation If you connect an audio receiver or amplifier place it on the top shelf so the heated air from it won t flow around other devices Position Cables Properly to Avoid Audio Interference Position Cables Properly to Avoid Audio Interference Insert each cable firmly into the de...

Page 7: ...tal Input Press the ANTENNA button to tune to the Digital Input Go to page 13 for more information When using both of these jacks use the ANTENNA button on the remote to toggle between the digital and analog signals or Receiving Digital Channels Coaxial cable Indoor or Outdoor Antenna Continues on next page Note You may experience a delay of several seconds before digital pictures appear both when...

Page 8: ...eady to watch analog channels make sure you are tuned to the analog input Press the ANTENNA button to tune to the analog input Go to page 13 for more information What You Need Antenna rabbit ears or outdoor antenna with coaxial cable Plug the antenna or coaxial cable from the wall outlet into the ANTENNA CABLE ANALOG INPUT to receive analog channels OR Coaxial cable from a cable outlet Plug the co...

Page 9: ...have Y Pb Pr outputs but video game consoles do not Y Pb Pr Connection Back of TV DVD Player 2 3 Go to page 5 for instructions on getting a signal IMPORTANT If you aren t receiving a picture with this connection the problem might be with your DVD player If the DVD player is a progressive scan DVD player you need to change the setting from progressive to interlace The procedure for changing this on...

Page 10: ...o cables Using the example of a DVD player 1 Connect your cable and or antenna as described on page 5 2 Connect your Y Pb Pr component video cables Connect three video grade cables to the Y Pb Pr jacks on the back of the TV and to the Y Pb Pr outputs on the DVD player Y Pb Pr cables are colored green blue and red Just match the colors on the cables and Y Pb Pr jacks 3 Connect your audio cables Con...

Page 11: ...ustration which uses S Video and audio cables Using the example of a video game console 1 Connect your cable and or antenna as described on page 5 2 Connect your S Video cables S Video cables fit into a special shaped jack which will be labeled S Video Connect the S Video cable to the jack on the side of the TV and the jack on the video game console 3 Connect your audio cables Connect the audio whi...

Page 12: ... The technical term is Navigation how you move through the on screen menus The method is the same throughout the menu screens highlight your choice and select it To highlight a menu item press the arrow buttons on the remote to highlight one of the items listed on the screen Use the up or down arrow button to move up or down Use the right or left arrow button to move right or left To select the it...

Page 13: ...econds before digital pictures appear both when you first turn on the digital signals and when you change channels This is normal Digital channels sometimes take longer to tune Complete the Initial Setup AUTO CHANNEL SEARCH is the first menu you should see when you turn on the TV It is located from this path Main Menu Setup Auto Ch Search It allows the TV to search for all channels viewable through ...

Page 14: ...arrow ZOOM buttons on the remote to choose different screen formats 4 3 16 9 or stretch This is also known as the aspect ratio Go to page 33 for examples of screen formats Remember If you have a digital signal connected to your ANTENNA CABLE DIGITAL INPUT then view digital channels on your Digital Input The ANTENNA button on the remote tunes to the analog digital inputs Most digital channels are s...

Page 15: ...returns you to normal TV viewing FAV Favorite Press to browse the channels in your Favorite List Refer to page 33 for more information GO BACK Returns you to the previous channel or menu INFO Brings up the channel banner Press again to remove Refer to page 18 for more information INPUT Toggles through the available Video Input Channels VID1 CVID FRNT SVID and current channel MENU Brings up the MAI...

Page 16: ...ut Channels to view components you have connected to the TV 1 Make sure the component you want to view is turned ON 2 Press INPUT to tune to an available Video Input Channel and view the component 3 To return to the previous channel continue pressing INPUT Connections Setup 14 Chapter 1 ...

Page 17: ...vices to your TV Y Pb Pr Lets you connect devices which have component Y Pb Pr outputs such as VCRs DVD players DVD PVRs DVD recorders satellite receivers and cable boxes This connection provides optimum picture quality because the video is separated into three signals Use the VIDEO IN left and right audio jacks to connect for sound To access the device when using these jacks use the INPUT button ...

Page 18: ...ated on the side of the TV for sound Refer to page 9 for a detailed explanation of how to connect S Video cables to your TV AUDIO L Provides the left audio connection The left audio connector is usually white AUDIO R Provides the right audio connection The right audio connector is usually red To access the device when using these jacks use the INPUT button on your remote until SVID appears Remembe...

Page 19: ...button on the remote MENU Brings up the MAIN MENU In the menu system clears the screen VOLUME Decreases increases the volume In the menu system acts like the left right arrow button on the remote control and adjusts menu controls CHANNEL Scans up and down through the current channel list In the menu system acts like the down up arrow button on the remote control Use to highlight items Chapter 1 17...

Page 20: ...asting in mono Skip 0 30 Corresponds to the SKIP button Shows the amount of time left before the TV switches back to the previous channel Refer to page 13 07 18 am Displays the current time The following Channel Banner display is available for analog broadcasts only 11 CNN Displays the current channel and label assigned to the channel The following Channel Banner display is available for digital b...

Page 21: ...emes you can block are identified and explained in detail in Chapter 4 The following sections give you more details about how to change the status of TV program limits PARENTAL CONTROL Go Back Lock Settings Change Passwrd Parental Control is locked A password is now necessary to change settings Activate Parental Control Note The PASSWORD screen appears the first time you enter the Parental Control m...

Page 22: ...ratings above a specified age based rating level To block programs with higher ratings 1 Press the up or down arrow button to scroll to the rating corresponding with the lowest rating you do not want the child to watch 2 Press the OK button to toggle between view and block The status for the rating listed to the left and all higher ratings automatically changes to block 3 Press the up or down arrow...

Page 23: ...ou want to change 3 Press the right arrow button to move the highlight to a particular content theme status 4 Press the OK button to change its status to B In the example on the previous page you block the language L corresponding with TV 14 The language for TV MA is blocked as well 5 After you Block specific content themes you can change some of the content themes back to V view Note You must reme...

Page 24: ... block 5 Press the OK button to change its status to block the lock icon appears All ratings above the one you selected change to lock Notes You must remember to activate Parental Control for rating limits to take effect Refer to page 19 If you forget your password you can reset it Make sure the TV is off Press VOL on the TV s front panel and then CLEAR on the remote for approximately 5 seconds Th...

Page 25: ...te Parental Control for rating limits to take effect Refer to page 19 V Chip Exempt Program Block The Exempt Prgms option lets you decide if programs that the V Chip recognizes as unrated can be viewed Unrated TV programs may include news sports political religious local and weather programs emergency bulletins public announcements and programs without ratings The Exempt option applies to both USA...

Page 26: ...NNA CABLE DIGITAL INPUT top jack you have two options you can Block All channels or none Individual channels cannot be blocked with this connection If you are using the ANTENNA CABLE ANALOG INPUT bottom jack then Block Channel works as described below This option lets you block specific channels 1 From the PARENTAL CONTROL menu press the down arrow button to highlight Settings and press OK 2 Press ...

Page 27: ...ghlight Lock Fr Panel 2 Press the right or left arrow button to turn on box has check mark or off box doesn t have check mark front panel lock Change Your Password Selecting this option lets you simply create a new password at any time Once you enter a new password from Change Passwrd in the PARENTAL CONTROL menu it is the password you use until you change it again PARENTAL CONTROL SETTINGS Go Bac...

Page 28: ...ound Type Press the right arrow button to scroll through the available audio types which control the way the sound comes through your speakers MONO Plays the sound in mono only Use this setting when receiving broadcasts with weak stereo signals STEREO Splits the incoming stereo audio signal into left and right channels Enhanced for analog channels only Makes the sound simulate surround sound Note ...

Page 29: ...digital channels only Def Language Default Digital Channel Audio Language Press the right arrow button to choose the language you prefer for dialog on digital channels If your preferred language is being broadcast with a program the TV will play it If not then the TV will play the default audio for the program usually English in the U S The default digital channel audio language options are Englis...

Page 30: ... palette of colors Normal Standard picture color This is the default setting Warm For a more red palette of colors Brightness Adjusts the brightness of the picture Contrast Adjusts the difference between the light and dark areas of the picture Color Adjusts the richness of the color Sharpness Adjusts the crispness of the edges in the picture Tint Adjusts the balance between the red and green level...

Page 31: ... and analog connections Analog Signal Type Choose between Cable or Antenna if you are connected to the ANTENNA CABLE ANALOG INPUT jack If you chose Both above then you ll need to choose a signal type for your digital and analog connections After you have made the selections above use the down arrow button to highlight Start Start Press the right arrow button to start the search Searches for channe...

Page 32: ...ressing the number 7 button one time the letter Q is typed by pressing the number 7 two times the letter R is three times and the letter S is four times 3 Move spaces with the right and left arrow buttons 4 Use the up arrow button to highlight Go Back and press OK to exit this menu when you have finished In List This option allows you to keep or delete a channel from the channel list Follow the pro...

Page 33: ...elow The following Closed Caption options are available for analog signals CC Display Lets you choose the way closed captioning information is shown on the screen Off No captioning information displayed On Captioning information always appears when available Muted On Displays captioning information when available whenever the TV s sound is muted by pressing the MUTE button The captioning informati...

Page 34: ...customize the following display options CC Size Lets you set the size of the digital closed caption text Standard Large or Small CC Font Lets you select a character design for the digital closed caption text A font is a complete assortment of type of a given design You can choose from a variety of fonts Ashley Floridian etc CC Opacity Lets you set the appearance of the space behind the digital clo...

Page 35: ...av 6 88 DISN FAVORITE CH Go Back Signal Source Digital Fav 1 13 1 NBC Fav 2 8 3 ABC Fav 3 79 4 CBS Fav 4 5 2 FOX Fav 5 17 3 WTR Fav 6 28 1 IND FAVORITE CH menu for analog signals FAVORITE CH menu for digital signals Favorite CH Favorite Channel Lets you store up to six of your preferred channels for each signal source into a favorite list Find your favorites easily by pressing the FAV button on th...

Page 36: ... display which is for traditional TV programs 16 9 This is for digital signals DVD or video programs that are in 16 9 screen size There are gray or black bars on the top and bottom on the screen Stretch The image is stretched vertically to fill the TV screen for digital channels only Note The right arrow Zoom and left arrow Zoom buttons on the remote change the TV s screen format Parental Control M...

Page 37: ...s you to set the date easily Wake Up Timer Lets you set the TV to turn on at a specific time Notes Unless Wake Up Timer is set to On the next three options Wake Up Time Wake up Ch and Recurrence aren t available When the TV turns on by the Wake Up Timer and no remote or front panel buttons are pressed for 2 hours the TV will turn itself off Wake Up Time Lets you set the time you want the TV to turn...

Page 38: ... the unwanted text and the right arrow button is for the blank space 3 The up arrow button is pressed to toggle the entry mode between uppercase or lowercase letters 4 When completed press the OK button to save the note Delete note Lets you delete the whole message Display note Enables you to display the box has check mark or not to display the box doesn t have check mark the message on the screen...

Page 39: ...ude mild fantasy violence FV or comedic violence or may frighten children under the age of 7 TV Y All Children Themes and elements in this program are designed for a young audience including children from ages 2 6 It is not expected to frighten younger children 18 Adults Programming intended for adults 18 and older It may contain elements of violence language and sexual content which could make it...

Page 40: ...s of violence Depictions of aggressive behavior will be infrequent and limited to portrayals that are clearly imaginary comedic or unrealistic in nature Other Content Guidelines There will be no offensive language nudity or sexual content Canadian English V Chip Rating System continued Canadian French V Chip Rating System 18 Adults Programming is for adults only This program contains sustained vio...

Page 41: ...ed Go to page 35 for instructions KidPass might have been set Go to page 24 for instructions Electronic protection circuit may have been activated because of a power surge If this happens frequently the voltage in your house may be abnormally high or low TV turns on unexpectedly Wake Up Timer might have been set Go to page 35 for instructions Blank screen You may be on an inactive channel Try anot...

Page 42: ...nsor on the device Make sure there is a clear path and point directly at the TV Maybe batteries in the remote are weak dead or installed incorrectly Put new batteries in the remote Problems with Parental Controls Can t select a certain channel The channel may be blocked or not approved through PARENTAL CONTROL SETTINGS The rating limits don t work You must activate the settings Go to page 19 for i...

Page 43: ... remote to change the TV s screen format Some format choices are not available in certain situations In that case you might see the message Function not available There is also a format setting in the menu system Go to the Setup Menu and choose Format How do I replace my remote If you need to replace your remote call 1 800 338 0376 A shipping and handling fee will be charged upon ordering and the ...

Page 44: ... to enable the Authorized Service Center to perform service at the Authorized Service Center If your unit is not located within the geographic territory covered by an Authorized Service Center you must take your unit to the Service Center location at your own expense or pay for the cost the Service Center may charge to transport your unit to and from your home To identify your nearest Authorized R...

Page 45: ...RESULTING FROM THE USE OF THIS PRODUCT OR ARISING OUT OF ANY BREACH OF ANY EXPRESS OR IMPLIED WARRANTY ON THIS PRODUCT THIS DISCLAIMER OF WARRANTIES AND LIMITED WARRANTY ARE GOVERNED BY THE LAWS OF THE STATE OF INDIANA EXCEPT TO THE EXTENT PROHIBITED BY APPLICABLE LAW ANY IMPLIED WARRANTY OF MERCHANTABILITY OR FITNESS FOR A PARTICULAR PURPOSE ON THIS PRODUCT IS LIMITED TO THE APPLICABLE WARRANTY A...

Page 46: ...onsult the dealer or an experienced radio TV technician for help This Class B digital apparatus complies with Canadian ICES 003 Care and Cleaning CAUTION Turn OFF your TV before cleaning You can clean the TV as required using a soft lint free cloth Be sure to occasionally dust the ventilation slots in the cabinet to help assure adequate ventilation The TV s screen may be cleaned with a soft lint f...

Page 47: ...This page intentionally left blank ...

Page 48: ...will only add delays in service for your product TTE Technology Inc 101 West 103rd Street Indianapolis IN 46290 2006 TTE Technology Inc RCA and associated marks are trademarks of THOMSON S A used under license to TTE Corporation Printed in USA TOCOM 1659497A Visit the RCA website at www rca com television ...

Reviews: