background image

2

Funciones del Identificador de Llamadas (Caller ID)

Pantalla Sumario

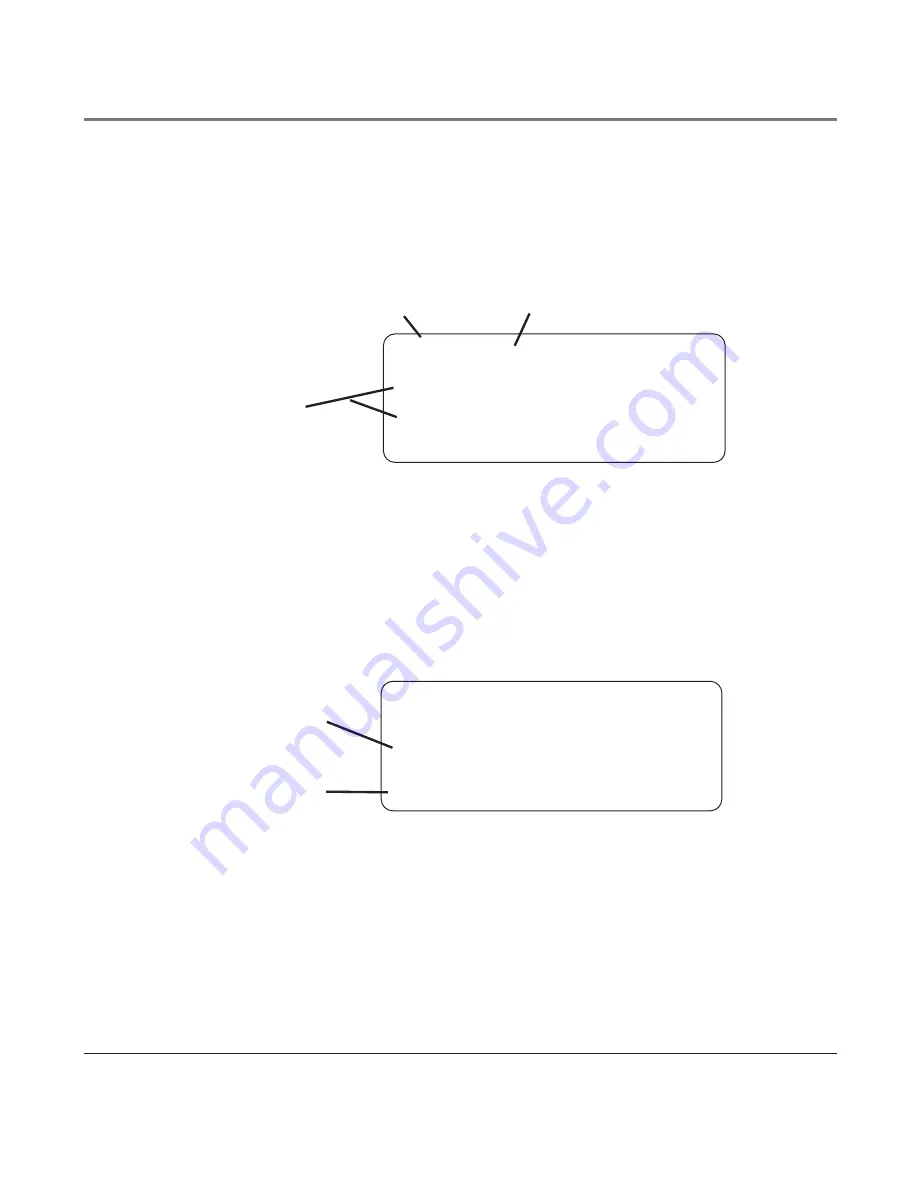
La pantalla sumario muestra la hora actual, la fecha actual y el número de llamadas esperando a ser 

revisadas. Esto aparece hasta que se oprime cualquier botón. Dentro de 60 segundos después de que 

se recibe una llamada nueva la información de la persona que acaba de llamar aparece en la pantalla 

y el indicador azul 

NUEVA

 parpadea..

Funciones del Identificador de Llamadas (Caller ID)

12/31   12:43 A     NUE 

JOHN SMITH
L1: 327-555-2325

Nombre del 

Identificador de 

Llamadas

Número telefónico 

de la persona que 

llamada 

12/31   12:43 A 
L1: 01 NUE LLAMS
L2: 02 NUE LLAMS
L2 TIMBRE APAF

Hora

Fecha

Número de 

llamadas 

nuevas

NOTA: El número de llamadas nuevas se muestra hasta que todas las llamadas nuevas hayan sido recibidas.

Para Recibir y Almacenar Archivos del Identificador de Llamadas 

Este aparato recibe y muestra información transmitida por su compañía telefónica local. Esta 

información puede incluir el número telefónico, fecha y hora; o el nombre, número telefónico, fecha y 

hora. El aparato puede almacenar hasta 100 llamadas para ser revisadas después. Cuando la memoria 

está llena, una llamada nueva automáticamente reemplaza a la llamada más vieja. La indicación de 

llamada nueva (“

NEW

”) aparece en la pantalla para llamadas recibidas que no han sido revisadas.

Para Revisar Archivos del Identificador de Llamadas

•  Presione el botón CID para ir primero a la revisión CID y luego use el botón 

5

 ó 

6

 para 

desplazarse a los registros de llamada.

NOTA: Cuando usted recorre los archivos hasta el principio o fin de la lista, la indicación FIN DE LISTA 

aparece en la pantalla.

Summary of Contents for 25204

Page 1: ...Two Line Speakerphone with Call Waiting Caller ID User s Guide Please read this manual before operating this product for the first time Model 25204 ...

Page 2: ...ation instructions for details Notes This equipment may not be used on coin service provided by the telephone company Party lines are subject to state tariffs and therefore you may not be able to use your own telephone equipment if you are on a party line Check with your local telephone company Notice must be given to the telephone company upon permanent disconnection of your telephone from your l...

Page 3: ...llation Privacy of Communications may not be ensured when using this product If this equipment does cause harmful interference to radio or television reception which can be determined by turning the equipment off and on the user is encouraged to try to correct the interference by one or more of the following measures Reorient or relocate the receiving antenna that is the antenna for radio or telev...

Page 4: ...7 New Call Indicator 18 Restoring the Defaults 18 Telephone Operation 18 Making Calls with the Handset 18 Making Calls with the Speakerphone 19 Making Calls with the Optional Headset 19 Receiving Calls with the Handset 19 Receiving Calls with the Speakerphone 19 Telephone Operation 19 Receiving Calls with the Optional Headset 20 Switching Between the Speakerphone Handset and Headset 20 Pre Dialing...

Page 5: ...leting a CID Record 25 Deleting All CID Records 25 Dialing Back 25 If You Programmed Your Local Area Code in the Setup Menu 25 Caller ID 25 If You Did Not Program Your Local Area Code in the Setup Menu 26 Call Waiting Caller ID 26 Memory 26 Direct Access Memory Directory Memory26 Storing a Name and Number in Memory 26 Reviewing Stored Names Numbers 27 Changing a Stored Name or Number 27 Storing th...

Page 6: ...Caller ID phone enables you to Identify callers before you answer the phone View the time and date of each incoming call Record up to 100 Caller ID messages sequentially Know who called while you were away To get the most from your new phone we suggest that you take a few minutes right now to read through this user s guide IMPORTANT In order to use this unit you must subscribe to either the standa...

Page 7: ...nnections and Setup Format button 4 Caller ID 4 button 3 directory 3button 5 6 volume buttons DND Do Not Disturb button Auto Redial button Flash button Store button Confer conference button Hold button Line 1 2 buttons Headset button Preset EQ button Mute button Dial button Speaker button Microphone PAUSE button ...

Page 8: ...ght look like the one pictured here installed in your home office Installation Important Installation Information Never install telephone wiring during a lightning storm Never touch uninsulated telephone wires or terminals unless the telephone line has been disconnected at the network interface Use caution when installing or modifying telephone lines Never install telephone jacks in wet locations ...

Page 9: ...rtment door located on the bottom of the phone by inserting a flathead screw driver into the battery door latch area and gently tilting the screw driver away from the battery door to release the latch Insert the batteries as shown on the diagram inside the battery compartment Snap the battery compartment door back into place IMPORTANT If you are not going to use the telephone for more than 30 days...

Page 10: ... line cord into separate wall jacks NOTE To use two line you must have two telephone lines with unique telephone numbers If you only have one telephone line this phone will still operate but only as a single line telephone 5 Connect the handset cord Plug one end of the coiled handset cord into the side of the base and the other end into the jack on the handset and place the handset in the cradle 6...

Page 11: ...rt the tabs on the pedestal into the two lower slots on the bottom of the base then push the pedestal downward until the tabs on the top of the pedestal snap lock into place Connections and Setup Data Port This phone has a DATA PORT jack to connect an auxiliary phone device such as a fax machine computer modem answering machine or even a cordless phone The DATA PORT switch on the back of the phone...

Page 12: ...achine back to the normal line when you are done because outside callers who may not know that you have multiple lines will not be able to reach your fax machine if they dial the normal fax line Wall Mounting the Phone 1 Remove the desktop stand from the base of the phone if it is already attached to the base unit 2 Thread the AC adaptor cord through the cord channel on the bottom of the phone 3 C...

Page 13: ...n you receive your first Caller ID call The unit resets the hour and minute each time a call is received 1 Press the MENU button 2 Use the 5 or 6 button to scroll to DISPLAY SETTING 3 Press Sel Save 4 Use the 5 or 6 button to scroll to TIME DATE 5 Press Sel Save The cursor moves to the Date field 6 Use the 5 or 6 button to scroll to the desired Month 7 Press Sel Save to save 8 Use the 5 or 6 butto...

Page 14: ...ORMAT menu LCD Contrast 1 Press the MENU button 2 Use the 5 or 6 button to scroll to DISPLAY SETTING 3 Press Sel Save 4 Use the 5 or 6 button to scroll to LCD CONTRAST 5 Press Sel Save button 6 Use the 5 or 6 button to adjust the LCD contrast 7 Press Sel Save to save To start over press EXIT to return to the LCD CONTRAST menu LCD Backlight 1 Press the MENU button 2 Use the 5 or 6 button to scroll ...

Page 15: ...to scroll to RING TONE 5 Press Sel Save button 6 Press 3 or 4 to select L1 or L2 for ring tone change 7 Then use the 5 or 6 button to scroll the tone selection There are 7 ring tones for you to select from 8 Press Sel Save to save To start over press EXIT to return to the SOUND SETTING submenu and repeat step 5 Key Tone Volume 1 Press the MENU button 2 Use the 5 or 6 button to scroll to SOUND SETT...

Page 16: ... 5 Press Sel Save button 6 Use the 5 or 6 button to scroll to ON or OFF 7 Press Sel Save to save To start over press EXIT to return to the CALL ALERT menu Local Area Code 1 Press the MENU button 2 Use the 5 or 6 button to scroll to PHONE SETTING 3 Press Sel Save button 4 Use the 5 or 6 button to scroll to AREA CODE 5 Press Sel Save ENTER DIGIT is displayed 6 Use the touch tone pad to enter your ar...

Page 17: ...on to scroll to PHONE SETTING 3 Press Sel Save button 4 Use the 5 or 6 button to scroll to REGIONAL CODE 5 Press Sel Save 6 Use the 5 or 6 to scroll to desired code 7 Use the touch tone pad to enter the code Press DELETE to clear and re enter all three digits 8 When finished press Sel Save to save and return to REGIONAL CODE Flash Time Depending on the services you have with the phone company you ...

Page 18: ...s Sel Save to save To start over press EXIT to return to the NEW CALL LED menu Restoring the Defaults This feature allows you to reset all the menu settings to the original default settings 1 Press the MENU button 2 Use the 5 or 6 to scroll to RESTORE SETTING 3 Press Sel Save 4 Use the 5 or 6 to scroll to YES 5 Press Sel Save to save To start over press EXIT to return to the RESTORE SETTING menu T...

Page 19: ...and the phone automatically selects an open line 5 Wait for a dial tone 6 Dial a phone number 7 Press HEADSET when finished NOTE To converse using the headset the handset must be placed in the cradle Receiving Calls with the Handset When the phone rings the corresponding line s indicator flashes rapidly 1 Pick up the handset your phone automatically selects the ringing line 2 When you are finished...

Page 20: ...witch to the headset press HEADSET The headset indicator turns on Place the handset in the cradle Pre Dialing Telephone Numbers Pre dialing lets you enter check and edit a telephone number before engaging the line There are several ways to pre dial a telephone number Manually enter the telephone number or Press one of the 16 memory location buttons or Press DIR followed by the 5 or 6 button to sea...

Page 21: ...lue 2 Hang up or press another line button Releasing a Call from Hold Press the line button for the call on hold The phone automatically goes into speakerphone mode NOTE If you want to change modes lift the handset to switch to the handset or press the HEADSET button to use the headset Flash Use the FLASH button to activate custom calling services such as Call Waiting which is available through yo...

Page 22: ...utton Conference This feature lets you connect two calls to make a conference call To connect with two calls 1 Make a call and stay in talk mode 2 Press HOLD 3 Press the another line button to answer or make a second call 4 When the second call connects press Confer To disconnect one line press the line button for the party you want to continue talking with and the other party is automatically dis...

Page 23: ...saging service and you subscribe to it the VOICE MAIL indicator on the base flashes to indicate a message is waiting It stops flashing after the message is reviewed IMPORTANT You must have the voice mail access code programmed for this feature to work See Storing a name and number in memory 1 Pick up the handset or press HEADSET or SPEAKER 2 Press VOICE MAIL 1 for line 1 voicemail or VOICE MAIL 2 ...

Page 24: ...me or the name phone number date and time The unit stores up to 100 call records for later review When the call log is full a new call automatically replaces the oldest call NEW appears in the display for calls received that have not been reviewed Reviewing CID Records Press the CID button to enter the CID review menu then use 5 or 6 buttons to scroll through the call records NOTE When you scroll ...

Page 25: ...ORDS shows in the display 2 Press the Sel Save button again to confirm Dialing Back When reviewing CID records you can dial back the numbers showing on the display If You Programmed Your Local Area Code in the Setup Menu 1 Press the CID button to enter the CID review menu then use 5 or 6 button to scroll to the desired number 2 Press the DIAL button If you see a number with 7 digits i e 555 1234 t...

Page 26: ...hear the tone IMPORTANT In order to use this feature you must subscribe to either the standard Name Number Caller ID Service or Caller ID with Call Waiting Service To know who is calling while you are on the phone you must subscribe to Caller ID with Call Waiting Service Direct Access Memory Directory Memory Storing a Name and Number in Memory 1 Press the STORE button ENTER DIGITS shows in the dis...

Page 27: ...ndex card NOTE If you press the EXIT button before selecting the location to save the record your will exit without saving any changes Reviewing Stored Names Numbers 1 Press the DIR button 2 Use the 5 and 6 button to review the records stored in Directory Memory Or press the number key to review the records with the name starting with the corresponding alphabet OR 1 Press a MEMORY button to review...

Page 28: ...ory 1 Pick up the handset or press SPEAKER or HEADSET 2 Wait for the dial tone 3 Press the DIR button and use the 5 and 6 button to find the number 4 Press the DIAL button and the number automatically dials If the number is stored in the Direct Access Memory 1 Pick up the handset or press SPEAKER or HEADSET 2 Wait for the dial tone 3 Press the MEMORY location button and the number automatically di...

Page 29: ...cally redial the last number or re try after a busy tone is received 1 After getting the busy tone place the handset back on the cradle or press SPEAKER to hang up the call 2 Press the Auto Redial button 3 The phone will automatically redial the last dialed number 4 The SPEAKER LED blinks and the speaker is on which allows you to listen for the call to connect However the microphone is muted at th...

Page 30: ...the calibration will complete in less than 10 seconds 2 During this calibration both parties in the conversation may hear a faint echo which will fade off as your speakerphone adapts itself to its surroundings and the condition of the phone line 3 If the surroundings change during the conversation such as the speakerphone being moved the calibration will adjust accordingly This adjustment samples ...

Page 31: ...empty UNKNOWN CALLER The incoming call does not have CID service or their service area is not linked to yours If UNKNOWN CALLER appears along with a calling number the name information for that number was not available BLOCKED CALL The caller is registered as Private Number and their CID information is withheld INCOMPLETE DATA Caller information has been interrupted or corrupted during transmissio...

Page 32: ...low or none at all Check and adjust volume control setting Memory dialing doesn t work Make sure you program the memory location keys correctly Make sure you follow proper dialing sequence General Product Care To keep your telephone working and looking good follow these guidelines Avoid putting the phone near heating appliances and devices that generate electrical noise for example motors or fluor...

Page 33: ...g the warranty period Purchase date ________________________________________________ Name of store ________________________________________________ Limited Warranty What your warranty covers Defects in materials or workmanship For how long after your purchase One year from date of purchase The warranty period for rental units begins with the first rental or 45 days from date of shipment to the ren...

Page 34: ...mplied including all implied warranties of merchantability or fitness for a particular purpose are hereby disclaimed No verbal or written information given by Thomson Inc its agents or employees shall create a guaranty or in any way increase the scope of this warranty Repair or replacement as provided under this warranty is the exclusive remedy of the consumer Thomson Inc shall not be liable for i...

Page 35: ...25 Deleting All Directory Memory 29 Dialing a Stored Number 28 Dialing Back 25 Direct Access Memory Directory Memory 26 Display Language 13 Display Messages 31 Do Not Disturb 23 E Equipment Approval Information 2 F Flash 21 Flash Time 17 G General Product Care 32 H Hearing Aid Compatibility 3 Hold 21 Hour Format 14 I Important Information 2 Important Installation Information 8 Installation 8 Insta...

Page 36: ...ith the Optional Headset 20 Receiving Calls with the Speakerphone 19 Redial 21 Regional Area Codes 17 Removing a Call from Hold 21 Restoring the Defaults 18 Reviewing CID Records 2 Reviewing Stored Names Numbers 27 Ringer Volume 22 Ring Tone 15 S Saving CID Records to Memory Phone Directory Memor 25 Service 33 Speakerphone Handset and Headset Volume 22 Storing a Name and Number in Memory 26 Storin...

Page 37: ...terCard or Discover Card ready and call toll free 1 800 338 0376 A shipping and handling fee will be charged upon ordering We are required by law to collect appropriate sales tax for each individual state country and locality to which the merchandise is being sent Items are subject to availability ...

Page 38: ...olis address listed in this manual or on the carton This will only add delays in service for your product Thomson Inc 10330 North Meridian Street Indianapolis IN 46290 2007 Thomson Inc Trademark s Registered Marca s Registrada s Model 25204 00007055 Rev 1 DOM E S 07 13 Printed in China ...

Page 39: ...Teléfono con Altavoz de Dos Líneas con Identifica dor de Llamada en Espera Guía del Usuario Por favor lea este manual antes de operar este producto por primera vez Modelo 25204 ...

Page 40: ...o Están diseñados para ser conectados a un enchufe modular compatible que también esté en conformidad Para más detalles vea las instrucciones para la instalación NOTAS No se puede usar este equipo con un teléfono de previo pago proveído por la compañía telefónica Las líneas compartidas son sujetas a las tarifas del estado y por eso es posible que Ud no pueda usar su propio equipo telefónico si Ud ...

Page 41: ...gurada al usar este producto Si este equipo causa en efecto una interferencia dañosa a la recepción de la radio o de la televisión lo cual puede ser determinado apagando y prendiendo el equipo le animamos a Ud de tratar de corregir la interferencia por medio de una o más de las sugerencias siguientes Cambie la posición o la ubicación de la antena quiere decir la antena de la radio o de la televisi...

Page 42: ...de Llamada Nueva 17 Para Restablecer las Programaciones de Fábrica 17 Operación del Teléfono 18 Operación del Teléfono 18 Para Hacer Llamadas con el Auricular 18 Para Hacer Llamadas con el Altavoz 18 Para Hacer Llamadas con los Audífonos Opcionales 18 Para Recibir Llamadas con el Auricular 18 Para Recibir Llamadas con el Altavoz 19 Para Recibir Llamadas con los Audífonos Opcionales 19 Para Cambiar...

Page 43: ...o Automático 28 Teléfono con altavoz full duplex ampliado29 Preselección de ecualizador 29 Otra Información 30 Mensajes de la Pantalla 30 Guía para Solución de Problemas 31 Cuidado General del Producto 32 Cómo Obtener Servicios de Mantenimiento32 Garantía Limitada 33 Índice 35 Información de Accesorios 37 VEA ADVERTENCIA EN LA PARTE POSTERIOR BASE DEL PRODUCTO RIESGODESACUDIDA ELÉCTRICANOABRA ADVE...

Page 44: ...le permite Identificar a la persona que llama antes de que usted conteste el teléfono Ver la hora y fecha de cada llamada entrante Grabar hasta 100 mensajes del Identificador de Llamadas en secuencia Saber quién llamó mientras usted estaba fuera Para aprovechar al máximo su nuevo teléfono le sugerimos que se tome unos minutos ahora mismo para leer esta guía del usuario IMPORTANTE Para poder utiliz...

Page 45: ...SH Botón para servicios 5 6 Botónes para volumen 5 6 DND Botón de No Molestar Voice Mail 1 2 Botónes de Mensaje de Voz 1 2 Delete Botón para borrar Exit Botón para salir New Call Indicador de llamada nueva Sel Save Botón para seleccionar guardar Conexión y Programación Formato de la Base Auto Redial Botón Remarcado Automático 4 Botón de identificador de llamada 4 Format Botón para formato Preset E...

Page 46: ... dos enchufes tipo RJ11C que pueden ser como el que está ilustrado aquí en su casa oficina Instalación Información Importante para la Instalación Nunca instale cableado telefónico durante una tormenta de relámpagos Nunca toque cables o terminales no aislados a menos que la línea telefónica haya sido desconectada en la interfaz de la red Utilice precaución cuando instale o modifique líneas telefóni...

Page 47: ...la parte inferior del teléfono insertando un desarmador de cabeza plana en el área del seguro de la puerta de la batería e inclinando suavemente el desarmador hacia afuera de la puerta de la batería para liberar el seguro Introduzca las baterías como se muestra en el diagrama dentro del compartimiento de las baterías Coloque la puerta del compartimiento de las baterías en su sitio IMPORTANTE Si us...

Page 48: ...fes de pared separados NOTA Para usar dos líneas usted debe tener dos líneas telefónicas con números separados Si usted tiene únicamente una línea telefónica este teléfono operará pero únicamente como teléfono de una sola línea 5 Conecte el cable del auricular Conecte un extremo del cable espiral en el enchufe al costado de la base y el otro extremo dentro del enchufe en el auricular y coloque el ...

Page 49: ...ores en la parte inferior de la base luego empuje el pedestal hacia abajo hasta que la lengüeta en la parte superior del pedestal quede colocada asegurada en su lugar Conexión y Programación A B Terminal de Datos Este teléfono tiene una terminal de datos DATA PORT para que usted pueda conectar un accesorio auxiliar del teléfono como una máquina de fax un módem de computadora una máquina contestado...

Page 50: ... línea donde el fax está conectado normalmente Para Montar la Base sobre la Pared 1 Retire el soporte del escritorio de la base del teléfono si éste ya está unido a la unidad de base 2 Alimente el cable a través de las ranuras en la parte de abajo de la base 3 Conecte el cable de la línea al receptáculo de la pared y al teléfono 4 Deslice loa agujeros para montaje en la parte de abajo de la base s...

Page 51: ...or se mueve al campo de Fecha 6 Use el botón 5 o 6 para desplazarse al Mes deseado 7 Oprima el botón Sel Save 8 Utilice los botones 5 o 6 para programar la fecha 9 Oprima el botón Sel Save para salvar El cursor se mueve al campo de Hora 10 Utilice los botones 5 o 6 para programar la hora AM PM deseada 11 Oprima el botón Sel Save para salvar El cursor se mueve al campo de Minuto 12 Utilice los boto...

Page 52: ...D La Luz de Fondo del LCD 1 Oprima el botón MENU 2 Utilice los botones 5 o 6 para ir a la indicación CONFIG PANTALLA 3 Oprima el botón Sel Save 4 Utilice los botones 5 o 6 para ir a la indicación LUZ DE FONDO LCD 5 Oprima el botón Sel Save 6 Utilice los botones 5 o 6 para activar AUTOMATICO o SIEMPRE ENCNDIDO NOTA si usted selecciona la opción AUTOMATICO el LCD se activará durante la llamada entra...

Page 53: ...nes 5 o 6 para activar OFF BAJO o ALTO 7 Oprima el botón Sel Save para salvar Para volver a empezar oprima el botón EXIT para volver al menú de VOL TONO TECLA Tono para Alerta de Llamada Cuando el tono para alerta de llamada está activado ON usted lo escucha cuando está en el teléfono y recibe una llamada en la otra línea Si usted prefiere que las llamadas entrantes no le interrumpan o le distraig...

Page 54: ...ando recibe una señal válida del Identificador de Llamadas Las llamadas que provengan de la misma clave de área que las áreas regionales programadas se mostrarán como números de diez dígitos Si el número no se muestra correctamente el teléfono no puede contestar la llamada automáticamente Usted puede almacenar hasta 6 claves de área regionales Usted puede necesitar utilizar estas funciones si tien...

Page 55: ...la indicación CONFIG TELFONO 3 Oprima el botón Sel Save 4 Utilice los botones 5 o 6 para llegar a la indicación LED NUEV LLAMD 5 Oprima el botón Sel Save 6 Utilice los botones 5 o 6 para activar ON o desactivar OFF NOTA Si usted selecciona ON el Indicador Nueva Llamada parpadeará después de que el teléfono reciba un nuevo Identificador de llamada Si este está apagado el Identificador de Nueva Llam...

Page 56: ... Hacer Llamadas con los Audífonos Opcionales 1 Conecte un auricular al receptáculo HEADSET en el lado derecho de la base 2 Ajuste los audífonos a que descansen sobre su cabeza 3 Mueva el micrófono a aproximadamente 2 o 3 pulgadas de su boca 4 Oprima el botón HEADSET y el teléfono selecciona automáticamente una línea abierta 5 Espere al tono de marcar 6 Marque el número telefónico 7 Oprima el botón...

Page 57: ... Para Cambiar entre Altavoz Auricular y Audífonos Para cambiar a altavoz oprima el botón SPEAKER El indicador del altavoz se ilumina Para cambiar a auricular levántelo El altavoz o los audífonos se desactivan Para cambiar a los audífonos oprima el botón HEADSET El indicador de audífonos se ilumina Coloque el auricular sobre la base Pre Marcado de Números Telefónicos La función de pre marcado le pe...

Page 58: ... cancela En Espera Para Poner una Llamada en Espera 1 Oprima el botón HOLD El indicador de la línea en espera parpadea en azul 2 Cuelgue u oprima el botón de otra línea Para Liberar una Llamada en Espera Oprima el botón de la línea en donde está la llamada en espera El teléfono automáticamente se pone en modalidad de altavoz NOTA Si usted quiere cambiar modalidades levante el auricular para cambia...

Page 59: ...ferencia Esta función le permite conectar dos llamadas para establecer una llamada en conferencia Para conectar con dos llamadas 1 Haga una llamada y permanezca en el modo hablar 2 Oprima el botón HOLD 3 Oprima el botón de la otra línea para contestar o hacer una segunda llamada 4 Cuando la segunda llamada es conectada oprima el botón Confer Para desconectar una línea oprima el botón de la línea c...

Page 60: ...e mensaje de voz y que usted se suscribe a éste el indicador VOICE MAIL en la base parpadea para indicar que hay un mensaje esperando Deja de parpadear después de que el mensaje es revisado IMPORTANTE Usted debe tener programada la clave de acceso para el buzón de voz para que funcione Vea la sección Para Almacenar un Nombre y Número en la Memoria 1 Levante el auricular u oprima el botón HEADSET o...

Page 61: ... se muestra hasta que todas las llamadas nuevas hayan sido recibidas Para Recibir y Almacenar Archivos del Identificador de Llamadas Este aparato recibe y muestra información transmitida por su compañía telefónica local Esta información puede incluir el número telefónico fecha y hora o el nombre número telefónico fecha y hora El aparato puede almacenar hasta 100 llamadas para ser revisadas después...

Page 62: ...ación BORRAR TODOS LOS REGISTROS CID aparece en la pantalla 2 Oprima nuevamente el botón Sel Save para confirmar Para Volver a Marcar Cuando usted revisa los archivos del Identificador usted puede marcar los número que aparecen en la pantalla Si usted programó su Clave de Área en el Menú de Programación 1 Presione primero el botón CID para ir al modo de revisión CID y luego use el botón 5 y 6 para...

Page 63: ...zar las funciones del Identificador de Llamadas con este aparato usted debe suscribirse ya sea al Servicio Estándar de Identificador de Llamadas de Nombre Número o al Servicio de Identificador de Llamada en Espera Caller ID with Call Waiting Memoria de Acceso Directo y Directorio de Memoria Para Almacenar un Nombre y Número en la Memoria 1 Oprima el botón STORE La indicación INSCRIBA DIGITO aparec...

Page 64: ...úmeros Almacenados 1 Oprima el botón DIR 2 Utilice los botones 5 o 6 para recorrer los archivos almacenados en el Directorio de Memoria O presione la tecla de número para revisar los registros con el nombre comenzando con el alfabeto correspondiente O 1 Oprima uno de los botones de memoria MEMORY para revisar el archivo localizado en Memoria de Acceso Directo Para Cambiar un Nombre o Número Almace...

Page 65: ...al tono de marcar 3 Oprima el botón DIR o utilice los botones 5 o 6 para encontrar el número 4 Oprima el botón DIAL y el número se marca automáticamente Si el número está almacenado en la Memoria de Acceso Directo 1 Levante el auricular u oprima el botón SPEAKER o HEADSET 2 Espere al tono de marcar 3 Oprima el botón de la localización de memoria MEMORY y el número se marca automáticamente Marcado ...

Page 66: ...marcar automáticamente el último número o remarcar después de que se recibe un tono de ocupado 1 Después de obtener el tono de ocupado vuelva a colocar el auricular en la base o presione Speaker para colgar la llamada 2 Presione el botón Auto Redial 3 El teléfono remarcará automáticamente el último número marcado 4 El LED Speaker parpadea y el altavoz se activa lo cual le permite escuchar mientras...

Page 67: ... terminará en menos de 10 segundos 2 Durante esta calibración ambas partes en la conversación pueden escuchar un eco débil el cual desaparecerá conforme su teléfono con altavoz se adapte así mismo a sus entornos y a la condición de la línea telefónica 3 Si los entornos cambian durante la conversación como cuando el teléfono de altavoz es movido la calibración se ajustará según corresponda Este aju...

Page 68: ...talla Los siguientes mensajes especiales indican el estado actual de un mensaje o del aparato NO HAY LLAMADAS El registro de memoria está vacío PERSONA DESCONOCIDA La llamada entrante viene de un área en donde el Identificador de Llamadas Caller ID no está disponible o no está enlazado al suyo Si aparece la indicación DESCONOCID junto con el número la información del nombre no está disponible LLAM...

Page 69: ...lar y el cable de los audífonos estén conectados adecuadamente Asegúrese que la función del enmudecedor MUTE no haya sido activada El teléfono no timbra Asegúrese que el selector del timbre RINGER esté en la posición de activado ON Usted puede tener demasiadas extensiones de teléfono en su línea Intente desconectar algunos teléfonos Vea las soluciones para No hay tono de marcar Asegúrese que la fu...

Page 70: ...la red telefónica la compañía telefónica puede pedirle que desconecte su equipo hasta que el problema haya sido resuelto Este producto puede únicamente ser reparado por el fabricante o sus agentes de reparación autorizados Cualquier cambio o modificación no aprobados expresamente por Thomson Inc podría ser motivo de anulación de la autoridad del usuario para operar este producto Para recibir instr...

Page 71: ...uiere como evidencia el primer contrato de renta También escriba claramente su nombre dirección y la descripción del defecto Mande vía UPS o un servicio de paquetería equivalente a Thomson Inc c o Thomson 11721 B Alameda Ave Socorro Texas 79927 Pague cualquier cargo que le facture el Centro de Intercambio por servicio que no esté cubierto por garantía Asegure su empaque para prevenir pérdida o dañ...

Page 72: ...ENTALES DAÑOS DERIVADOS COMO CONSECUENCIA DEL USO DE ESTE PRODUCTO O COMO RESULTADO DEL INCUMPLIMIENTO DE CUALQUIER GARANTÍA IMPLÍCITA O EXPRESA DE ESTE PRODUCTO LA INVALIDEZ DE LAS GARANTÍAS O LAS GARANTÍAS LIMITADAS ESTÁN REGLAMENTADAS POR LAS LEYES DEL ESTADO DE INDIANA EXCEPTO POR EL ALCANCE ESTABLECIDO POR LAS LEYES APLICABLES CUALQUIER GARANTÍA IMPLÍCITA DE MERCADO O DE SALUD PARA CUALQUIER ...

Page 73: ...Formato de la Base 7 Formato de la Hora 13 Función de No Molestar 22 Función de Remarcado Automático 28 Funciones del Identificador de Llamadas Caller ID 23 G Garantía Limitada 33 Guía para Solución de Problemas 31 I Idioma de la Pantalla 13 Indicador de Llamada Nueva 17 Información de Accesorios 37 Información de Interferencias 3 Información Importante 2 Información sobre la Aprobación de Equipo ...

Page 74: ...una Llamada en Espera 20 Para Programar el Teléfono 12 Para Programar la Fecha y Hora Manualmente 13 Para Recibir Llamadas con el Altavoz 19 Para Recibir Llamadas con el Auricular 18 Para Recibir Llamadas con los Audífonos Opcionales 19 Para Recibir y Almacenar Archivos del Identificador de Llamadas 23 Para Restablecer las Programaciones de Fábrica 17 Para Revisar Archivos del Identificador de Lla...

Page 75: ...sta su tarjeta Visa Mastercard o Discover y llame al 1 800 338 0376 Se aplicará un cargo por envío al ordenar La ley nos requiere que cobremos el impuesto sobre la venta apropiado para cada estado condado y área individuales a las cuales se envíe la mercancía Los artículos están sujetos a disponibilidad ...

Page 76: ...ápolis enlistada en este manual o en la caja Esto únicamente resultará en un retraso para dar servicio a su producto Thomson Inc 10330 North Meridian Street Indianapolis IN 46290 2007 Thomson Inc Trademark s Registered Marca s Registrada s Modelo 25204 00007055 Rev 1 DOM E S 07 13 Impreso en China ...

Reviews: