background image

Connections & Setup

6                                                                                                                                                               

Connecting Other Components

The exact arrangement you use to interconnect various video and audio components to the TV is dependent on the model 
and features of each component. Check the Owner’s Manual provided with each component for the location of video and 
audio inputs and outputs.

The connection diagrams below are offered as suggestions. You may need to modify them to accommodate your particular 
assortment of components. The diagrams are intended to show component video and audio interconnections only.

Press the TV/AV button to select the AV mode to use the TV as a monitor. Operate your VCR as usual.

TV/AV Selection

If you connect the TV to a VCR, camcorder or TV game, through the audio/video in jacks, use the 
TV/AV button to make your selection. Press the TV/AV button repeatedly to select the desired mode. 
“AUX” will display on the screen for 4 seconds.

To Connect the TV to a VCR

To Connect the TV to a Video Game System

The TV can also be used as a display device for many video games. However, due to the wide variety of different types 
of signal generated by these devices and subsequent hook-up variations required, they have not all been included in the 
suggested connection diagrams. You’ll need to consult each component’s Owner’s Manual for additional information.

To Connect the TV to a Camcorder

To playback from the camcorder, connect the camcorder to the TV as shown.

(not supplied)

To Audio/Video OUT

Side of the TV

VCR

AUDIO

VIDEO

TV GAME 

To Audio/Video OUT

(not supplied)

Side of the TV

AUDIO

VIDEO

(not supplied)

To AV OUT jack

Side of the TV

AUDIO

VIDEO

AUX

Summary of Contents for 14B042

Page 1: ...Television User s Guide Models 14B042 21B042 Please read these instructions before operating this product for the first time TOCOM 1640641B Changing Entertainment Again ...

Page 2: ..._______________________ CAUTION FCC Regulations state that unauthorized changes or modifications to this equipment may void the user s authority to operate it Caution To prevent electric shock match wide blade of plug to wide slot fully insert Attention Pour éviter les chocs électriques introduire la lame la plus large de la fiche dans la borne correspondante de la prise et pousser jusqú au fond P...

Page 3: ...nce receptacles and the point where they exit from the appliance 13 LIGHTNING To protect your unit during a lightning storm or when it is left unattended and unused for long periods of time unplug it from the wall outlet and disconnect the antenna or cable system This will prevent damage to the unit due to lightning and power line surges 14 POWER LINES An outside antenna system should not be locat...

Page 4: ...ing the Remote Control Buttons on the Remote Control 6 Using the TV s Features TV Operation 8 Setting the Language 8 Setting Channels 9 Sleep Function 9 Using the Menu System Navigating the Menus 10 Using the PICTURE menu 11 Using the P LOCK menu 12 Using the TIMER menu 14 Using the PRESET menu 15 Using the EXTRA menu 16 Other Information Troubleshooting 17 Specifications 17 Additional Jacks 17 Li...

Page 5: ... 6 7 9 1 3 2 15 16 17 10 11 14 12 13 Notes The side AV jacks cannot be used with the rear AV2 jacks AV on the 14B042 simultaneously Model 14B042 does not have AV OUT AV2 or headphone jacks Back and Side of the TV 10 Antenna jack 11 VIDEO INPUT jack 12 AUDIO INPUT jack Mono 13 AUDIO OUTPUT jack Mono 14 VIDEO OUTPUT jack 15 Side VIDEO INPUT jack AV 2 16 Side AUDIO INPUT jack Mono AV 2 17 Headphone ...

Page 6: ...WER button on the remote control Antenna and Cable TV Connections Combination VHF UHF Antenna Single 75 ohm cable or 300 ohm twin lead wire Connect the 75 ohm cable from a combination VHF UHF antenna to the antenna jack If your combination antenna has a 300 ohm twin lead wire use the 300 75 ohm matching transformer not supplied Combination VHF UHF Antenna Separate VHF and UHF 300 ohm twin lead Con...

Page 7: ...to the output of the converter descrambler box usually channel 3 or 4 and use the converter descrambler box to select channels For Subscribers to Unscrambled Basic Cable with Scrambled Premium Channels If you subscribe to a cable service in which basic cable channels are unscrambled and premium channels require the use of a converter descrambler box you may wish to use a two set signal splitter so...

Page 8: ...e through the audio video in jacks use the TV AV button to make your selection Press the TV AV button repeatedly to select the desired mode AUX will display on the screen for 4 seconds To Connect the TV to a VCR To Connect the TV to a Video Game System The TV can also be used as a display device for many video games However due to the wide variety of different types of signal generated by these de...

Page 9: ...o your last channel TIMER Sets the sleep timer TV AV Toggles between regular TV programming and the Video Input Channels TV1 AV1 AV2 VOL VOLUME buttons Increases and decreases the volume Battery Precautions These precautions should be followed when using batteries in this device 1 Use only the size and type of batteries specified 2 Be sure to follow the correct polarity when installing the batteri...

Page 10: ...e to select channel 2 press 0 then 2 If you press only 2 channel selection will be delayed for a few seconds For channels 10 and above press the 2 digits in order CATV mode direct channel selection When the ANTENNA menu option is set to CABLE channels can be selected as follows 1 9 Press 0 twice then 1 9 as needed For example to select channel 2 press 002 10 12 Press 0 then the remaining 2 digits ...

Page 11: ...e to the desired setting CABLE cable TV or AIR off air antenna 4 Press the PROG or button to highlight AUTO PROGRAM then press the VOL button to begin auto channel search This may take several seconds Adding Deleting Channels 1 Press the MENU button the Main menu appears 2 Press the PROG or button to highlight PRESET CH NO Channel Number is already highlighted 3 Press the VOL or button or the numb...

Page 12: ...t P LOCK and V CHIP in this menu Timer The TIMER menu sets the clock on your TV and allows you to program your TV for scheduled viewing by using the ON OFF timer Preset The PRESET menu provides several options for your channel settings including auto channel search and adding deleting channels see Setting Channels on page 9 Extra Set Closed Captioning language and background in this menu Navigatin...

Page 13: ...crease color intensity or saturation Adjust right to increase color intensity or saturation Tint Adjust left to decrease the red tone Adjust right to increase the red tone Sharpness Adjust left to soften the picture detail Adjust right to sharpen the picture detail PICTURE P LOCK TIMER PRESET EXTRA CONTRAST BRIGHT COLOR TINT SHARPNESS Using the PICTURE menu Display Highlight PICTURE Select To sele...

Page 14: ...nter the number ENTER CODE appears in blue Reconfirm your password by entering it again If you forget your password enter 4769 as your password and change it to a new one CH Lock Channel Lock You can lock individual channels with this feature LOCK ON Turns on CH LOCK OFF Turns off CH LOCK CH AIR Select the channel you want to lock You can use VOL buttons or number buttons to input channel number N...

Page 15: ...ngs below it will also be set to VIEW if a low rating is set to BLOCK all the ratings above it will also be set to BLOCK 14 Parents strongly cautioned The following items can be set for this rating D Suggestive Dialogue L Strong language S Sexual situation V Violence MA Mature Audience only The following items can be set for this rating L Strong language S Sexual situation V Violence Y All childre...

Page 16: ... must be set to ON for this feature to work On CH Channel You can press the 0 9 number buttons or PROG buttons to select your desired channel Off Time Press the number buttons to set the hour and minute Press the VOL buttons to set AM or PM Note OFF TIME will turn off the TV automatically at preset time TIMER must be set to ON for this feature to work Note When you unplug the power cord the time w...

Page 17: ...ed in CH NO Antenna AIR Select to receive off air antenna signals CABLE Select to receive cable signals Auto Program Searches for all available channels Note TIMER ON TIME ON CH and OFF TIME items in the TIMER submenu will be reset when AIR CABLE modes are switched Using the PRESET menu Display Highlight PRESET Select PICTURE P LOCK TIMER PRESET EXTRA CH NO 10 CH ADDED ANTENNA AIR AUTO PROGRAM To ...

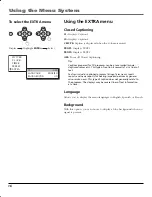
Page 18: ...rams can be pre recorded movie daytime dramas etc This type of caption is normally 1 or 2 lines of text Text can include captioned program listings farm news sports reports and news reports for hearing impaired persons or general wire service news This type of caption does not generally relate to the program The displays may be several lines of text information at a time Language Allows you to dis...

Page 19: ...ts Station or CATV experiencing problems tune to another station CATV company is scrambling signal Check antenna orientation No CATV reception Check CATV connections Make sure Antenna Mode is correct Station or CATV system problems try another station Horizontal or diagonal bars on screen Check antenna connections and reorient antenna Make sure Antenna Mode is correct Check for source of possible ...

Page 20: ...The return of the card is not required for warranty coverage Limitation of Warranty THE WARRANTY STATED ABOVE IS THE ONLY WARRANTY APPLICABLE TO THIS PRODUCT ALL OTHER WARRANTIES EXPRESS OR IMPLIED INCLUDING ALL IMPLIED WARRANTIES OF MERCHANTABILITY OR FITNESS FOR A PARTICULAR PURPOSE ARE HEREBY DISCLAIMED NO VERBAL OR WRITTEN INFORMATION GIVEN BY TTE TECHNOLOGY INC ITS AGENTS OR EMPLOYEES SHALL C...

Page 21: ...dos en el domicilio del cliente 4 El tiempo de reparación en ningún caso será mayor a 30 días contados a partir de la recepción del producto en el Centro de Servicio Autorizado 5 Para la adquisición de partes y accesorios contactar al 01 800 1117221 o acudir a TTE México NOTAS En caso de extravío de la póliza el consumidor podrá recurrir a su distribuidor para su reposición previa presentación de ...

Page 22: ...660 VERACRUZ Serv Técnicos Prof Av 13 No 400 Esq Calle 4 Col Bella Vista Córdoba Ver C P 94500 Tel 271 7127322 Fax 271 7122539 Electrónica Arizona Acosta No 9 Zona Centro Jalapa Ver C P 91000 Tel 228 8903561 y 62 Electrónica Digital Av Juárez No 516 Col 27 de Septiembre Poza Rica Ver C P 93320 Tel 782 8229899 Tel Fax 782 8236949 Electrónica DICA F del Paso y Troncoso No 908 Col Centro Veracruz Ver...

Page 23: ......

Page 24: ...site at www rca com IMPORTER for Mexico only TTE México S A de C V Álvaro Obregón No 151 Piso 13 Col Roma Delegación Cuauhtémoc C P 06700 México D F Teléfono 52 55 11 020360 RFC TME 040528 7S2 2004 TTE Technology Inc Trademark s Registered Marca s Registrada s Printed in Mexico TOCOM 1640641B EXPORTER TTE Technology Inc 10330 North Meridian Street Indianapolis IN 46290 ...

Reviews: