Razor POCKET MOD BELLEZZA Owner'S Manual Download Page 8

Charger

7

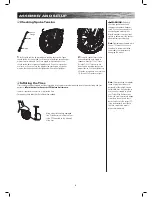
Your Pocket Mod Bellezza may not have a fully charged battery; therefore it is a good idea to charge the battery prior to use. 

Make sure the power switch 

is in the 

OFF 

position. Plug the 

charger into the charger port 

on the product. The light on the 

charger should turn red during 

charging. The light will turn green 

when charging is complete.

Plug the charger plug into wall 

outlet. The light on the charger 

should be green. 

Note:

 If green light (LED) does not 

turn on, try a different outlet.

Note: 

Make sure power is turned 

OFF

 when unit is not in use. If 

the power switch is left on for an 

extended period of time, the battery 

may reach a stage at which it will 

no longer hold a charge.

• Initial charge time: 12 hours.
• Recharge time: up to 12 hours, even if the light turns 

green. Recommended maximum charging time is  

24 hours.

• Always charge the battery immediately after riding.
• Fully charge battery before storing for extended periods 

of time.

• Unplug charger from the wall outlet when not in use.
• Failure to recharge battery periodically may result in a 

battery that will not accept a charge.

• Make sure power switch is turned 

OFF

 when unit is not 

in use. If the power switch is left on for an extended 

period of time, the battery may reach a stage at which 

it will no longer hold a charge.

• To ensure long battery life, never store the product in 

freezing or below freezing temperatures! Freezing will 

permanently damage the battery.

• Run time: Up to 70 minutes of continuous ride time. 

Run time may vary depending on riding conditions, rider 

weight, climate and/or proper maintenance.

• Constant stopping and starting may shorten ride time.
• Battery life can vary depending on proper maintenance 

and usage of the unit.

WARNING:

 Use ONLY with 

the recommended charger. Batteries 

are only to be charged under adult 

supervision. The charger is not a 

toy. Always disconnect the charger 

before wiping down and/or cleaning 

the Pocket Mod Bellezza with a 

damp cloth.

The charger supplied with the 

Pocket Mod Bellezza should be 

regularly examined for damage to 

the cord, plug, enclosure and other 

parts. In the event of such damage, 

the Pocket Mod Bellezza must 

not be charged until it has been 

repaired or replaced.

Chargers have built-in overcharge 

protection to prevent battery from 

being overcharged. 

Note:

 If the charger gets warm 

during regular use, this is a normal 

response and is no cause for 

concern. If your charger does not get 

warm during use, it does not mean 

that it is not working properly. 

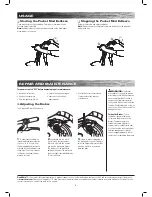
Wall outlet - Green (stand by)

Wall outlet and unit - Red (charging)

Wall outlet and unit - Green (charged)

Note:

 Continue charging unit even if 

light turns green prior to 12 hours.

WARNING:

 Battery charge 

can deplete over time. Periodically 

recharge battery when not in use.

CHARGING THE  BATTERY
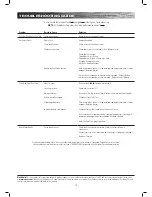
PRE-RIDE CHECK LIST

Brakes

Check the brakes for proper function. When you squeeze the 

levers, the brakes should provide positive braking action.  

When you apply the brakes with the speed control on, the 

brakes cut-off switch will stop the motor.

Tires

Periodically inspect the tires for excess wear, and regularly 

check the tire pressure and reinflate as necessary. If you get 

a flat tire, the inner tube can be patched or a new tube can be 

purchased from Razor or an authorized service center.

Frame, Fork and Handlebars

Check for cracks or broken connections. Although broken frames 

are rare, it is possible for an aggressive rider to run into a curb 

or object and wreck, bend or break a frame. Get in the habit of 

inspecting your product on a regular basis.

Hardware/Loose Parts

Before every ride, check all parts, such as nuts, bolts, cables, 

fasteners, etc., to ensure they are secure and assembled correctly. 

There should not be any unusual rattles or sounds from loose 

parts or broken components. If the unit is damaged, do not ride. 

Reference “Safety Warnings” on pages 1 and 2 of  

this manual.

Safety Gear 

Always wear proper protective gear, such as an approved safety 

helmet. Elbow pads and kneepads are recommended. Always wear 

athletic shoes (lace-up shoes with rubber soles) and keep shoelaces 

tied and out of the way of the wheels, motor and drive system. 

NEVER RIDE BAREFOOTED OR IN SANDALS.

Laws and Regulations

Always check and obey any local laws or regulations.

Insurance

Do not assume that your existing insurance policies necessarily 

provide coverage for electric product use. Check with your 

insurance company for information regarding insurance.

Summary of Contents for POCKET MOD BELLEZZA

Page 1: ...nual illustrations are for demonstration purposes only Illustrations may not reflect exact appearance of actual product Specifications subject to change without notice Please have your product along with the 19 character product I D code with you before contacting Razor for warranty assistance and or replacement parts Product I D Code _____________ ____________ ____________ ...

Page 2: ...ng the consequences of failing to maintain inspect or properly use your electric ride on product Because any incident can result in serious injury or even death we do not repeat the warning of possible serious injury or death each time such a possibility is mentioned DO NOT EXCEED THE WEIGHT LIMIT OF 220 lb 100 kg Rider weight does not necessarily mean a person s size is appropriate to fit or main...

Page 3: ... A long sleeved shirt long pants and gloves are recommended Always wear athletic shoes lace up shoes with rubber soles and keep shoelaces tied and out of the way of the wheels motor and drive system Never ride barefooted or in sandals USING THE CHARGER The charger supplied with the Pocket Mod Bellezza should be regularly examined for damage to the cord plug enclosure and other parts In the event o...

Page 4: ...ted Assembly and Set Up Time Razor recommends assembly by an adult Allow up to 15 minutes for assembly Allow up to 12 hours for initial charge see page 7 for charging information WARNING DO NOT USE NON RAZOR PRODUCTS WITH YOUR RAZOR POCKET MOD BELLEZZA The Pocket Mod Bellezza has been built to certain Razor design specifications The original equipment supplied at the time of sale was selected on t...

Page 5: ...rs so the throttle is on your right the red SAFETY ZONE print will be facing you Align wedge inside handlebar tube 5 Slowly slide the handlebars up to make certain that the bar is in the SAFETY ZONE Failure to secure the handlebars within the safety zone can cause the handlebars to come out while riding WARNING Periodically check to make sure the steering bolt is tightly fastened Note Failure to s...

Page 6: ...levers to adjust the angle of the brake levers to a comfortable position for the rider 2 When desired position is reached re tighten bolt until brake levers are securely in place 1 Remove the plastic packing material from the front fork 2 Insert the wheel into the front fork with the lock washers on the outside of the fork 3 Insert the tab on the lock washer into the hole on the front fork and tig...

Page 7: ...Spoke Tension 1 Verify spoke tension by grasping and shaking each spoke Spoke should not be loose from hub Look for any play between spoke flanges where it mates with hub Try to turn nipple using your fingers You should not be able to spin any nipple by hand If one or more spokes are loose or if you can turn any nipple using your fingers all spokes must be checked and need to be tightened with a s...

Page 8: ...ch damage the Pocket Mod Bellezza must not be charged until it has been repaired or replaced Chargers have built in overcharge protection to prevent battery from being overcharged Note If the charger gets warm during regular use this is a normal response and is no cause for concern If your charger does not get warm during use it does not mean that it is not working properly Wall outlet Green stand...

Page 9: ...our fingers to twist the caliper adjuster in either direction until disc is centered between pads 1 To adjust brake cable play thread the brake lever adjuster in or out 1 4 to 1 2 turn until the desired brake adjustment is attained Most adjustments are complete at this step If brakes still needs further adjustment proceed to step 2 WARNING The brakes are capable of causing the electric motor bike ...

Page 10: ...heel by slipping the chain around the axle Slide the wheel forward and maneuver the chain onto the rear sprocket motor sprocket and chain tensioner 5 Reattach the chain guard 4 Verify chain is properly installed on each sprocket and chain tensioner is correctly positioned at the bottom of the chain Note The arrangement of the hardware sequence Left Side Brake 21 1 15 mm Locknut 21 2 Lock Washer Fr...

Page 11: ... of the front wheel then remove front wheel 2 Insert replacement wheel into the front fork 3 Re insert the tab on the lock washers into the holes on the front fork and tighten the locknuts on both sides of the wheel REPAIR AND MAINTENANCE 1 Open up seat and loosen the four 4 Phillips screws located inside the storage compartment and remove tray 3 Remove the fuse and replace with a new one of equal...

Page 12: ... the electric product should be regularly examined for damage to the cord plug enclosure and other parts and in the event of such damage the product must not be charged until it has been repaired or replaced Use ONLY with the recommended charger Wheels Wheels and drive system are subject to normal wear and tear It is the responsibility of the user to periodically inspect wheels for excess wear and...

Page 13: ...motor engages Replace Battery If motor does not engage but makes a clicking sound Replace Battery If motor does not engage no clicking sound Replace Control Module Short Ride Time Runs Slow Rider s weight Low tire pressure Riding conditions Battery not fully charged Old damaged Battery Improper battery maintenance Do not exceed 220 lb maximum weight limit Check tires for correct PSI Use only on fl...

Page 14: ...ite or e mail us for more information on spare part availability Specifications subject to change without notice 1 Handlebar Grip Right Left 2 Single Speed Twist Grip Throttle 2 1 Sleeve 3 Front Brake Lever Assembly right 4 Handlebars 5 6 mm Stem Bolt w Wedge 6 Rear Brake Lever assembly left 7 Headset Upper Lower 8 Front Fairing w Head Lamp Cover 9 Front Fairing Cover 10 Front Wheel Complete 11 Fr...

Page 15: ...ANCE YOUR INSURANCE POLICIES MAY NOT PROVIDE COVERAGE FOR ACCIDENTS INVOLVING THE USE OF THIS SCOOTER ELECTRIC RIDE ON PRODUCT TO DETERMINE IF COVERAGE IS PROVIDED YOU SHOULD CONTACT YOUR INSURANCE COMPANY OR AGENT ...

Page 16: ...embly maintenance storage or use of the Razor Pocket Mod Bellezza This Limited Warranty will be void if the product is ever used in a manner other than for recreation or transportation modified in any way rented The manufacturer is not liable for incidental or consequential loss or damage due directly or indirectly to the use of this product Razor does not offer an extended warranty If you have pu...

Reviews: