Razor eSpark Owner'S Manual Download Page 9

 REPAIR AND MAINTENANCE 

8

7


With two (2) 13mm wrenches, 

re-tighten the locknuts. 

8


Re-attach the chain guard.  

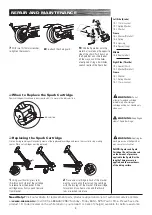
When to Replace the Spark Cartridge 

Spark cartridge will continue to emit sparks until it is worn to the indicator line.  

Indicator line  

2


Place a new cartridge in back of the bracket 

making sure to align the slots on the cartridge 

with the two legs of the bracket. Slide cartridge 

forward until you hear a click and the thumb 

tabs are locked into place.

1


Using your thumbs, press tabs  

(A & B) on both sides of the cartridge 

to release from the bracket. Slide 

cartridge away from you and remove 

from bracket.

A

B

Replacing the Spark Cartridge 

       WARNING:


Applying too 

much pressure on the Spark Bar 

may cause loss of control.

NOTE:


Sparks and Spark 

Cartridge life will vary based  

on the amount of pressure 

applied to the Spark Bar, the 

length of time pressure is 

applied, and the smoothness  

of the riding surface.

       WARNING:


Do not 

attempt to replace cartridge 

immediately after riding as 

cartridge will be hot. Handle only 

when cool.

       WARNING: 

Keep fingers 

clear of Spark Bar hinge .

Friction during sparking will eventually wear out the replaceable cartridge and cause the scooter to stop making 

sparks. Worn out cartridges must be replaced. 

9


Slide the Spark Bar onto the 

metal bar located on the opposite 

side of the chain. Push down on 

the Spark Bar and slide the bar 

all the way on until the holes 

are aligned. Using a 5mm Allen 

wrench reattach the Spark Bar.

Right Side (Throttle)

18-4  Spacer (Short)
18-3  Washer (Plate Cut)

Frame

18-2  Washer
18-7  Spring Washer
18-1  13 mm Locknut

Left Side (Brake)

18-1  13 mm Locknut
18-7  Spring Washer
18-2  Washer

Frame

18-3  Washer (Plate Cut)
18-4  Spring
18-5  Housing
18-6  Spacer (Long)

Middle

18-8  Rear Axle Bolt

Need Help?

 Visit our website for replacement parts, product support and a list of authorized service centers 

at 

www.razor.com

 or call toll free 866-467-2967


Monday - Friday 8AM - 5PM Pacific Time. Please have the 

product I.D. code (located on the white label on your product or back of charger) available for better assistance.

Summary of Contents for eSpark

Page 1: ...ing the throttle to engage motor NOTE Manual illustrations are for demonstration purposes only Illustrations may not reflect exact appearance of actual product Specifications subject to change without...

Page 2: ...and only use where allowed and with caution Do not activate the speed control on the hand grip unless you are on the scooter and in a safe outdoor environment suitable for riding The scooter must acc...

Page 3: ...oved safety helmet with chin strap securely buckled elbow pads and kneepads A helmet may be legally required by local law or regulation in your area A long sleeved shirt long pants and gloves are reco...

Page 4: ...IC SCOOTER The scooter has been built to certain Razor design specifications The original equipment supplied at the time of sale was selected on the basis of its compatibility with the frame fork and...

Page 5: ...he stem into the fork WARNING Failure to properly tighten the collar clamp may allow the handlebars to dislodge while riding and may cause you to lose control and fall When correctly tightened the han...

Page 6: ...freezing or below freezing temperatures Freezing will permanently damage the battery Run time Up to 40 minutes of continuous ride time Run time may vary depending on riding conditions climate and or...

Page 7: ...it is possible for an aggressive rider to run into a curb or a wall and wreck bend or break a frame Get into the habit of inspecting your scooter on a regular basis Tires Periodically inspect the tir...

Page 8: ...00 Rear Wheel Sequence 18 1 18 7 18 2 18 3 18 4 18 4 18 3 18 2 18 7 18 1 18 8 18 5 18 6 1 Using a 10mm wrench loosen the brake cable bolt q Front Wheel Replacement Tools required 10mm wrench and two 2...

Page 9: ...attempt to replace cartridge immediately after riding as cartridge will be hot Handle only when cool WARNING Keep fingers clear of Spark Bar hinge Friction during sparking will eventually wear out the...

Page 10: ...harger supplied with the electric scooter should be regularly examined for damage to the cord plug enclosure and other parts In the event of such damage the product must not be charged until it has be...

Page 11: ...Replace Battery If motor does not engage no clicking sound Replace Control Module Short Ride Time Runs Slow Rider weight Riding conditions Battery not fully charged Old damaged battery Tire is not pr...

Page 12: ...le for better assistance 01 02 1 02 03 04 01 05 06 07 08 09 10 11 12 13 14 15 16 17 18 19 20 21 22 23 24 25 01 Handlebar Grip right left 02 Single Speed Twist Grip Throttle 02 1 Sleeve 03 Handlebar St...

Page 13: ...DECLARATION YOUR INSURANCE POLICIES MAY NOT PROVIDE COVERAGE FOR ACCIDENTS INVOLVING THE USE OF THIS SCOOTER ELECTRIC RIDE ON PRODUCT TO DETERMINE IF COVERAGE IS PROVIDED YOU SHOULD CONTACT YOUR INSUR...

Page 14: ...Design are among the registered trademarks of Razor USA LLC in the United States and or select foreign countries The manufacturer is not liable for incidental or consequential loss or damage due direc...

Reviews: