Raypak RayTemp Installation & Operating Instructions Manual Download Page 18

18

ered by 5°F. Then for each 24-hour period that heater

demand is less than one half of DA, the setpoint is

increased by 1°F until the original value is restored.

The default value is 70%. The PERFORMANCE DATA

screen titled Temp Reduced by ASL Strategy will show

a value other than zero if this strategy is in effect.

Default Value 70.

Return Temperature

The return sensor is used to compensate for seasonal

changes in loop heat loss. The strategy may raise the

supply/branch temperature in cold weather to ensure

that the last rooms on the loop have hot enough water

even during low demand periods.

R0 - SELECT - Return Sensor Installed:

Select YES

if this sensor is connected, otherwise select NO.

Default is YES.

R1 - SELECT - Minimum Return Temperature:

If the

return temperature drops below this value then the

return sensor strategy will be activated. Above this

value, the strategy will have no effect on desired tem-

perature.

Default Temp 108°F.

R2 - SELECT - Return Sensor Response:

This is a

multiplier which increases the desired temperature as

the return temperature drops. Example: desired = 130,

return = 100, R1 (above) = 102, R2 = 5. The desired

temperature will be increased to 140 = 130 + (102-

100) X 5.

Default Value is 1.

Branch Temperature - Not

Used

B0 - SELECT - # of Branch Sensors Installed:

Not

used.

Relay Sequencing

(4-Stage Control)

HS - SELECT - # of Heaters:

Enter 1 thru 4 for the

number of heaters connected to relay outputs 1 thru 4.

This allows the RayTemp to correctly sequence

heaters and record demand.

SP - SELECT - Stages Per Heater:

Enter the number

of stages in each heater, from 1 to 4.

SQ - SELECT - Firing Options:

Four options for

stage sequencing are available. Select number 1, 2, or

3 as follows:

#1 No Lead/Lag: Stage 1 of heater #1 always fires

first. The remaining stages and heaters will fire in

order as demand increases.

#2 24-Hour Rotation: At midnight each day, the firing

order is rotated to the next heater. This distributes

the work load equally among all heaters.

#3 Lead/Lag & Rotate: With this option, heater #1

always fires first, then the remaining heaters fire in

rotation. Since some flue designs require heater

#1 to fire first; this option meets this requirement

while still providing limited rotation.

US - SELECT

- Use 24volt on/off sensing.

Do not use.

DD - SELECT - Differential:

Increasing DD lengthens

the heater burn cycle; decreasing DD improves tem-

perature stability. For instance: desired=140,

deadband=1, heater turns off at 141 and on at 139.

This deadband applies equally to all stages.

D1 - SELECT - Temperature Delay Between Stages

(In addition to differential setting):

This value caus-

es successive output stages to come on according to

the deviation to target temperature. D1 activates addi-

tional heaters or stages as demand increases. For

example with a setpoint of 140°F and a temperature

delay of 1°F, stage 1 will fire at 140, stage 2 at 138,

stage 3 at 136, etc., assuming 2°F deadband.

RL - TEXT - Relay Logic (1-12):

The default value is

++++++++++++.

Relay Sequencing

(2-Stage Control)

HS - SELECT - # of Heaters:

Enter 1 or 2 for the num-

ber of heaters connected to relay outputs 1 and 2. This

allows the RayTemp to correctly sequence heaters

and record demand.

SP - SELECT - Stages Per Heater:

Enter the number

of stages in each heater, 1 or 2.
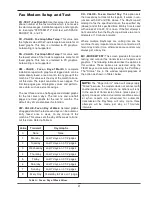
NOTE:

If you select minus (-) and the RayTemp

loses power or fails, then the heater or pump will

remain off!!! Edit text with SPACE, BACKSP, F4, and

F5 to return to a plus setting.

Summary of Contents for RayTemp

Page 1: ...ATION OPERATING INSTRUCTIONS Catalog No 5000 61E Effective 09 08 10 Replaces 02 06 08 P N 241098 Rev 6 For Raytherm Hi Delta Hot Water Supply Boilers Water Heaters RayTemp Hot Water Energy Management...

Page 2: ...Fig 1 on page 6 Fig 4 on page 8 20 characters was 20 lines on page 10 screen code index on pages 14 15 Additions Warnings and notes on page 3 General Safety information on page 4 contact number for Pr...

Page 3: ...lay 11 Reading Logged Data Not All Models 12 Using Your PC PTT and Modem to Call a Control 12 PROGRAMMING 13 Quick Reference 13 First Screen at Power up 16 Manual Override 16 View Sensors and Relays 1...

Page 4: ...ignored NOTE Indicates special instructions on installation operation or maintenance which are important but not related to personal injury hazards WARNINGS Pay Attention to These Terms NOTE Piping di...

Page 5: ...r stream and read the thermometer NOTE When this water heater is supplying general purpose hot water for use by individuals a thermo statically controlled mixing valve for reducing point of use water...

Page 6: ...and increases the life of the system The control is preprogrammed with typical settings making installation very simple However the program values can be adjusted to accommodate many types of water h...

Page 7: ...he pipe Overlap each turn and DO NOT STRETCH the tape On the sensor end roll the shielding and tape so it will not contact a conductor On the control end the shield should be grounded Do not ground bo...

Page 8: ...8 Fig 4 Installation Layout Installation Layout...

Page 9: ...ter Connecting the Optional ELSA Brand Modem Raypak recommends the ELSA Microlink 56k modem for data communication This modem will work with RayTemp and technical support will be provided if this mode...

Page 10: ...re than two degrees there may be a problem with how the sen sor is attached Also check for correct wiring at the terminal block Next select the RELAY STATUS screen and manual ly verify that you can tu...

Page 11: ...o your CD drive Double click on the folder Ptt258 then double click on Install The PTT communication soft ware will then be installed on your C GBX subdirectory To run PTT type PTT then press enter fr...

Page 12: ...rts and graphs to any supported printer When this item is selected a directory of data files will appear Point to a file using the arrow keys then press enter to select the file A check mark will appe...

Page 13: ...e front panel or by using a laptop For information on connection with a LapTop using PTT software refer to the previous section The following keys provide access to all RayTemp dis play and programmin...

Page 14: ...est modem or fax 16 17 16 21 PD PERFORMANCE DATA Savings Analysis 19 DN PN SL FN TEXT Company Name TEXT Property Name TEXT Site Location TEXT Disk File Name 20 20 20 20 MS SH AD FD PW PM RL TEXT Modem...

Page 15: ...ate Residents SELECT Day of Month for Savings Test SELECT Old Maximum Supply Temperature 19 19 HS SP SQ US DD D1 SELECT of water heaters SP SELECT stages per heater SQ SELECT Alternating Relay Sequenc...

Page 16: ...AUD rate on your LapTop garbage charac ters will appear Zero Run Meters set all run time meters to zero Erase History sets all 7 day and 365 day history to 30 Reset Program sets all program values to...

Page 17: ...tures which can be scheduled for any purpose They will become the max imum and minimum supply temperature if the Extra schedule is activated by the time clock Default Temp 140 F C7 SELECT Minimum Extr...

Page 18: ...g Options Four options for stage sequencing are available Select number 1 2 or 3 as follows 1 No Lead Lag Stage 1 of heater 1 always fires first The remaining stages and heaters will fire in order as...

Page 19: ...press SPACE or BKSP until Inactive appears The RayTemp will automati cally restore actual sensor values 30 minutes after exiting this screen Savings Test Setup S1 SELECT Day of Month for Savings Test...

Page 20: ...tallation reports Edit with SPACE BACKSP F4 and F5 PN TEXT Property Name Accepts entry of site name into RayTemp memory This information will appear in installation reports Edit with SPACE BACK SP F4...

Page 21: ...t 7 days on 3 1 2 pages 2 Tuesday Last 7 days on 3 1 2 pages 3 Wednesday Last 7 days on 3 1 2 pages 4 Thursday Last 7 days on 3 1 2 pages 5 Friday Last 7 days on 3 1 2 pages 6 Saturday Last 7 days on...

Page 22: ...Fax Today Detailed graph for one day today 1 Fax Yesterday Detailed graph for one day yesterday 1 Fax All Report and all graphs 7 Status Description blank No Activity Sending Transmission in process T...

Page 23: ...ty call or write RAYPAK INC 2151 Eastman Avenue Oxnard CA 93030 805 278 5300 Service Return Authorization Procedure Raypak will not accept a returned unit unless the buyer has received prior authoriza...

Page 24: ...Raypak Inc 2151 Eastman Avenue Oxnard CA 93030 805 278 5300 805 278 5495 www raypak com...

Reviews: