5973132-10
8. If "
VENTILATION (N.O)
" was selected, the distance the door is to open needs to be set. The display should read "
OPEN
VENT TIME
" , the distance is determined by the number of seconds the door will open. This is done in 1 second intervals
from 3 to 30 seconds. Use the open and close buttons on the board to set the time. Press the
stop button
to
continue
to
the next option.
9. If "
FIRE STATION (N.O)
" was selected, the timer to close needs to be set. "
FS: TIME TO CLOSE
" will display. This is
done in 10 second intervals from 60 to 900 seconds. Use the open and close buttons on the board to set the time. Press
the
stop button
to
continue
to the next option.
10. "
AUX INPUT 2 TYPE
" will display, this is used for a second auxiliary contact to open or close the door. Repeat steps 7
through 9 if a second auxiliary contact is required.
11. "
MIDWAY STOP
", this allows the door to stop midway through the open cycle. If a midway stop is not required, select
"
OFF
". If the midway stop is required, select "
ON
". Press the
stop button
to
continue
.
12. If a midway stop is requried, "
MIDWAY TIME
" will display, the distance is determined by the number of seconds the door
will open. This is done in 1 second intervals from 3 to 30 seconds. Use the open and close buttons on the board to set
the time. Press the
stop button
to
continue
to the next option.
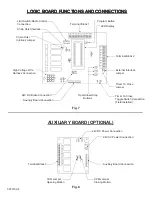
13. If there is no auxiliary board, then programming the logic board is complete. If there is an auxiliary board, then continue
through steps 14 - 16.
14. "
LIGHT ON TIME
" will display, this is used to turn on a light and shut off a light after a determined amount of time. This is
done in 10 second intervals from 10 to 240 seconds. Use the open and close buttons on the board to set the time. Press
the
stop button
to
continue
to the next option.
15. "
CLOSE WARNING LIGHT
" will display, this is used to activate a warning light a determined amount of time before the
door times out and closes. If no warning light is required, select "
OFF
". If a warning light is required, select "
ON
".
Press the
stop button
to
continue
.
16. If a warning light is "
ON
", "
WARNING TIME
" will display. The time is set in 1 second intervals from 3 seconds to 10
seconds. If there is a timer to close, the close warning light time must be set lower than the timer to close time. Use the
open and close buttons on the board to set the time. Press the
stop button
to
end
programing.
SPECIAL PROGRAMMING INSTRUCTIONS
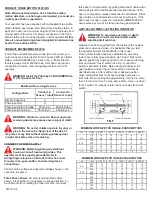
The maximum run timer and reverse limits option are factory set and you are not required to set these in the initial set up.
However, in the event that you need to modify either one of these options, use the instructions below.
Maximum Run Timer
To help prevent damage to the operator, it is supplied with a maximum run timer (factory set at 40 seconds) with a maximum
run time of 120 seconds.
To change factory default, press and hold the stop button and program button until you enter the programing mode. Once in
the program, release both buttons. Then press and hold the program button for approximately 30 seconds, or until an
asterisk shows up on the screen. Then release the program button. You can now use the stop button to advance through the
program until you see the maximum run timer. Use the open and close buttons to adjust the time. Once finished, use the
stop button to advance the rest of the way through the program.
Reverse Limits
For ease of changing the operator position, it has been supplied with a “reverse limits” option. If you need to switch the open
and close limit switches, press and hold the stop button and program button until you enter the programming mode. Once in
the program, release both buttons. Then press and hold the program button for approximately 30 seconds, or until an
asterisk shows up on the screen. Then release the program button. You can now use the stop button to advance through the
program until you see the reverse limits option. Use the open and close buttons to select “yes” or “no” (factory default is “no”).
Once finished, use the stop button to advance the rest of the way through the program.


