background image

10

Rotary Drive - Installation Guide

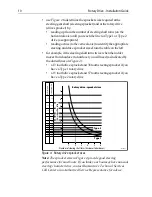
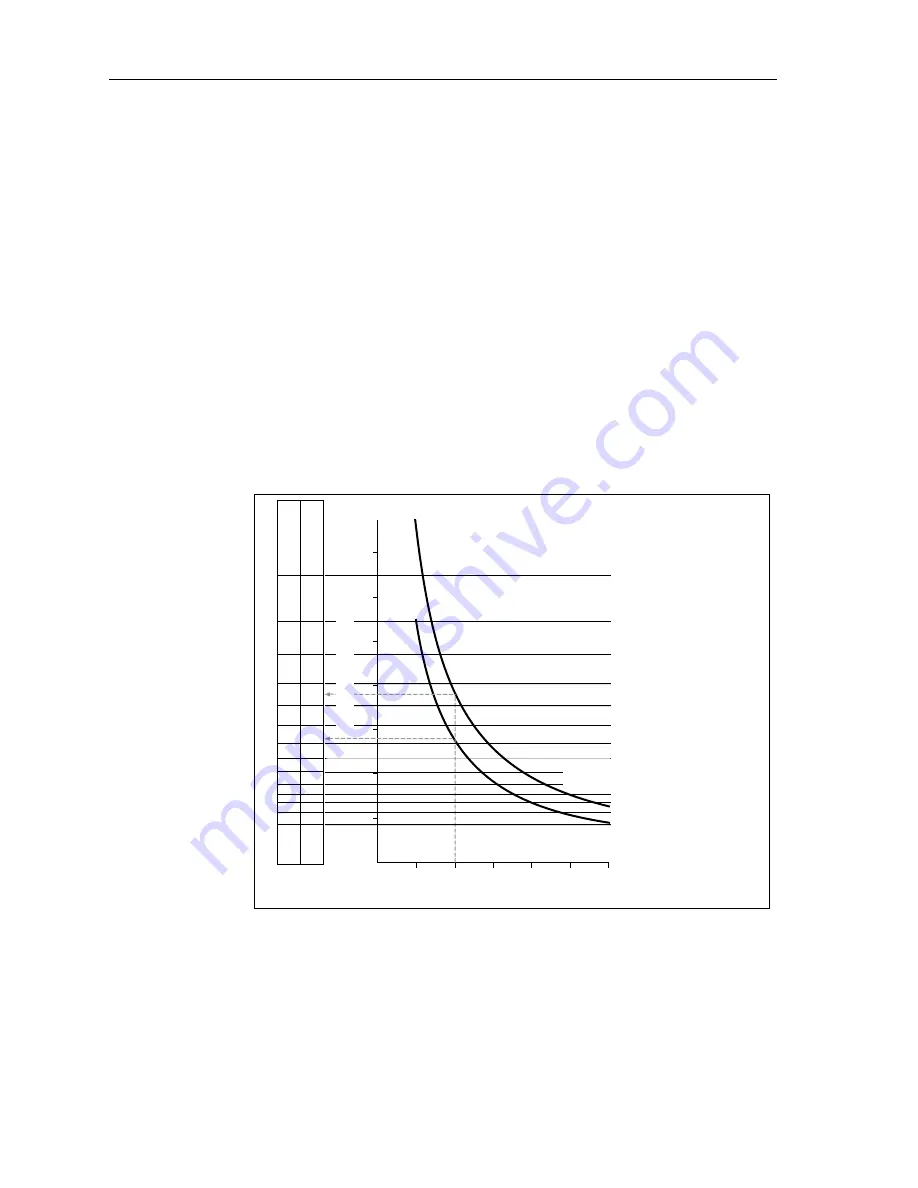
use Figure 4 to determine the sprocket sizes required at the 
steering gear shaft (steering sprocket) and at the rotary drive 
(drive sprocket) by:

reading up from the number of steering shaft turns (on the 
horizontal axis) until you reach the line for Type 1 or Type 2 
drive (as appropriate)

reading across (to the vertical axis) to identify the appropriate 
steering and drive sprocket sizes from the table on the left 

for example, if the steering shaft turns twice when the rudder 
moves from hardover to hardover you will need (as indicated by 
the dotted lines on Figure 4):

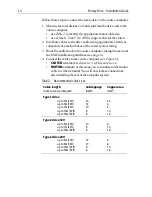
a 13 tooth drive sprocket and 38 tooth steering sprocket if you 
have a Type 1 rotary drive

a 15 tooth drive sprocket and 57 tooth steering sprocket if you 
have a Type 2 rotary drive


Figure 4: Rotary drive sprocket sizes

Note: The sprocket sizes in Figure 4 provide good steering 
performance for most boats. If you think your boat may have unusual 
steering characteristics, contact Raymarine’s Technical Services 
Call Center or an Authorized Service Representative for advice.

17
19
25

15

13

17

15

13

17

15

13

15

13

Steering sprocket

Drive sprocket

76

76

57

57

57

38

38

38

25

25

25
25
25

1

2

3

4

5

6

1

2

3

4

5

6

7

Number of steering shaft turns (hardover to hardover)

Chain reduction ratio

Rotary drive - sprocket sizes

Type 1

Type 2

D5083-1

Summary of Contents for Rotary Drive

Page 1: ...Distributed by Any reference to Raytheon or RTN in this manual should be interpreted as Raymarine The names Raytheon and RTN are owned by the Raytheon Company...

Page 2: ...Rotary Drive Installation Guide Drives covered M81135 Type 1 Rotary Drive 12 V M81136 Type 2 Rotary Drive 12 V M81137 Type 2 Rotary Drive 24 V Document number 81174 3 March 2001...

Page 3: ...e and navigational judgement Always maintain a permanent watch so you can respond to situations as they develop EMC conformance All Raymarine equipment and accessories are designed to the best industr...

Page 4: ...ng design of the Raymarine rotary drive unit provides smooth powerful autopilot controlled steering with quiet operation The main parts of the drive are a rugged electric motor that drives a precision...

Page 5: ...24 V Maximum boat displacement 10 000 kg 22 000 lb 20 000 kg 44 000 lb Peak output torque 20 Nm 180 lb in 34 Nm 300 lb in Maximum shaft speed 33 rpm 33 rpm Recommended hardover to hardover time no loa...

Page 6: ...nd grub screws for drive and steering system see page 9 thread locking compound suitable drive chain see page 9 suitable cable and electrical connectors for the drive motor and clutch see page 13 Note...

Page 7: ...en to ensure that they will perform under all conditions it is important to understand what factors could affect the operation of the product The guidelines given here describe the conditions for opti...

Page 8: ...perating mode Raymarine specified cables are used Cutting and rejoining these cables can compromise EMC performance and must be avoided unless doing so is detailed in the installation manual Ifasuppre...

Page 9: ...tantial frame member in the boat In some cases you may need to build a special frame to mount the drive unit To prevent excess noise andvibration do not attach this drive to any structures that suppor...

Page 10: ...between a sprocket on the drive and a sprocket on the boat s steering shaft Note Most steering gear manufacturers supply special autopilot drive attachments and many include this as standard Contact y...

Page 11: ...ed by the dotted lines on Figure 4 a 13 tooth drive sprocket and38 toothsteering sprocket if you have a Type 1 rotary drive a 15 tooth drive sprocket and57 toothsteering sprocket if you have a Type 2...

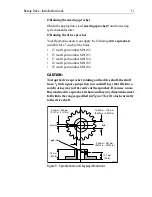
Page 12: ...85 25 tooth part number M81186 CAUTION To stop the drive sprocket rotating on the drive shaft the shaft has a 1 8 inch square projection a woodruff key that fits into a notch or keyway at the centre o...

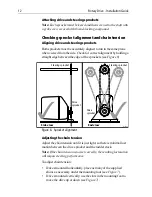
Page 13: ...ckets see Figure 6 Figure 6 Sprocket alignment Adjusting the chain tension Adjust the chain tension until it is just tight so there is minimal lost motion between the drive sprocket and the rudder sto...

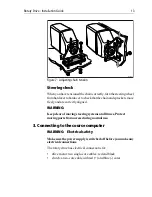
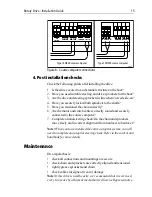
Page 14: ...rrectly aligned WARNING Keep clear of moving steering systems at all times Protect moving parts from access during normal use 3 Connecting to the course computer WARNING Electrical safety Make sure th...

Page 15: ...EMC installation guidelines see page 6 4 Connect the cables to the course computer see Figure 8 CLUTCH terminals red core to ve blue core to ve MOTOR terminals at this stage you can connect either mot...

Page 16: ...e a hand steering check Do the chain and sprockets move freely and in correct alignment from hardover to hardover Note When you have installed the entire autopilot system you will needtocompleteanauto...

Page 17: ...e can cause adjacent pieces of electrical equipment to interact with one another with a consequent adverse effect on operation In order to minimize these effects and enable you to get the best possibl...

Reviews: