


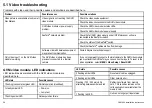


5.1 Video troubleshooting
Problems with video and their possible causes and solutions are described here.
Problem
Possible causes
Possible solutions
Check the video source equipment.
Video signal is not reaching the GVM
video module.
Check the video connections to the GVM video module.
Check the GVM video module status LEDs.
GVM video module or power supply
problem.
Check the GVM video module power supply.
Check that all GVM video module and all GPM processor units are
connected to the SeaTalk
hs
switch.
Check the status of the SeaTalk
hs
switch.
SeaTalk
hs
network problem.
Check that SeaTalk
hs
cables are free from damage.
Video picture is unavailable at some or all
Nav Stations.
Software mismatch between equipment
may prevent communication.
Contact Raymarine technical support.
Only Video Input 1 on the GVM video
module is working.
The GVM video module has been
previously connected to a thermal
camera.
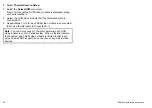
If you no longer want to connect a thermal camera to the GVM video module
you must reset the GVM before you can use its other inputs. To reset, in the
video application, select
MENU > Video Setup > Reset GVM
.
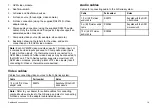
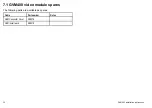
GVM video module LED indications
LED indications associated with the GVM video module are
described here.
LED state
Possible causes
1 flashing (various rates) green LED.
Normal operation (Heartbeat).
1 steady amber LED.
• Power on.
• Lamp test.
1 flashing amber LED.
Data acquisition failure.
LED state
Possible causes
2 flashing amber LEDs.
No network / cable unplugged.
3 flashing amber LEDs.
Other network error.
Flashing (750 / 250 ms) LEDs
alternating between amber and red.
Retrieving software from memory
card. This condition remains until a
valid application is available from the
memory card.
1 flashing red LED.
Unit can no longer poll input status.
26
GVM400 Installation instructions
Summary of Contents for GVM400
Page 1: ...GVM400 video module Installation instructions...
Page 2: ......
Page 4: ......
Page 6: ...6 GVM400 Installation instructions...
Page 10: ...10 GVM400 Installation instructions...
Page 15: ...2 4 Dimensions D11883 1 170 mm 6 7 in 237 mm 9 33 in 56 mm 2 2 in Planning the installation 15...
Page 16: ...16 GVM400 Installation instructions...
Page 28: ...28 GVM400 Installation instructions...
Page 33: ......
Page 34: ...www raymarine com...


