


6.3 Basic touchscreen operations
Placing and moving the cursor using
touch
To place or move the cursor around the screen on
a touchscreen multifunction display follow the steps
below.
1. Touch the screen at any position on the screen to
place the cursor there.
Touchscreen lock
On a multifunction display with HybridTouch you can
lock the touchscreen to prevent accidental use.
For example, locking the touchscreen is particularly
useful in rough water or weather conditions.
The touchscreen can be locked and unlocked from
the homescreen. The touchscreen can only be
unlocked using physical buttons.
Locking the touchscreen – HybridTouch
displays
On HybridTouch multifunction displays the
Homescreen contains a dedicated Touch Lock icon.
With the homescreen displayed:
1. Select the
Touch Lock
icon.
It changes color to indicate that the touchscreen
is disabled. All functions are still available using
the physical buttons.
Touchscreen is locked. All
functions remain available using
physical buttons.
Unlocking the touchscreen – HybridTouch
displays
You can unlock the touchscreen by following the
steps below.
With the hHomescreen displayed:
1. Use the UniControl to highlight the
Touch Lock
icon.
2. Press the
OK
button.
The Touchscreen is enabled.
Touchscreen is unlocked.
6.4 Multi-Touch gestures
Raymarine a Series and gS Series multifunction
displays support multi-touch.
Multi-touch means that the display is capable of
recognizing multiple simultaneous touch inputs.
This means that you can use 2 or more fingers on
the screen at the same time to perform multi-touch
gestures.
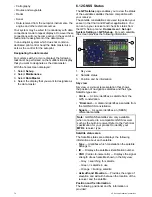
Pinch to Zoom
The pinch to zoom gestures can be performed on
multifunction displays that support multi-touch.
Pinch to zoom consists of 2 actions:
• Move 2 fingers apart to zoom in.
• Move 2 fingers together to zoom out.
0
0
0
0
00
00
D12920-2
Pinch to Zoom can be used in the following
applications:
• Chart application.
• Weather application.
64
eS Series installation instructions
Summary of Contents for eS Series
Page 2: ......
Page 4: ......
Page 30: ...30 eS Series installation instructions...
Page 56: ...56 eS Series installation instructions...
Page 92: ...92 eS Series installation instructions...
Page 114: ...114 eS Series installation instructions...
Page 124: ...124 eS Series installation instructions...
Page 128: ...128 eS Series installation instructions...
Page 138: ...138 eS Series installation instructions...
Page 146: ...146 eS Series installation instructions...
Page 147: ......
Page 148: ...www raymarine com...