background image


0049-1200-XXX                                                                       RM16M   –   USER’S GUIDE                                                               12/29/2010 
Rev.  C 

                                                                                                             Page 7


of


27


Mechanical Assembly


The Data Shelf mounts into a standard 19-inch cabinet and requires 7 inches of vertical panel 
space. 

The 19-inch Data Shelf also fits into a 23-inch cabinet.  This installation requires the rack-
mounting brackets to be removed and reinstalled in the reversed position, so the wider tabs are 
used for mounting to the cabinet. 


ELECTRICAL INSTALLATION


All power connections are made at the back panel of the Data Shelf. 


AC Power (RM16M VAC-R Data Shelf)


Power for the AC version of the Data Shelf (RM16M VAC) is supplied to the power modules 
through a separate AC power cord.   

One power module is sufficient to power all 16 slots.  If only one power source is available, it 
can be connected to either input 1 or 2. 

After the power module is installed, insert the power cord into the power module socket on the 
back of the Data Shelf. 

To apply power to the module, plug the opposite end of the power cord into a standard 115/220 
VAC grounded wall socket. 


Redundant AC Power 

Power for the redundant AC version of the Data Shelf (RM16M VAC-R) is supplied to the 
power modules through separate AC power cords (see figure below).   

After the power modules are installed, insert the power cords into the power module sockets on 
the back of the Data Shelf. 

To apply power to the modules, plug the opposite ends of the power cords into standard 115/220 
VAC grounded wall sockets.                                    

In the event of a power source failure or a power supply module failing, the enclosure will 
remain online using the alternate source. 


Summary of Contents for RM16M VDC-R

Page 1: ...0049 1200 XXX RM16M USER S GUIDE 12 29 2010 Rev C RM16M VDC R RM16M VAC R User s Guide...

Page 2: ...0049 1200 XXX RM16M USER S GUIDE 12 29 2010 Rev C Page i Raymar Information Technology Inc 7325 Roseville Road Sacramento CA 95842 800 695 1951 Fax 916 783 1952...

Page 3: ...ice and does not represent a commitment on the part of Raymar Telenetics Raymar Telenetics assumes no responsibility for any inaccuracies that may be contained in this User s Guide Raymar Telenetics m...

Page 4: ...to maintain uninterrupted telephone service If you experience trouble with this telephone equipment please contact Raymar Information Technology Inc 7325 Roseville Road Sacramento CA 95842 1 800 747...

Page 5: ...v C Page iv TABLE of CONTENTS 1 INTRODUCTION Page 1 2 INSTALLATION Page 5 3 OPERATION Page 14 4 MAINTENANCE Page 15 5 APPENDIX A SPECIFICATIONS Page 17 6 APPENDIX B DIGITAL INTERFACE DESCRIPTIONS Page...

Page 6: ...the Data Shelf see the Back Panel Interface Connectors section This allows PC cards to be installed or replaced without disturbing the cable connections at the back The AC version of the Data Shelf a...

Page 7: ...nnectors can be Individual 8 pin modular jacks one for each PC card standard Two 50 pin termination connectors optional The telephone line connectors are identified by the telephone company Universal...

Page 8: ...of 27 Single row RJ45 connectors Dual rows of RJ45 connectors Figure 1 2 Examples of Back Panels with 25 pin DTE Connectors and 8 pin Modular Telco Jacks Figure 1 3 Example of Back Panel with 25 pin...

Page 9: ...calls at 1 916 783 1951 Monday through Friday 7 00 am to 5 00 pm PST For technical support you may also reach us at 1 800 747 1522 Fax Number You can also send your requests for information to our 24...

Page 10: ...lean well lit and free from extremes of temperature humidity appreciable shock and vibration Is within seven feet of a power source that can furnish 48 4 VDC at 3 5 amps or 90 265 VAC Is within 50 fee...

Page 11: ...Equipment Special tools or test equipment are not required for installation CAUTION To prevent damage to enclosure components from overheating ensure clearances of 1 inch top and bottom between mount...

Page 12: ...to power all 16 slots If only one power source is available it can be connected to either input 1 or 2 After the power module is installed insert the power cord into the power module socket on the bac...

Page 13: ...e is available it can be connected to either terminal strip PS1 or PS2 on the back of the Data Shelf with shunt bars installed to connect power to the opposite strip see Figure 2 5 The bars should alw...

Page 14: ...Table 2 1 shoes the EIA 232 levels from the modem NOTE Some modems may not use all the functions listed in Tables 2 1 and 2 2 Table 2 1 Modem EIA Levels Received data mark 5 to 15 V Received data spa...

Page 15: ...hone line connections Figure 1 4 and Figure 1 5 show examples of these backplanes Modems with dial backup capability can switch to a dial up line if the leased line fails For this reason both the TELS...

Page 16: ...ss of supply or operating voltage to one module causes the other module to carry the entire load If this happens the common alarm contacts close to reflect the alarm condition The AC power module cons...

Page 17: ...ed by personnel familiar with this procedure 1 Lower the Data Shelf s hinged front panel 2 Locate the power module slots between slots 8 and 9 3 Grasp power module handle with one hand while supportin...

Page 18: ...options need to be changed or verified before inserting the card The following procedures describe how to install PC cards PC cards can be installed while the Data Shelf is powered on This procedure s...

Page 19: ...also have automatic dialing and answering capabilities TEST MODES Each plug in modem card has a switch or switches that provide for modem testing Test features are described in the manual for the mode...

Page 20: ...ng and Removing PC Cards section When swapping out PC cards you do not have to turn off system power This allows PC cards to be changed while allowing all other PC cards to continue operation For more...

Page 21: ...0049 1200 XXX RM16M USER S GUIDE 12 29 2010 Rev C Page 16 of 27 NOTES...

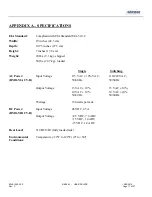
Page 22: ...g shipped 50 lbs 22 7 kg loaded Single Switching AC Power Input Voltage 115 VAC 10 VAC 110 220 VAC RM16M ACV R 50 60 Hz 50 60 Hz Output Voltage 15 VAC 10 15 VAC 10 10 VAC 10 10 VAC 10 50 60 Hz 50 60 H...

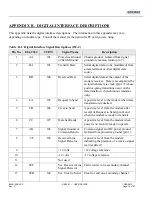
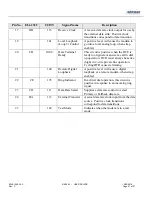
Page 23: ...an internal data rate clock pin 17 whose positive going transitions occur on the data transition Synchronous modems only 4 CA 105 Request to Send A positive level to the modem when data transmission i...

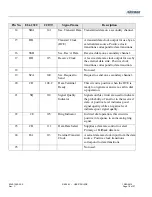
Page 24: ...Send Request to send on a secondary channel 20 CD 108 2 Data Terminal Ready This circuit is positive when the DTE is ready to originate or answer a call in dial up operation 21 SQ 110 Signal Quality...

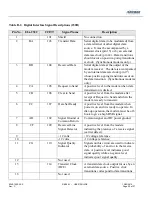
Page 25: ...on is desired 5 CB 106 Clear to Send A positive level from the modem after receipt of Request to Send and when the modem is ready to transmit 6 CC 107 Data Set Ready A positive level from the modem wh...

Page 26: ...riginate or answer a call in dial up operation DTR must always be active high in 2 wire private line operation Cycling DTR causes retraining 21 140 Remote Digital Loopback A positive level will cause...

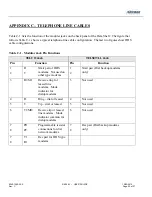
Page 27: ...ions TELCO Jack TELSET LL Jack Pin Function Pin Function 1 2 R T Xmit pair of DDS modems Not used on other type modems 1 2 Xmit pair Dial backup modems only 3 R1 MI Receive ring for leased line modems...

Page 28: ...16M USER S GUIDE 12 29 2010 Rev C Page 23 of 27 Figure C 1 Programmable Cable 8 Pin Connector Figure C 2 Leased Line Cable 8 Pin Connector Figure C 3 Example 1 DDS Cable cable is also used for dial ba...

Page 29: ...le 2 DDS Cable cable is also used for dial backup type modems Table C 2 Telco Connections DSP9612 MOT202T Rear Panel V 3600 Rear Panel Telco Dial Telco PIN Signal Direction RJ45 RJ45 3 RING 1 INPUT 3...

Page 30: ...Connector TELCO CONNECTOR TELSET LL Connector Pin Function Pin Function Pin Function Pin Function 1 26 2 27 Ring 1 Tip 1 MI 1 Rec Ring 1 MIC 1 Rec Tip 1 1 26 2 27 Xmit Ring 1 Xmit Tip 1 Rec Ring 1 Re...

Page 31: ...E OF THE PRODUCT FOR ANY LOSS OF USE LOSS OF TIME INCONVENIENCE COMMERCIAL LOSS LOST PROFITS OR SAVINGS OR OTHER INCIDENTAL SPECIAL OR CONSEQUENTIAL DAMAGES ARISING OUT OF THE USE OR INABILITY TO USE...

Page 32: ...rial number a description of the problem being encountered and the cause of the problem if known Please note that prior to authorizing a return a product support specialist may call to verify that the...

Reviews: