background image

30

You should only use a voltmeter or a diode test la mp for checking
the voltage applying at car cables, because normal test lamps con-
sume too high currents and thus can damage the electronic system
of the car. 
When installing cables make sure that the connection cables are not
squeezed or damaged by sharp edges. Use rubber bushings for
passing points.
In order to reduce parasitic induction of the generator or of other
electric systems of the vehicle, the amplifier should be directly pow-
ered by the car battery. It is not allowed to supply other electric
loads, such as the cooling fan, the windscreen washer etc., via the
same cable as the amplifier.
Use connection cables with a possibly large cross-section for con-
necting the power supply and the ground of the amplifier.  The neces-
sary cross-section of the cable depends on the power requirements
of the components connected.
A cross-section of the cables that is too small can cause a cable to
char through in the worst case. Moreover, the increased ohmic
resistance leads to unnecessary power losses.
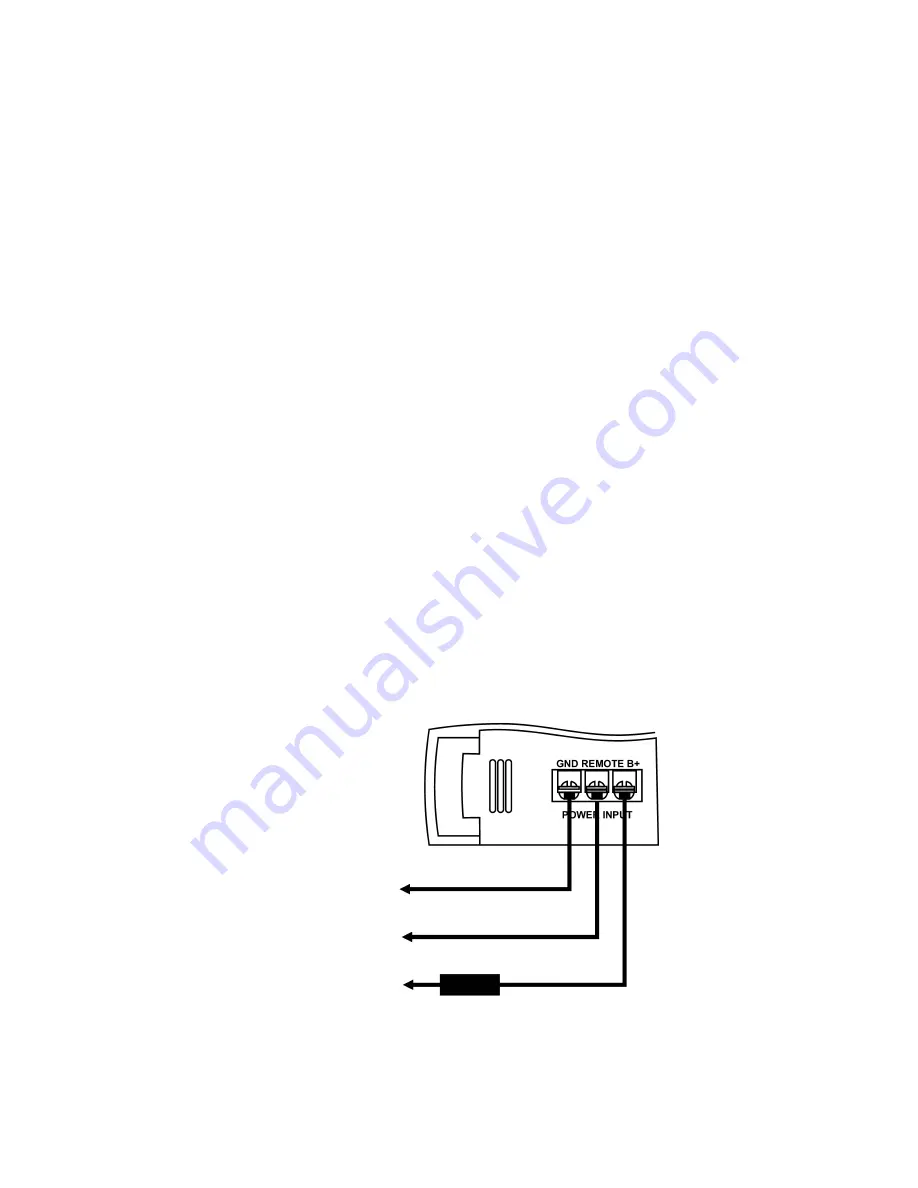
An additional fuse in the positive connection of the amplifier is nec-
essary in any case (fuse holder is not included in the scope of deliv-
ery). The fuse should be installed close to the battery. In case of
short circuit (e.g. if the connection cable is worn through) the fuse
disconnects the positive lead and thus avoids a damage of the bat-
tery and prevents the supply cable from burning.
The strength of the fuse depends on the power consumption of the
connected devices of the car hi-fi system.

Ground (-)

Control lead

Spare fuse

Battery (+)

Summary of Contents for XCA 1000

Page 1: ...age 24 43 Amplificateur Raveland Page 44 63 Raveland eindtrap Pagina 64 83 Item No No de commande Best Nr Bestnr XCA 1000 37 22 05 XCA 1002 37 24 69 XCA 1500 37 22 14 XCA 2000 37 24 68 BEDIENUNGSANLEI...

Page 2: ...in technology and equipment reserved Copyright 2009 by Conrad Electronic SE Information l gales Ce mode d emploi est une publication de la soci t Conrad Electronic SE Klaus Conrad Str 1 D 92240 Hirsc...

Page 3: ...contents with the corresponding page numbers can be found in the index on page 25 Ce mode d emploi appartient ce produit Il contient des recommanda tions en ce qui concerne sa mise en service et sa ma...

Page 4: ...3 XCA 1500 XCA 2000 XCA 1000 XCA 1002...

Page 5: ...ung Achten Sie hierauf auch wenn Sie dieses Pro dukt an Dritte weitergeben Heben Sie deshalb diese Bedienungsanleitung zum Nachlesen auf Alle enthaltenen Firmennamen und Produktbezeichnungen sind Ware...

Page 6: ...en 5 Inhaltsverzeichnis 5 Bestimmungsgem e Verwendung 6 Sicherheitshinweise 6 Produktbeschreibung 7 Inbetriebnahme 8 Mechanischer Einbau 8 Anschluss der Stromversorgung 9 Anschluss der Eing nge 11 Ans...

Page 7: ...oder Personensch den die durch unsachgem e Hand habung oder Nichtbeachten der Sicherheitshinweise verursacht werden bernehmen wir keine Haftung In solchen F llen erlischt die Gew hrleistung Garantie...

Page 8: ...tzlichen Sicherheitshinweise in den einzelnen Kapiteln dieser Anleitung Sollten Sie sich ber den korrekten Anschluss nicht im Klaren sein oder soll ten sich Fragen ergeben die nicht im Laufe der Bedie...

Page 9: ...ng zu gew hrleisten muss rund um das Geh use ein Bereich von 5cm freigehalten werden Au erdem darf die Luftzirkulation nicht durch Gegenst nde wie Zeitschriften Decken Abdeckungen o behindert werden V...

Page 10: ...n das Ger t als Schablone verwendet werden Bohren Sie die L cher f r die Befestigungsschrauben Befestigen Sie die Endstufe mit den beiliegenden Schrauben Anschluss der Stromversorgung Der elektrische...

Page 11: ...rgung und Masse der Endstufe Anschlusskabel mit einem m glichst gro en Lei tungsquerschnitt Der erforderliche Leitungsquerschnitt richtet sich nach dem Leistungsbedarf der angeschlossenen Komponenten...

Page 12: ...sen werden Sollte das Autoradio nur ber Lautsprecherausg nge verf gen so muss zum Anschluss ein geeigneter NF Adapter verwendet werden Modell XCA 1000 und XCA 1002 Die Endstufe besitzt sowohl Lautspre...

Page 13: ...g und an die Lautspre chereing nge der Modelle XCA 1000 und XCA 1002 nur Lautspre cherausg nge angeschlossen werden Beachten Sie hierzu auch die Anschlusswerte in den Technischen Daten Modell XCA 1500...

Page 14: ...ufe Verbinden Sie die Lautsprecherausg n ge Ihres Autoradios mit den Leitungsen den der Lautsprecher Anschlussleitung L R 80Hz 50Hz 2KHz 250Hz IN OUT FULL LPF HPF LPF HPF Min Max GAIN 0dB 6dB 12dB SUP...

Page 15: ...h digt werden kann Verwenden Sie nur Lautsprecher mit einer ausreichenden Belast barkeit siehe Technische Daten Achten Sie darauf dass alle Lautsprecher richtig gepolt sind also die Plus und Minuskenn...

Page 16: ...A 2000 Lautsprecherimpedanz min 2 Ohm Stereobetrieb Modell XCA 1000 und XCA 1002 Lautsprecherimpedanz min 2 Ohm Mono Br ckenbetrieb Modell XCA 1500 und XCA 2000 Lautsprecherimpedanz min 2 Ohm Stereo L...

Page 17: ...erwendung von Adaptern zu weiteren Komponen ten der Auto HiFi Anlage durchgeschleift werden kann Benutzen Sie zum Anschluss der Cinchausg nge nur hierf r geeig nete abgeschirmte Cinchleitungen Bei Ver...

Page 18: ...bei stufenlos einstellbar Modell XCA 1000 und XCA 1002 Die Endstufe ist mit einer Aktivweiche ausgestattet die es erlaubt f r die beiden Kan le einen Hochpass bzw Tiefpasszweig zu schalten Die Trennfr...

Page 19: ...den Uhrzeigersinn auf Minimum Schieben Sie den die Frequenzweichen schalter X OVER 4 in die f r Ihre Konfi guration richtige Stellung Stellen Sie mit den Reglern HPF 1 und LPF 2 die Trennfrequenzen f...

Page 20: ...e Anschl sse und Lautsprecher Sollte hierbei kein Fehler feststellbar sein ziehen Sie bitte einen Fachmann zu Rate Achten Sie darauf dass die maximale Lautst rke von der Leistungsf higkeit der Lautspr...

Page 21: ...men ist dass ein gefahrloser Betrieb nicht mehr m glich ist so ist das Produkt au er Betrieb zu setzen und gegen unbeabsichtigten Betrieb zu sichern Bordnetz abklemmen Es ist anzunehmen dass ein gefah...

Page 22: ...gen kommen Deshalb m chten wir Ihnen hier beschreiben wie Sie m gliche St rungen beheben k nnen Beachten Sie unbedingt die Sicherheitshinweise Problem L sung Keine Funktion Der Anschluss GND des Ansch...

Page 23: ...den Kabeln f r die Z ndanlage des Fahrzeugs Die Z ndanlage ist nicht entst rt Die Kabel des Verst rkereingangs liegen zu nahe an den Spannungsversorgungskabeln Das Ger t schaltet Schlechter Massekont...

Page 24: ...ckt gebr ckt gebr ckt 2 x 350W max 2 x 1000W max 4 x 300W max 4 x 500W max Ausgangsimpedanz 2 16 Ohm 2 16 Ohm 2 16 Ohm 2 16 Ohm Stereo Stereo Stereo Stereo 4 16 Ohm 4 16 Ohm 4 16 Ohm 4 16 Ohm gebr ck...

Page 25: ...ains important information concerning commissioning and handling Please take this into consideration when you pass on the product to third parties Please keep these instructions for further reference...

Page 26: ...ction 24 Overview of Components and Control Elements 25 Contents 25 Intended Use 26 Safety Instructions 26 Product Description 27 Startup 28 Mechanical Installation 28 Connecting the Power Supply 29 C...

Page 27: ...damage to prop erty caused by incorrect handling of the device or failure to observe the safety instructions In such cases the warranty guarantee is ren dered void An exclamation mark in a triangle i...

Page 28: ...uctions If you are not sure about the correct connection or if questions arise which are not covered by the operating instructions please do not hesitate to con tact our technical support or another s...

Page 29: ...ensure an adequate ventilation there must be an open area of 5 cm around the housing Apart from this the air circulation may not be obstructed by objects such as magazines blankets covers or similar...

Page 30: ...for the screws at the place of installation For doing this use the device as a pattern Drill the holes for the fastening screws Fasten the amplifier by the two screws delivered Connecting the Power Su...

Page 31: ...ge cross section for con necting the power supply and the ground of the amplifier The neces sary cross section of the cable depends on the power requirements of the components connected A cross sectio...

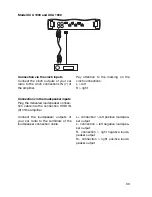
Page 32: ...rectly connected to the input sockets If your car radio is only provided with loudspeaker outputs a suitable audio frequency adapter is to be used for the connection Model 1000 and XCA 1002 The amplif...

Page 33: ...and only speaker outputs should be connected to the speaker inputs of the models XCA 1000 and XCA 1002 Please also pay attention to the connection loads in the Technical Data Model XCA 1500 and XCA 2...

Page 34: ...mplifier Connect the loudspeaker outputs of your car radio to the terminals of the loudspeaker connection cable L R 80Hz 50Hz 2KHz 250Hz IN OUT FULL LPF HPF LPF HPF Min Max GAIN 0dB 6dB 12dB SUPER BAS...

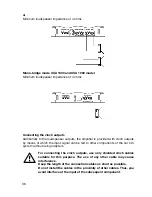
Page 35: ...harp edges which may damage the cables Only use loudspeakers which have a sufficiently high loading capa city see Technical Data Make sure that the loudspeakers have been connected in the cor rect po...

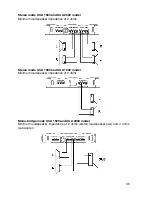
Page 36: ...imum loudspeaker impedance of 2 ohms Stereo mode XCA 1000 and XCA 1002 model Minimum loudspeaker impedance of 2 ohms Mono bridge mode XCA 1500 and XCA 2000 model Minimum loudspeaker impedance of 2 ohm...

Page 37: ...ts by means of which the input signal can be fed to other components of the car hi fi system without using adapters For connecting the cinch outputs use only shielded cinch cables suitable for this pu...

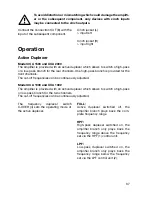
Page 38: ...ed Model XCA 1000 and XCA 1002 The amplifier is provided with an active duplexer which allows to switch a high pass or low pass branch for the two channels The cut off frequencies can be continuously...

Page 39: ...ounter clockwise to minimum Slide the frequency duplexer switch es X OVER 4 into the position corre sponding to your configuration Set the cut off frequencies for the con nected loudspeakers via the H...

Page 40: ...ier via the SUPER BASS switch 6 all connections and loudspeakers If you cannot detect an error please con tact a specialist for help Take care that the maximum volume depends on the power capacities o...

Page 41: ...product must be turned off and precautions are to be taken to ensure that it is not used unin tentionally Disconnect the car power system It can be assumed that the safe operation is no longer possibl...

Page 42: ...wever arise We would therefore like to describe how you can repair certain malfunctions yourself Always adhere to the safety instructions Problem Solution No function the The GND connection of the con...

Page 43: ...nition system of the vehicle The ignition system is not shielded The cables of the amplifier input are positioned too close to the power cables The device turns Bad mass contact of the mass connection...

Page 44: ...d bridged 2 x 350W max 2 x 1000W max 4 x 300W max 4 x 500W max Output impedance 2 16 Ohm 2 16 Ohm 2 16 Ohm 2 16 Ohm Stereo Stereo Stereo Stereo 4 16 Ohm 4 16 Ohm 4 16 Ohm 4 16 Ohm bridged bridged brid...

Page 45: ...mise en service et la manipulation du produit Tenez en compte notamment lorsque vous transmettez le produit un tiers Conservez le pr sent mode d emploi afin de pouvoir le consulter tout moment Tous l...

Page 46: ...rents l ments 45 Sommaire 45 Utilisation conforme 46 Consignes de s curit 46 Description du produit 47 Mise en service 48 Montage m canique 48 Connexion de l alimentation lectrique 49 Connexion des en...

Page 47: ...s cutifs De m me le constructeur n assume aucune responsabilit en cas de dommages mat riels ou corporels r sultant d une utilisation non conforme de l appareil ou du non respect des pr sentes consigne...

Page 48: ...urant dans les diff rents chapitres du pr sent mode d emploi En cas de doute quant au raccordement correct de l appareil ou lorsque vous avez des questions pour lesquelles vous ne trouvez aucune r pon...

Page 49: ...ant la chaleur Afin de garantir une a ration suffisante une zone de 5 cm doit res ter d gag e tout autour du bo tier Des objets tels que revues cou vertures rev tements et autres ne doivent en aucun c...

Page 50: ...l appareil comme mod le Percez les trous pour les vis de fixation Fixez l amplificateur l aide des vis fournies Raccordement de l alimentation lectrique Le raccordement lectrique doit uniquement tre...

Page 51: ...cordement de l alimentation en tension et de la masse de l amplificateur des c bles de raccordement avec une sec tion m tallique aussi grande que possible La section m tallique requise est fonction du...

Page 52: ...ntr e Si l autoradio ne devait disposer que de sorties haut parleur utili sez dans ce cas un adaptateur NF appropri pour le raccorder Mod le XCA 1000 et XCA 1002 L amplificateur ainsi que les haut par...

Page 53: ...es aux sources sortie RCA et aux entr es de haut parleur des mod les XCA 1000 et XCA 1002 Pour cela respecter galement les valeurs de raccordement dans les Caract ristiques techniques Mod le XCA 1500...

Page 54: ...9 de l amplificateur Branchez les sorties haut parleurs de votre autoradio aux extr mit s du cor don d alimentation de haut parleurs L R 80Hz 50Hz 2KHz 250Hz IN OUT FULL LPF HPF LPF HPF Min Max GAIN...

Page 55: ...urs disposant d une capacit de charge suffisante voir les Caract ristiques techniques Veillez ce que la polarit de tous les haut parleurs ne soit pas invers e donc que les signes plus et moins concord...

Page 56: ...dance de haut parleur min 2 ohms Mode st r o mod le XCA 1000 et XCA 1002 Imp dance de haut parleur min 2 ohms Mode pont mono mod le XCA 1500 et XCA 2000 Imp dance minimale de haut parleur 2 ohms pair...

Page 57: ...r e sans utiliser d adaptateurs pour les autres com posants de l installation HiFi embarqu e Utilisez pour la connexion des sorties Cinch uniquement des c bles Cinch blind s appropri s L utilisation d...

Page 58: ...XCA 1002 L amplificateur est quip d un filtre d aiguillage actif qui permet de connecter pour les deux canaux une branche passe bas ou passe haut Les fr quences de s paration sont r glables ici en co...

Page 59: ...iguilles d une montre en position minimum Faites glisser le les commutateur s de diplex X OVER 4 dans la bonne posi tion correspondant votre configura tion R glez les fr quences de s paration avec les...

Page 60: ...tes les connexions et haut parleurs Si vous ne deviez constater aucune erreur veuillez consulter un technicien Veillez ce que le volume maximum d pende de la capacit des haut par leurs et de l amplifi...

Page 61: ...de l appareil n est plus assur il convient de le mettre hors service et de le pr server de toute mise sous tension involontaire D connecter le du r seau d alimentation de bord Un fonctionnement sans...

Page 62: ...nt Vous trouverez ci apr s plusieurs proc dures vous permettant de vous d panner le cas ch ant Observer imp rativement les consignes de s curit Probl me Solution Absence de La borne GND du terminal de...

Page 63: ...iff rents points de mise la masse Les c bles de l amplificateur sont trop rapproch s des c bles d allumage du v hicule L allumage n est pas d parasit Les c bles de l entr e d amplificateur sont trop r...

Page 64: ...200W RMS 1 x 300W RMS 1 x 800W RMS 2 x 240W RMS 2 x 400W RMS pont pont pont pont 2 x 350W max 2 x 1000W max 4 x 300W max 4 x 500W max Imp dance de sortie 2 16 2 16 ohms 2 16 ohms 2 16 ohms st r o st...

Page 65: ...ruiksaanwijzing in acht te nemen Deze gebruiksaanwijzing hoort bij dit product Zij bevat belangrijke informatie over de inbedrijfstelling en het gebruik Let hierop ook wanneer u dit product aan derden...

Page 66: ...Inhoudsopgave 65 Reglementaire toepassing 66 Veiligheidsinstructies 66 Productbeschrijving 67 Ingebruikname 68 Mechanische inbouw 68 Aansluiting van de stroomverzorging 69 Aansluiting van de ingangen...

Page 67: ...ade aanvaarden wij geen enkele aansprakelijkheid Voor materi le schade of persoonlijk letsel veroorzaakt door ondes kundig gebruik of het niet opvolgen van de veiligheidsvoorschriften zijn wij niet ve...

Page 68: ...an deze handleiding Indien u vragen heeft over de correcte aansluiting of als er problemen zijn waar u in de gebruiksaanwijzing geen oplossing voor kunt vinden neemt u dan contact op met onze technisc...

Page 69: ...izing een ruimte van 5cm vrij om voldoende ventilatie rondom het apparaat te verkrijgen Zorg dat de luchtcircu latie niet door voorwerpen zoals tijdschriften tafelkleden of gordij nen wordt beperkt Le...

Page 70: ...aan Hiervoor kan het toestel als sjabloon worden toegepast Boor de gaten voor de bevestigingsschroeven Bevestig de eindtrap met de meegeleverde schroeven Aansluiting van de stroomverzorging De elektri...

Page 71: ...g van voedingsspanning en massa van de eindtrap aansluitkabels met een zo groot als mogelijke kabeldoor snede De vereiste kabeldoorsnede richt zich na de vermogensbe hoefte van de aangesloten componen...

Page 72: ...angsbussen worden aan gesloten Indien de autoradio slechts over luidsprekeruitgangen beschikt moet ter aansluiting een geschikte NF adapter worden toegepast Model XCA 1000 en XCA 1002 De eindtrap bezi...

Page 73: ...aan de luid sprekeringangen van de modellen XCA 1000 en XCA 1002 uitslui tend luidsprekeruitgangen worden aangesloten Let hierbij ook op de aansluitwaarden in de Technische gegevens Model XCA 1500 en...

Page 74: ...e eindtrap Verbind de luidsprekeruitgangen van uw autoradio met de kabeleinden van de luidspreker aansluitleiding L R 80Hz 50Hz 2KHz 250Hz IN OUT FULL LPF HPF LPF HPF Min Max GAIN 0dB 6dB 12dB SUPER B...

Page 75: ...orden beschadigd Gebruik uitsluitend luidsprekers met voldoende belastingscapaci teit zie Technische gegevens Let erop dat alle luidsprekers correct aan een elektrische pool zijn aangesloten dus de pl...

Page 76: ...XCA 2000 Luidsprekerimpedantie min 2 ohm Stereobedrijf model XCA 1000 en XCA 1002 Luidsprekerimpedantie min 2 ohm Mono brugbedrijf model XCA 1500 en XCA 2000 Luidsprekerimpedantie min 2 ohm stereo lui...

Page 77: ...ruik van adapters naar verdere componenten van de auto hifi installatie kan worden overgebracht Gebruik ter aansluiting van de cinchingangen slechts hiervoor geschikte afgeschermde cinchleidingen Bij...

Page 78: ...unnen hierbij traploos worden ingesteld Model XCA 1000 en XCA 1002 De eindtrap is met een actieve wissel uitgerust die het mogelijk maakt voor de beide kanalen een hoogpas resp dieppastak te schakelen...

Page 79: ...N 3 tegen de wijzers van de klok in op minimum Schuif de frequentiewisselschakelaar s X OVER 4 in de voor uw configuratie juiste positie Stel met de regelaars HPF 1 en LPF 2 de scheidingsfrequenties v...

Page 80: ...rs Indien hierbij geen storing kan worden geconstateerd raadpleeg dan a u b een vakman Let erop dat het maximale volume van het prestatievermogen van de luidspre kers en de eindtrap afhankelijk is Doo...

Page 81: ...en dat gebruik zonder gevaren niet meer mogelijk is dan moet het product buiten bedrijf worden gesteld en worden beveiligd tegen onopzettelijk gebruik Boordnet afklemmen Het apparaat kan niet meer vei...

Page 82: ...voordoen Hieronder vindt u enkele manieren om eventuele storingen te verhelpen Neem altijd de veiligheidsinstructies in acht Probleem Oplossing Geen werking De aansluiting GND van het aansluitterminal...

Page 83: ...ingssysteem van het voertuig Het ontstekingssysteem is niet ontstoort De kabels van de versterker liggen te dicht aan de kabels van de voedingsspanning Het toestel schakelt Slecht massacontact van de...

Page 84: ...gd 2 x 350W max 2 x 1000W max 4 x 300W max 4 x 500W max Uitgangsimpedantie 2 16 Ohm 2 16 Ohm 2 16 Ohm 2 16 Ohm Stereo Stereo Stereo Stereo 4 16 Ohm 4 16 Ohm 4 16 Ohm 4 16 Ohm gebrugd gebrugd gebrugd g...

Page 85: ...84...

Page 86: ...85...

Reviews: