background image

33

OPERATING 

INSTRUCTIONS

NOTE: 

Before using the tool, read the 

instruction book carefully.

Intended Use

The machine is intended for impact drilling in 

brick, concrete and stone as well as for drilling in 

wood, metal and plastic.

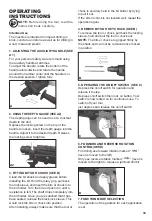
1. ADJUSTING THE AUXILIARY HANDLE (SEE 

A1 )

For your personal safety we recommend using 

the auxiliary handle at all times.

To adjust the handle, rotate the bottom of the 

handle anticlockwise and rotate the handle 

around the hammer collar until the handle is in 

the desired position. Tighten fully.

2. USING THE DEPTH GAUGE (SEE A2)

The depth gauge can be used to set a constant 

depth to the drill.

Depress the locking screw on the top of the 

handle to loosen, insert the depth gauge into the 

handle. Adjust it to the desired depth. Release 

the locking screw to tighten.

3. FITTING BITS OR CHUCK (SEE B)

Clean the bit shank and apply grease before 

installing the bit. Hold the rotary grip, pull back 

the lock sleeve and insert the bits or chuck into 

the bit holder. Turn the bit and push it in until a 

resistance is felt. The shaft drops completely into 

the bit holder. Once you are satisfied that it has 

been seated, release the black lock sleeve. This 

would lock the bits or chuck into position.

After installing, always make sure that the tool or 

chuck is securely held in the bit holder by trying 

to pull it out.

If the bits or chuck is not located well, repeat the 

operation again.

4. REMOVE BITS OR KEY CHUCK (SEE B)

To remove the tool or chuck, pull back the locking 

sleeve, hold and pull the tool or chuck out.

NOTE:

 The bits or chuck are gripped firmly by 

the shank and can not be removed once locked 

in position.

5. OPERATING THE ON/OFF SWITCH  (SEE C)

Depress the on/off switch for operation and 

release it to stop.

Depress on/off switch then lock on button, Your 

switch is now locked on for continuous use. To 

switch off your tool

just depress and release the on/off switch.

6. FORWARD AND REVERSE ROTATION 

CONTROL(SEE D) 

For drilling use forward rotation marked “ 

 ” 

(lever is moved to the left). 

Only use reverse rotation marked “ 

 ” (lever is 

moved to the right) to release a jammed drill bit.

7. FUNCTION MODE SELECTION

The operation of the gearbox for each application 

is set

D

A

A2

B

C

Summary of Contents for PRO XF35J

Page 1: ......

Page 2: ...2 Instrucciones en Espa ol Instru es em Portugu s Instructions in English...

Page 3: ...terruptor de encendido apagado 7 Selector de funci n taladro cincel martillo 8 Bot n de bloqueo para funci n de taladro taladro percutor y cincel 9 Empu adura adicional 10 Punta SDS cincel 11 Brocas S...

Page 4: ...m s2 K 1 5 m s Cincelado ah Cheq 16 081m s2 K 1 5 m s El valor total de vibraci n declarado puede emplearse para comparar varias herramientas y en una evaluaci n de exposici n preliminar ADVERTENCIA...

Page 5: ...s de seguridad y todas las instrucciones El incumplimiento de cualquiera de las instrucciones o las advertencias puede tener como resultado una descarga el ctrica un incendio y o lesiones graves Conse...

Page 6: ...a posici n de encendido puede causar accidentes d Retire cualquier llave mandril o llave inglesa antes de encender la herramienta Una llave mandril o una llave inglesa sujeta a una parte en rotaci n d...

Page 7: ...enta de corte podr a entrar en contacto con cables ocultos o con su propio cable el ctrico sostenga las herramientas el ctricas por las superficies aisladas El accesorio de corte que entra en contacto...

Page 8: ...ecci n ac stica Use gafas de protecci n Use una m scara para el polvo Aislamiento doble Los productos el ctricos no deben eliminarse con la basura dom stica Recicle en las instalaciones destinadas a t...

Page 9: ...uele grasa antes de instalarla Sujete la empu adura giratoria retraiga el manguito de bloqueo e introduzca las puntas o el portabrocas en el portapuntas Gire la punta y emp jela hasta que sienta resis...

Page 10: ...portabrocas con llave con el adaptador 10 tire de la Manga de Bloqueo 1 hacia la parte posterior sostenga en esta posici n y retire el portabrocas con llave con el adaptador del portaherramientas E 9...

Page 11: ...el uso coloque el selector en modo taladro y permita que la herramienta funcione a velocidad m xima sin carga durante 2 minutos 3 Si el rendimiento de su martillo es bajo a ada suficiente grasa en el...

Page 12: ...parado o reemplazado por uno nuevo de igual o mayor valor seg n nuestro criterio Esta garant a no es v lida por defectos causados como resultado de 1 Mal uso abuso o negligencia 2 La herramienta no se...

Page 13: ...13...

Page 14: ...3182K 44 1 45 RD3182K 45 1 46 RD3182K 46 1 47 RD3182K 47 1 48 RD3182K 48 1 49 RD3182K 49 1 50 RD3182K 50 1 51 RD3182K 51 1 52 RD3182K 52 1 53 RD3182K 53 1 54 RD3182K 54 2 55 RD3182K 55 1 56 RD3182K 56...

Page 15: ...rota o revers vel 5 Mude o bot o de bloqueio 6 Interruptor de ligar desligar 7 Bot o seletor de a o de perfurar cinzelar martelar 8 Bot o de bloqueio para bot o seletor de a o de perfurar martelar e...

Page 16: ...ser utilizado para proceder a uma avalia o preliminar da exposi o AVISO O valor da emiss o de vibra es durante a utiliza o da ferramenta el trica pode diferir do valor apresentado dependendo da forma...

Page 17: ...rmo ferramenta el trica nos avisos refere se s ferramentas el tricas com fio ou s ferramentas el tricas sem fio a bateria 1 Seguran a da rea de trabalho a Mantenha a rea de trabalho limpa e bem ilumin...

Page 18: ...o exceda os limites Mantenha sempre os p s firmes no ch o e o equil brio Tal permite um melhor controlo da ferramenta el trica em situa es inesperadas f Use roupa adequada N o use roupa larga nem joa...

Page 19: ...O acess rio de corte que contata um fio ao vivo pode tornar as pe as de metal expostas da ferramenta el trica ao vivo e pode dar ao operador um choque el trico REGRAS DE SEGURAN A ADICIONAIS PARA MART...

Page 20: ...dos Use prote o para os olhos Use uma m scara de prote o contra o p Isolamento duplo Os res duos dos produtos el tricos n o devem ser eliminados juntamente com os res duos dom sticos Sempre que poss v...

Page 21: ...punho rotativo puxe a manga de bloqueio e introduza as brocas ou mandril no porta brocas Rode a broca e pressione a totalmente at sentir uma resist ncia O eixo cai completamente no porta brocas Assim...

Page 22: ...10 puxe a luva de bloqueio 1 para a retaguarda segure nesta posi o e remova o porta chaves com o adaptador do suporte da ferramenta 9 MONTAGEM DO BIT NO CHUCK KEYED COM ADAPTADOR ADVERT NCIA N o use...

Page 23: ...ado para ser reparada PROTE O AMBIENTAL Os res duos dos produtos el tricos n o devem ser eliminados juntamente com os res duos dom sticos Sempre que poss vel por favor recicle Consulte as autoridades...

Page 24: ...Descri o Martelo Perfurador Designa o do tipo PRO XF35J DH designa o de maquinaria representativo de martelo Fun o Martelar v rios materiais Em conformidade com as seguintes Diretivas 2006 42 EC 2011...

Page 25: ...25...

Page 26: ...3182K 44 1 45 RD3182K 45 1 46 RD3182K 46 1 47 RD3182K 47 1 48 RD3182K 48 1 49 RD3182K 49 1 50 RD3182K 50 1 51 RD3182K 51 1 52 RD3182K 52 1 53 RD3182K 53 1 54 RD3182K 54 2 55 RD3182K 55 1 56 RD3182K 56...

Page 27: ...r switch 5 Switch lock on button 6 On off switch 7 Drill chisel hammer drill action selector switch 8 Locking button for drill hammer drill and chisel action selector switch 9 Auxiliary handle 10 SDS...

Page 28: ...ssessment of exposure WARNING The vibration emission value during actual use of the power tool can differ from the declared value depending on the ways in which the tool is used dependant on the follo...

Page 29: ...s gases or dust Power tools create sparks which may ignite the dust or fumes c Keep children and bystanders away while operating a power tool Distractions can cause you to lose control 2 Electrical sa...

Page 30: ...ous and must be repaired c Disconnect the plug from the power source and or the battery pack from the power tool before making any adjustments changing accessories or storing power tools Such preventi...

Page 31: ...t of the casing missing or damaged 7 Use a detector to localize lines in walls with concealed electric water or gas lines Avoid touching live components or conductors 8 Before starting to work always...

Page 32: ...nual Wear ear protection Wear eye protection Wear dust mask Double insulation Waste electrical products must not be disposed of with household waste Please recycle where facilities exist Check with yo...

Page 33: ...and push it in until a resistance is felt The shaft drops completely into the bit holder Once you are satisfied that it has been seated release the black lock sleeve This would lock the bits or chuck...

Page 34: ...h the chuck key should be inserted Tighten them equally in turn at each of the three holes not just at one hole Your drill bit is now locked in the chuck The bit can be removed by reversing the above...

Page 35: ...ocal authorities or retailer for recycling advice GUARANTEE This product has been manufactured to the highest standards It is guaranteed against faulty materials and workmanship for at least 12 months...

Page 36: ...on Rockwell 1050W Martillo Rotativo Type designation PRO XF35J designaci n de maquinaria DH correspondiente a martillo Function Demolici n varios materiales Complies with the following Directives 2006...

Page 37: ...37...

Page 38: ...3182K 44 1 45 RD3182K 45 1 46 RD3182K 46 1 47 RD3182K 47 1 48 RD3182K 48 1 49 RD3182K 49 1 50 RD3182K 50 1 51 RD3182K 51 1 52 RD3182K 52 1 53 RD3182K 53 1 54 RD3182K 54 2 55 RD3182K 55 1 56 RD3182K 56...

Page 39: ......

Page 40: ......

Reviews: