37
13
2
1
9
11
7
12
45
o
11
14
b
a
15 16
17
20
18
19
D
E
F
G
H
I
J
K
L
M
N
O
P
Q
R
B
C
A
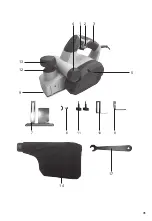
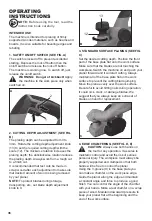
5. USING THE PARALLEL GUIDE (SEE FIG. F)
Insert the screw provided through the hole on the
support of parallel guide (7). Turn the screw into
the nut on the housing. Fix the parallel guide on
the support of parallel guide with the screw and
nut. Ensure the screws are tightened securely.
Note: The parallel guide should be fitted on
the left of housing.
To adjust the required width of cut, loosen the
nut and slide the parallel guide to the required
position. Retighten the nut fully.
Use the parallel guide while cutting. The guide
should be held firmly against the edge of the
workpiece.
13
2
1
9
11
7
12
45
o
11
14
b
a
15 16
17
20
18
19
D
E
F
G
H
I
J
K
L
M
N
O
P
Q
R
B
C
A
6. USING THE REBATE (SEE FIG. G)
Insert the screw(11) provided through the slot on
the Rebate. Turn the screw into the nut on the
housing.
The cut depth adjustment can be set from 0 to
10mm.
To adjust the depth of cut, place the planer on
a flat board, then loosen the screw and slide
the cut depth adjustment guide up and down for
required depth. Tighten the thumb screw fully.
13
2
1
9
11
7
12
45
o
11
14
b
a
15 16
17
20
18
19
D
E
F
G
H
I
J
K
L
M
N
O
P
Q
R
B
C
A
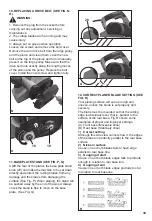
7. REBATING (SEE FIG. H)
The width of rebating cut (a) is adjustable by
moving the parallel guide. The depth of rebating
cut (b) is determined by moving the Rebate, and
the number of passes made along the workpiece.
Make sure that the plane is guided with a lateral
supporting pressure.
13
2
1
9
11
7
12
45
o
11
14
b
a
15 16
17
20
18
19
D
E
F
G
H
I
J
K
L
M
N
O
P
Q
R
B
C
A
8. USING THE DUST BAG (SEE FIG I)
Your planer is equipped with a dust bag for
collection of wood chips in the work area.
Make sure the zipper on the bag is fully closed.
To fit the dust bag, simply insert the tube end of
the bag into the dust extraction outlet. There are
two dust extraction outlets on opposite sides, and
the dust bag can be inserted into either one, with
the other coverd by the dust extraction cover.
Then switch on and start planing.
13
2
1
9
11
7
12
45
o
11
14
b
a
15 16
17
20
18
19
D
E
F
G
H
I
J
K
L
M
N
O
P
Q
R
B
C
A
Summary of Contents for CR900NM
Page 1: ......
Page 2: ...Instrucciones en Español Instruções no Portugués Instructions in English ...
Page 3: ...3 3 2 1 4 6 11 14 10 8 7 9 12 13 5 17 ...
Page 15: ...15 ...
Page 17: ...17 3 2 1 4 6 11 14 10 8 7 9 12 13 5 17 ...
Page 29: ...29 ...
Page 31: ...31 3 2 1 4 6 11 14 10 8 7 9 12 13 5 17 ...
Page 42: ...42 ...
Page 44: ......

