EMX Quick Setup Guide
6
QSG-EMX-1A-v3.3.10-E
255-80-6106-00 RoHS
192 --> 168 --> 84 --> 4
Note: If your network only supports IPv6 or DHCP is
unavailable, the IP address must be configured through a
direct connection to a computer. See
Appendix A:
Configuration via a Connected Computer
(on page 6).
Step 2: Log in to the EMX Web Interface
1.
Open a web browser and type the IP address of the EMX
device.
If the link-local addressing has been enabled, you can
type
pdu.local
instead of an IP address. See
Appendix
A: Configuration via a Connected Computer
(on page
6).
2.
Accept any security warnings that may appear.
3.
Type the default user credentials and click Login.
User name:
admin
Password:
raritan
4.
When prompted to change the password, change or ignore
it.
To change it, type the new password and click Ok.
To ignore it for this time only, click Not Now.
To ignore it permanently, select "Do not ask again" and
click Not Now.
Step 3: Configure the EMX
After logging in to the EMX web interface, you can:
Use the menu in the left pane to configure connected
assets strips and environmental sensor packages.
Use the menu to change network settings, set the system
date and time, create user profiles, set privileges and
security.
QS Rule
Connecting Environmental Sensors (Optional)
An EMX provides SENSOR port(s) for connecting Raritan
environmental sensor packages so that you can remotely
monitor environmental factors, such as temperature and
humidity, around the rack.
For sensor connection instructions, see the EMX User
Guide or Online Help.
For detailed information on each sensor package, refer to
the Environmental Sensors Guide or Online Help on the
Raritan website's
Support page
(
http://www.raritan.com/support/
).
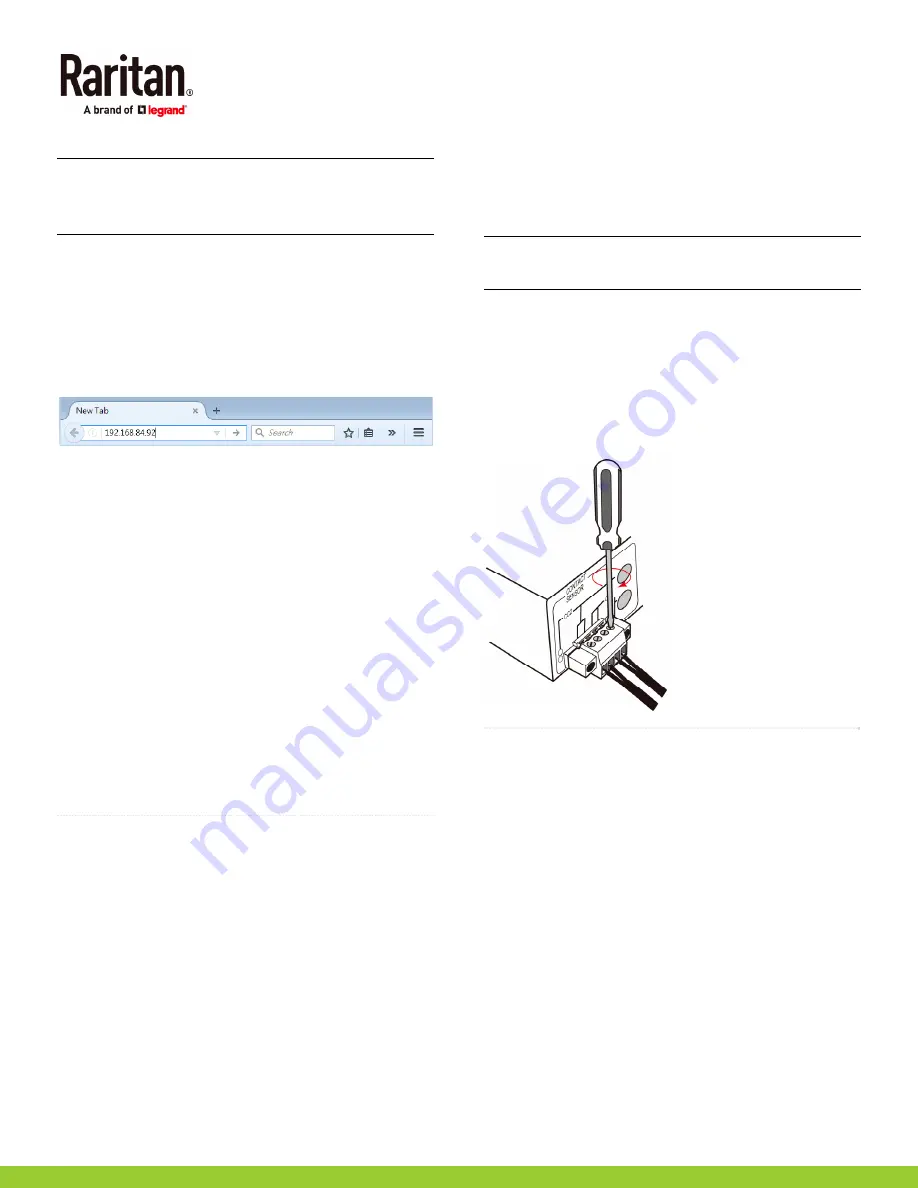
EMX2-888 Contact Closure Sensor Terminals
EMX2-888 provides two built-in contact closure (CC) sensor
channels for connecting Raritan's or third-party contact
closure detectors/switches.
Important: It is not guaranteed that all third-party
detectors/switches are compatible with the EMX. You need
to test the compatibility after installing them.
To connect detectors to the built-in CC termination:
1.
Strip the insulation around 12 mm from the end of each
wire of discrete detectors/switches.
2.
Fully insert each wire of the detectors/switches into each
termination point on the EMX2-888.
3.
Use a screwdriver with a 2.5 mm wide shaft to tighten the
screws above each termination point to secure the wires,
using a torque of 0.196 N·m (2 kgf·cm).
QS Rule
Appendix A: Configuration via a Connected
Computer
To use the command line interface (CLI) for configuration,
establish an RS-232 or USB connection.
To use a web browser for configuration, make a network
connection to the computer. The EMX is automatically
configured with the following link-local addressing in any
network without DHCP available:
https://169.254.x.x
(where x is a number)
https://pdu.local
Step 1: Connect the EMX to a Computer
Establish one of the following connections to a computer.
Serial connection for "DB9" RS-232 connector on
EMX:
1.
Connect one end of the null-modem DB9 cable to the male
"DB9" RS-232 port labeled CONSOLE / MODEM on the
EMX.


