background image


EMX Quick Setup Guide 

1

QSG-EMX-1A-v3.3.10-E 

 255-80-6106-00 RoHS 


EMX® 

Thank you for purchasing the EMX rack management system and asset management strips (asset strips). This product provides a 
rack management solution that integrates both asset management and environment monitoring capabilities in the data center and 
server room. 

This Quick Setup Guide explains how to install and configure the EMX. For additional information on any aspect of EMX, see EMX help, 
which can be accessed from the 

Product Support

 (

http://www.raritan.com/support

) section of Raritan's website. Or you can access 

the product's online help in the Product Online Help section (http://www.raritan.com/support/online-help/). 

For more detailed information, see the latest release notes provided by Raritan. 


Package Contents 

The following describes the equipment shipped with an EMX 
device. If anything is missing or damaged, contact the local 
dealer or Raritan Technical Support for help. 


The EMX device 


Power cord 


Bracket pack and screws 


Asset strips (optional) 


Asset tags (optional) 


QS Rule 


Before You Begin 

Prepare the installation site. Make sure the installation area 
is clean and not exposed to extreme temperatures or 
humidity. Allow sufficient space around the EMX for cabling 
and asset strip connections. 


QS Rule 


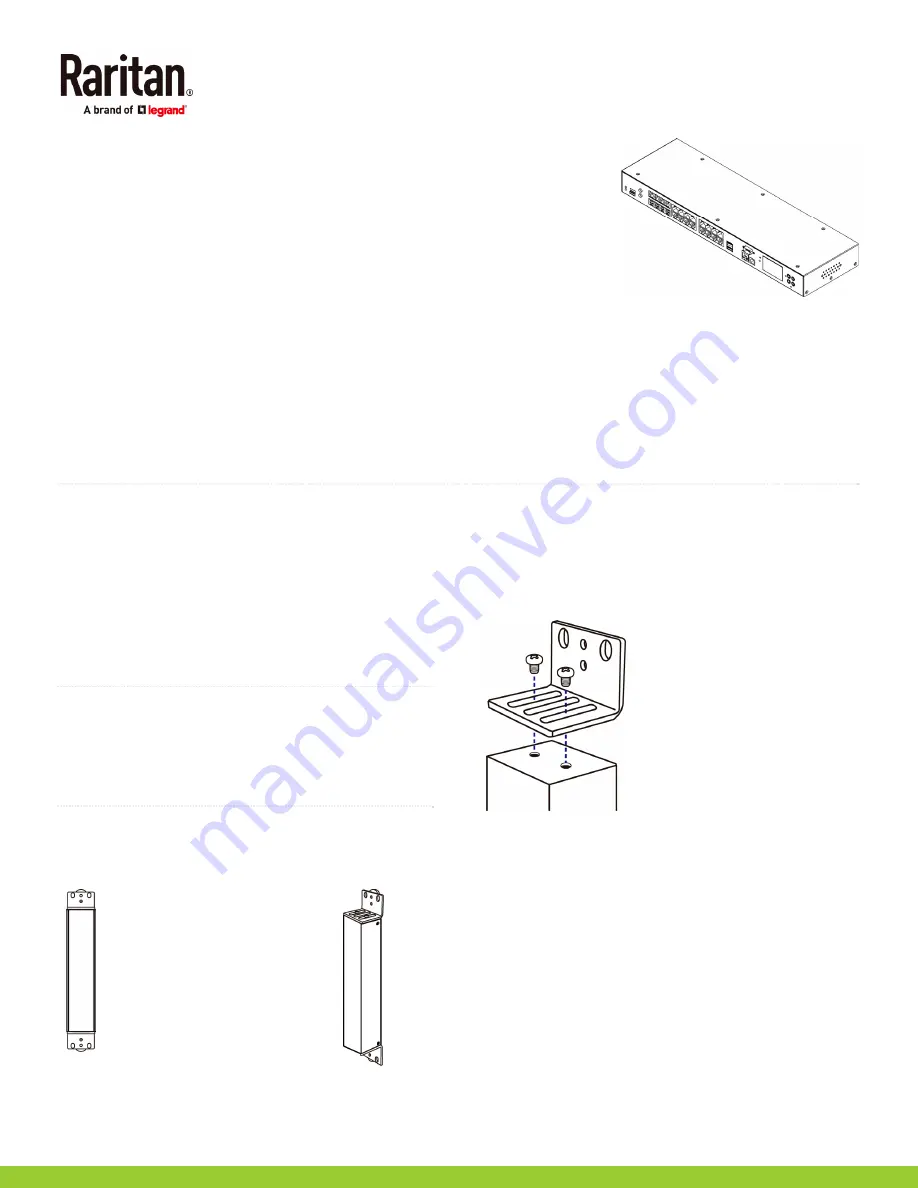
Mounting a Zero U EMX 

This section describes how to mount a Zero U EMX device 
using L-brackets and two buttons. 


To mount Zero U models using L-brackets and two 
buttons: 

1.


Align the two edge slots of the L-bracket with the two 
screw holes on the top of the EMX device. 

2.


Screw the L-bracket to the device and ensure the bracket 
is fastened securely. 


3.


Repeat Steps 1 to 2 to screw another L-bracket to the 
bottom of the device. 

4.


After both L-brackets are installed, you can choose either 
of the following ways to mount the device in the rack. 


Using rack screws, fasten the device to the rack 
through two identical holes near the edge of each 
L-bracket. 

QUICK SETUP GUIDE

Summary of Contents for EMX

Page 1: ...ng or damaged contact the local dealer or Raritan Technical Support for help The EMX device Power cord Bracket pack and screws Asset strips optional Asset tags optional QS Rule Before You Begin Prepar...

Page 2: ...both sides of the EMX with the provided screws 2 Insert the cable support bar into rackmount brackets 3 Secure with the provided end cap screws 4 Fasten the rackmount brackets ears to the rack using...

Page 3: ...code number while non programmable ones have factory default ID or barcode numbers which you cannot change A Barcode ID number which is available on either end of the non programmable asset tag B Tag...

Page 4: ...X2 888 EMX2 111 models a Connect the MASTER asset strip s RJ 45 connector to the male RJ 45 connector at the longer end of the Raritan X cable b Plug the male RJ 12 phone connector at the shorter end...

Page 5: ...the tiny holes on two hexagon screws adjacent to the power socket 2 Plug one end of the Raritan provided power cord into the power socket and press the cable retention clip toward the power cord until...

Page 6: ...r sensor connection instructions see the EMX User Guide or Online Help For detailed information on each sensor package refer to the Environmental Sensors Guide or Online Help on the Raritan website s...

Page 7: ...System Hardware Device Manager and locating the Dominion EMX Serial Console under the Ports group 3 In the communications program press Enter to send a carriage return to the EMX 4 The EMX prompts yo...

Page 8: ...uthentication outer_auth outer_auth PEAP To set or enable Use this command EAP inner authentication network wireless eapInnerAuthentication inner_auth inner_auth MSCHAPv2 EAP identity network wireless...

Page 9: ...nnection Make the EMX connect to a wireless network as needed To make a wireless connection Do one of the following Plug a supported USB wireless LAN adapter into the USB A port on your EMX Connect a...

Page 10: ...nformation For more information about EMX and the entire Raritan product line see Raritan s website www raritan com For technical issues contact Raritan Technical Support See the Contact Support page...

Reviews: