Raptor R5X Quick Start Manual Download Page 5

Attaching the screen protector

Attach the screen protector following these instructions:

All Raptors are provided with a screen protector which must be used in order to 

maintain the warranty of the device.

A screen protector not only helps defend against scratches and knocks to the screen, 

but it will also help prolong the life of your device.

Step 1: 

Check

 there


isn’t


already


a


screen


protector


on


the


device.


Most


Raptor


smartphones


have 

one pre-attached in the box.

Step 2: 

Remove the old screen protector if necessary by simply peeling it of.  Now make sure you 

clean

 the screen thoroughly to remove dirt, dust and any fluff that will create bubbles in the adhesion.

Step 3: 

Peel

 the underside of the screen protector off, being careful not to let it touch anything.
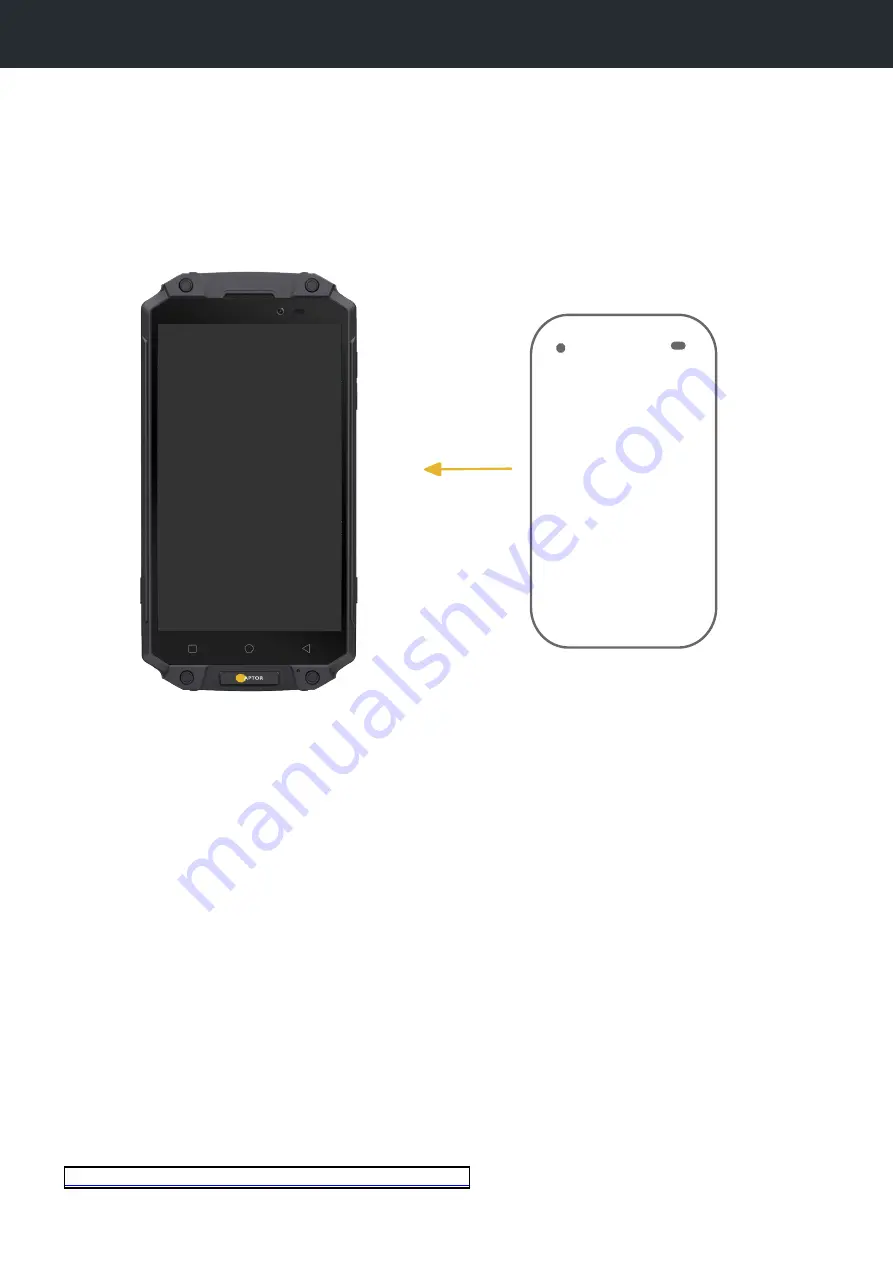
Step 4: 

Now carefully line up the top of the screen protector with the top of the device LCD. Carefully

let it drop onto the screen making sure it lines true all the way down to the bottom as you go.  Use a 

credit card to smooth out any bubbles as you go.

Step 5: 

Once you’re happy, 

peel

 off the top protective layer of the screen protector off and you’re 

done!

R

Check out our experts guide to screen protector fitting on our YouTube channel: 

https://www.youtube.com/watch?v=2N-Qv6J2oZM


Summary of Contents for R5X

Page 1: ...RAPTOR R5X Quick Start RAPTOR R R...

Page 2: ...se screws Main screen Power Light sensor External headset Ear phone Volume Volume Menu soft key USB Connector MIC Back soft key Home soft key Front camera Hand strap mount point Fingerprint reader NFC...

Page 3: ...ccessories are included with every Raptor R5X Power supply Country specific Fast charge power supply OTG cable On the go cable for connecting external peripherals via USB USB Cable USB C cable for cha...

Page 4: ...h device on or put wake device into out of standby mode Home The Android Home button brings the device to the home screen Menu soft key The Android Menu key brings up the menu feature and will behave...

Page 5: ...y simply peeling it of Now make sure you clean the screen thoroughly to remove dirt dust and any fluff that will create bubbles in the adhesion Step 3 Peel the underside of the screen protector off be...

Page 6: ...Raptor R5X device is constantly monitoring for new notifications and status of the device Apps can create there own icons but below are some of the more common ones with their meanings Phone connectio...

Page 7: ...oing this as Type C USB connectors can be easily damaged if not used correctly Step 3 Plug the other side of the cable into either the USB A socket of the domestic or vehicle charger Please note Only...

Page 8: ...ensuring you are careful when doing this as Type C USB connectors can be easily damaged if not used correctly Step 3 Plug the other side of the USB cable into a free USB A socket in your PC or laptop...

Page 9: ...host USB communication via the supplied OTG cable External headset Stereo DIN connector for use with supplied headset MIC It can be used for making phone calls and for listening to music on the devic...

Page 10: ...m the device 1 Gently insert the SIM Tool into notch on the SIM tray and prise it out carefully Full remove using your fingers 2 You can now insert SIM and SD cards into the tray The combinations can...

Page 11: ...uses them to not fit correctly If damaged please request spares via the Raptor support portal Prolonged immersion In water is not recommended Whilst your Raptor R5X can be submerged in 1 2M of water f...

Reviews: