Raptor R5 Quick Start Manual Download Page 10

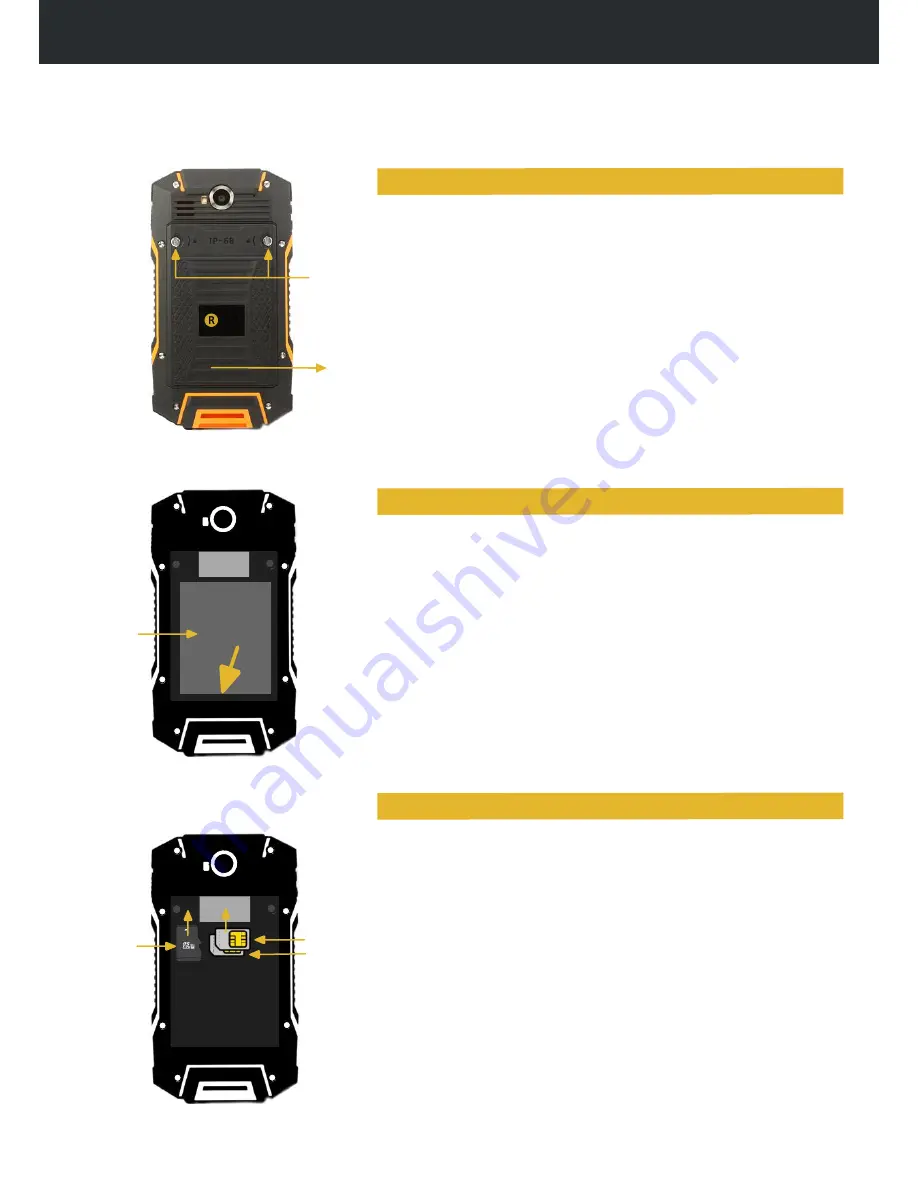
REPLACING THE BATTERY AND CARDS

The replaceable battery, dual SIM cards and Micro-SD storage cards are accessed by 

removing the battery cover.

Step 1:

 Using the provided screwdriver, unscrew both screws on the 

battery cover on the back of the device.

Step 2: 

Remove the cover by prising the top apart at point A where 

there’s a small recess in the cover.

Step 3: 

Remove the battery back cover fro the device fully, taking 

care not to lose any screws.

Back case
screws

SIM 2

SIM 1

Micro-SD

Pull the battery up at the top at point A using your finger or the 
supplied screwdriver.  The battery will lift up and you can then get 
hold of it to remove it completely.

To replace the battery you do the opposite, seating the top of 
the battery in first and then pushing the bottom in until the battery 
is seated firmly in place.

The SIM and SD cards are found at the top of the battery 
compartment. Raptors use standard SIM sizes and micro-SD storage 
cards as found in most mobile devices.

To install a SIM card, gently slide your SIM card into the top of either 
connector 1 or 2.  If you are using only one SIM card, then please 
use SIM1 slot.

If you are using two SIM cards, then place the second one in SIM2. 
You will now be able to dynamically make and receive calls on either 
SIM.

To remove or install a micro-SD card:

The Micros-SD slot is at the top left corner of the battery 
compartment.

Simply slide the SD Card up into the slot.

Simply pull the card down and out to remove it.

3600/6000mAh

SIM

A

Battery

2 1

SIM

Installing Dual SIM and SD cards

Replacing / replacing the battery

Removing the battery cover

APTOR

Battery
door

Summary of Contents for R5

Page 1: ...RAPTOR R5 Quick Start RAPTOR...

Page 2: ...a Loud speaker Camera flash Battery door Back case screws Main screen Power Light sensor External headset Ear phone Volume Volume Menu softkey USB Connector MIC Back softkey Home Front camera Hand str...

Page 3: ...mAh OR extended 6000mAh battery and back case The following accessories are included with every Raptor R5 Power supply Country specific power supply used for charging Vehicle Charger 12 24v USB charge...

Page 4: ...ce while in call Power Used to switch device on or put wake device into out of standby mode Home The Android Home button brings the device to the home screen Menu soft key The Android Menu key brings...

Page 5: ...the box Step 2 Remove the old screen protector if necessary by simply peeling it of Now make sure you clean the screen thoroughly to remove dirt dust and any fluff that will create bubbles in the adh...

Page 6: ...aptor R5 device is constantly monitoring for new notifications and status of the device Apps can create there own icons but below are some of the more common ones with their meanings Phone connection...

Page 7: ...rovided USB cable carefully into the Micro USB connector in the device Please ensure you are careful when doing this as Micro USB connectors can be easily damaged if not used correctly Step 3 Plug the...

Page 8: ...in the device ensuring you are careful when doing this as Micro USB connectors can be easily damaged if not used correctly Step 3 Plug the other side of the USB cable into a free USB A socket in your...

Page 9: ...r to host USB communication via the supplied OTG cable External headset Stereo DIN connector for use with supplied headset MIC It can be used for making phone calls and for listening to music on the d...

Page 10: ...the top of the battery in first and then pushing the bottom in until the battery is seated firmly in place The SIM and SD cards are found at the top of the battery compartment Raptors use standard SI...

Page 11: ...n the six cover screws securely Using another screwdriver could lead to under or over tightening of the screws which will compromise the sealing of the device Be careful not to expose the device to wa...

Reviews: