background image

RANE SL2 FOR SERATO SCRATCH LIVE • OPERATOR’S MANUAL 2.4.4

Cue Points

Use cue points in Scratch Live to mark 
and trigger different parts of your tracks. 
The cue point markers are saved with the 
file in the track’s ID3 tag, so they will be 
present each time you load the track.

Setting Cue Points

You can set up to five cue points for each 
track. Click on the 

+

 button to place a 

cue point, or use the keyboard shortcuts 
below. A cue point will be set at the 
current playhead position of the track and 
can occupy any of the 5 slots.
  Use the keyboard shortcuts: ctrl-
comma (for left) and ctrl-period (for right) 
to place cue points in chronological order. 
Alternatively, use ctrl-1 through 0 to set a 
specific cue point, i.e., to set a cue point 
on the Left Deck in slot 2, press ctrl-2.
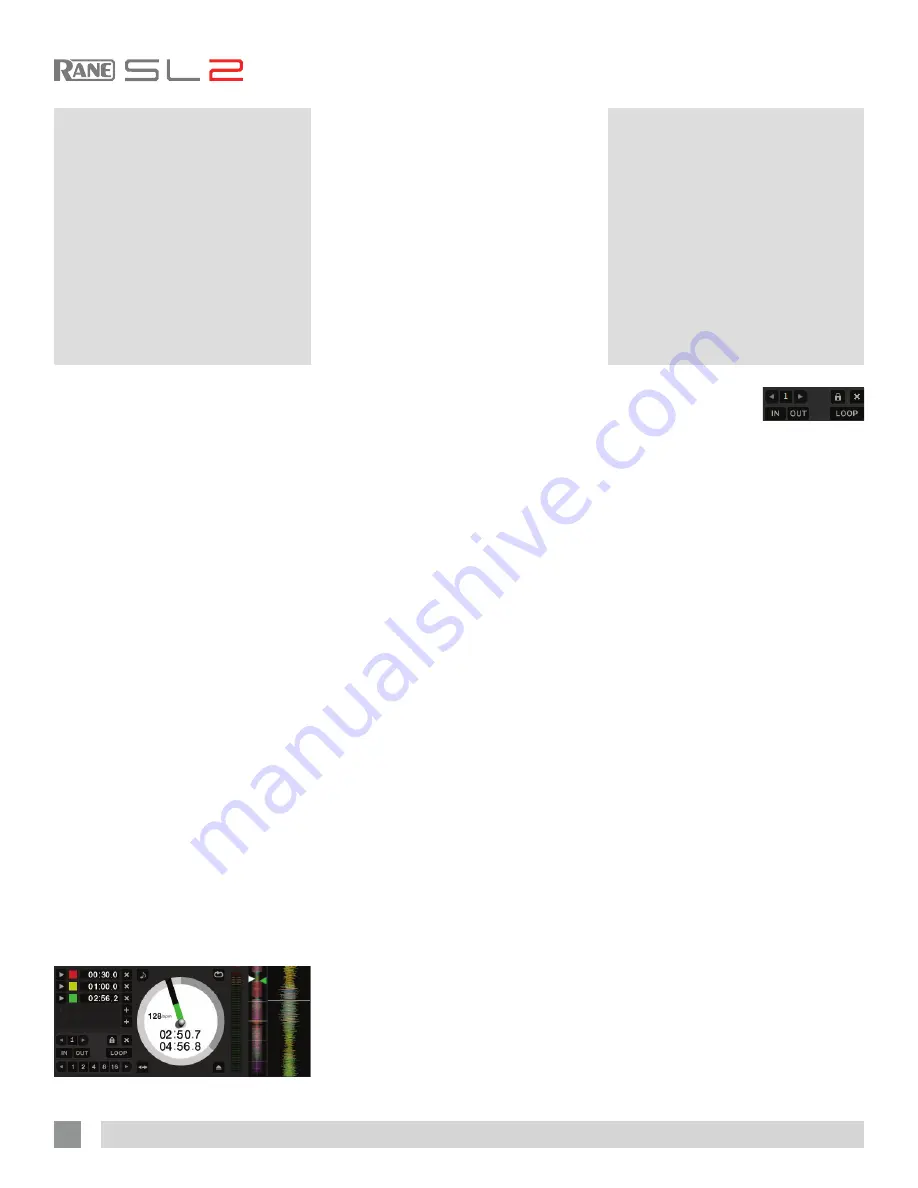
  Notice the stripe on the Virtual Deck 
jumps to the 12 o’clock position and 
changes color when you set a cue point 
– you are at the cue point when the stripe 
is one solid color and at the 12 o’clock 
position. As the track plays on beyond the 
position of the cue point, the colored bar 
shortens by a fifth for each rotation. 
Likewise, as you approach the cue point, 
the color will grow by a fifth each rotation. 
For example, the picture below shows the 
track just before the end of the 5th 
rotation before the cue point.

TIP: Zoom in on the waveform using the 
– and + keys and ‘scrub’ to the desired 
position for greater accuracy when 
setting cue points.

Enable Hot Cues

To turn on hot cues, check 

Enable Hot 

Cues

 in the Playback tab on the Setup 

screen. When Hot Cues are enabled, you 
can set cue points simply by pressing the 
number keys 1 through 0 (no ctrl modifier 
required). Note that you can only add cues 
this way if the cue point slots are empty.


See “Enable Hot Cues” on page 32.

Triggering Cue Points

Click the 

 

arrow to the left of each cue 

point to jump to it (REL and INT modes 
only). You can also jump to cue points 
using shortcuts: 1 through 5 for the cue 
points on the Left Deck, and 6 through 0 
for the Right Deck cue points.

Editing Cue Points

To remove a cue point, use the 

x

 button 

on the right side of the cue point panel. 
You can also overwrite cue points by 
using the shortcut keys ctrl-1 through 0.

Customizing Cue Points

To change the color of a cue point, click 
on the colored square and choose a new 
color from the drop down menu.
  To name your cue point, double click 
on the “time” field. You can now edit and 
name this cue point to whatever you like.
   You can also drag and drop cue points 
to change their order in the list. If you wish 
to have the cue points sorted by time, 
check 

Sort cues chronologically

 in the 

Playback tab on the Setup screen. If you 
load the same track onto both Decks, you 
will be able to add or modify cue points 
from either Deck.
  When you jump to a cue point in INT 
mode while paused, the track will play 
from the cue point for as long as the key 
or mouse button is pressed, after which 
the playhead returns to the cue point. If 
this is done using the keyboard while the 
track is playing in either INT or REL mode, 
the cue point will be repeatedly triggered, 
producing a stuttering effect.

Looping

You can save up to 9 
loops per track. These 
loops are saved in the 
file, and will be present when you reload 
the track. To make a loop, set the in-point 
by clicking the 

IN

 button, and the out-

point by clicking the 

OUT

 button. To turn 

the loop on or off, click the 

LOOP

 button. 

If you want the playhead to jump to the 
start of the loop when you enable the 
loop, hold the control key and press the 

LOOP

 button.

  To adjust the in-point of the loop, click 
the 

IN

 button. You can use the arrow keys: 

left arrow to move the in-point towards 
the start of the track, right arrow to move 
the in-point towards the end of the track. 
Hold down the shift key while pressing the 
arrow key to make coarse adjustments. 
Click the 

IN

 button again to save the in-

point. The same applies to adjusting the 
out-point.
  You can also use the control vinyl (or 
CD) to adjust the in- and out-point. Click 
the 

IN

 button, then move the control vinyl. 

Moving the vinyl will adjust the in-point. 
Once you are happy with the new in-point, 
click the 

IN

 button again to save, and 

release the control vinyl.
  The control vinyl will go back to 
controlling playback once the record 
is back up to normal speed. Using the 
control vinyl to adjust loop end points is 
optional — to turn this feature off, disable 

Adjust loops with vinyl

 under the Vinyl 

Control tab in the Setup screen.
  There are 9 available loop slots per 
track. If a loop is set in a given slot, the 
background (behind the loop number) 

18

Summary of Contents for SL2

Page 1: ...RANE SL2 FOR SERATO SCRATCH LIVE OPERATOR S MANUAL 2 4 4 ...

Page 2: ...dential installation This equipment generates uses and can radiate radio frequency energy and if not installed and used in accordance with the instructions may cause harmful interference to radio communications However there is no guarantee that interference will not occur in a particular installation If this equipment does cause harmful interference to radio or television reception which can be d...

Page 3: ... it a new copy may be downloaded at rane com sl2 html To keep up with the latest tips and to check for Scratch Live software updates visit the Official Scratch Live Forum at serato com Wear Parts The SL2 interface contains no wear parts The vinyl records and CDs are wear parts as described in Limited Warranties on page 42 Copyright Notices 2013 Rane Corporation All rights reserved Scratch Live and...

Page 4: ...Tempo Matching Display 13 Track Overview Display 13 Main Waveform Display 13 Beat Matching Display 13 Master Gain 13 33 45 Speeds 13 Tracking Indicator 13 Tap Tempo 14 Key Lock 14 Repeat 14 Censor 14 Eject 14 Autoplay 14 Reverse Input Control 14 Track Gain 14 USB Dropout Indicator 14 Display Modes 15 Library Views 15 Scratch Live Modes 16 Thru Mode 16 Absolute Mode 16 Relative Mode 16 Internal Mod...

Page 5: ...ntable or CD Player 30 Keyboard Shortcuts 31 Additional Setup 32 Hardware 32 USB Buffer Size Latency 32 Updating Firmware 32 Audio Input Level 32 Recording Bit Depth 32 Sample Rate kHz 32 Playback 32 Track End Warning 32 Playback Keys Use Shift 32 Lock Playing Deck 32 Sort Cues Chronologically 32 Enable Hot Cues 32 Use Auto Gain 33 Hi Fi Resampler 33 Play From Start 33 Instant Doubles 33 Play From...

Page 6: ...d wires of your turntables to the grounding post of your SL2 or your mixer If you do not ground your turntables properly the control signal will be noisy and the tracking of the record position will be erratic 3 Ensure the SL2 is set to receive a phono level signal See step 2 of Connecting the SL2 CD Player Setup Disable all built in effects on the CD player including keylock master tempo Ensure t...

Page 7: ...e device at the same time ASIO and Core Audio drivers are not available on a machine when Scratch Live is running The ASIO and Core Audio drivers are included in the Scratch Live installer as an option See the instructions in Installing Scratch Live on page 8 ASIO Windows The SL2 uses a low latency multi client ASIO device driver to interface with software applications other than Scratch Live on W...

Page 8: ...ou insert your installation CD When you first connect it Windows will attempt to install the drivers via the hardware wizard Cancel and close the hardware wizard 2 Insert the Software Installation CD ROM Make sure your SL2 is connected first If a window doesn t open automatically browse to the CD drive Run setup exe or Launch the installer you just downloaded from serato com 3 Follow the on screen...

Page 9: ...speed and direction of the record while the noise map tells the software precisely where on the record the needle is currently The Noise Threshold A threshold is a lower limit below which a process will not occur In the case of Scratch Live the noise threshold is the limit below which the input signal will not be interpreted as control signal in other words if it s below the threshold it is consid...

Page 10: ...s M3U playlists are also supported For more on Whitelabel net audio files see Whitelabel net on page 11 NOTE Older iTunes Music Store DRM files cannot be played back by Scratch Live iTunes Plus files are DRM free Playing Music Click on the All icon to show all the tracks in your library Use the keyboard shortcut Shift Left Arrow to load the highlighted track on to the Left Deck and Shift Right Arr...

Page 11: ...ty 320 kbps stereo audio in Scratch Live when Rane Scratch Live hardware is connected Without Scratch Live hardware connected or when playing these files through other mp3 software and devices they will play as low quality 32 kbps mono audio Whitelabel audio files are promotional releases from records labels available to Scratch Live DJs for free from Whitelabel net Set Auto BPM If this option is ...

Page 12: ... Go back to the Vinyl Scroll area of the record to choose a track within the crate or playlist Once you have found the track you wish to play put the needle back at the beginning of the record and it will load automatically This feature is available to CD users Go to track 2 on the control CD to access Vinyl Scroll Find the track you want to load and go back to track 1 The track you selected will ...

Page 13: ...seful if you wish to set cue points in your tracks without your turntables or CD players connected The Main Waveform is zoomed around the current position in the track See Cue Points on page 18 and Scratch Live Modes on page 16 TIP Use the and keys to zoom in and out TIP Waveform can be either vertical or horizontal See Display Modes on page 15 Kick Drum In this example the red part of the wave re...

Page 14: ...nsor is available only in REL and INT Modes Eject This ejects the track playing or loaded from it s Virtual Deck Autoplay Click the Auto button to enable autoplay With this setting turned on when one track finishes playing the next track starts automatically Load from a crate to play through the songs in that crate or from your library to play through your library Autoplay works in both REL and IN...

Page 15: ... each other in a horizontal fashion Stack Mode aligns the waveforms on top of each other while maximizing waveform space The controls for all Decks can be shown or hidden by pressing the Show Deck Controls Button on any deck You can choose between four different library views which allow for visual browsing using text and album art Select your Library View by using the buttons in the bottom left a...

Page 16: ... stops starts scratching needle dropping rubbing and other turntablist techniques When you reach the end of the record using either REL or ABS modes Scratch Live automatically switches to INT mode This is known as Emergency Internal mode and prevents long tracks from stopping when you run out of record You can switch from Emergency Internal mode to ABS mode by lifting the needle and placing it in ...

Page 17: ...nges the slider range to 8 10 16 50 or 100 Temporary Cue There is a temporary cue point that can be used like the cue button on many DJ CD players Press ctrl I to set this temporary cue point on the Left Deck and ctrl K to set it on the Right Deck This temp cue point is shown in the main waveform as a white marker This cue point is not saved with the track and by default is set to the beginning of...

Page 18: ...ough 0 Customizing Cue Points To change the color of a cue point click on the colored square and choose a new color from the drop down menu To name your cue point double click on the time field You can now edit and name this cue point to whatever you like You can also drag and drop cue points to change their order in the list If you wish to have the cue points sorted by time check Sort cues chrono...

Page 19: ... looping buttons as laid out on screen ie if the onscreen buttons display 1 2 4 8 16 beat loops alt 1 triggers a 1 beat loop and alt 5 triggers a 16 beat loop Loop Roll Loop roll performs a standard auto loop but when the loop is turned off the playback position is returned to the position where it would be if it had not entered the loop much like censor The other difference between loop roll and ...

Page 20: ... Use the shortcut keys z slot 1 x slot 2 c slot 3 v slot 4 b slot 5 n slot 6 to trigger each sample respectively SP 6 Instant Doubles You can instant double from the Virtual Decks down to the SP 6 from the SP 6 up to the Virtual Decks and also between the sample slots themselves This means the position track gain and speed will match when you drag a track to from one location into another This all...

Page 21: ... to the volume slider there is an additional gain knob for each slot These allow you to fine tune the maximum gain volume of the loaded sample The gain adjustment will also be written to the track s ID3 tag meaning that it will be the same everytime you load it SP 6 Output Selector Use the master output selector button to choose where you wish to send the SP 6 output L outputs through the left cha...

Page 22: ...udio from slot 1 passes through slot 2 which is then passed through slot 3 Effects BPM Multiplier The Effects BPM Multiplier is used to adjust the effect time The effect time is set using the track s BPM value but by applying the Effects BPM Multiplier you can increase or decrease the effect time Deck Assign You can select which Deck the FX unit applies to by clicking the Deck buttons Each Deck ca...

Page 23: ...tra or Super Knob you will see the parameter knob move within the range that you just specified Any parameters not customized but linked to the Super or Ultra Knob will behave as normal You can save any macro mappings you have made to an effect by clicking the Save button by the Super Knob and save effects combinations made in Ultra Knob Mode by clicking the Save button by the Ultra Knob Assigning...

Page 24: ... com for detailed documentation on how to use these controllers MIDI Devices Any connected MIDI device will be listed within the MIDI Device List in the MIDI panel of the Setup screen You are able to enable or disable any of these devices using the Enable MIDI Device checkbox Technical Information Scratch Live MIDI Control only supports Note On Off Standard 7 bit CC Control Change 14 bit CC RPN NR...

Page 25: ...ecked the crate contents will be updated only when you click the refresh crate icon which is not visible when Live update is checked Click Save to save your crate or Cancel to exit without saving Click the Edit button next to the Add Smart Crate button to edit the rules of an existing Smart Crate Sorting Your Files The track information display area can be customized to display the columns listed ...

Page 26: ...vinyl or CDs select the song you want to insert after and click the Insert Track button Double click the inserted track fields and edit your information accordingly When exporting an m3u playlist see exporting below Inserted Tracks will not be present Export You can export each session as a data file using the Export button Select a session then choose your preferred file Format and click Export T...

Page 27: ...hat file Click it to bring up a color palette and customize the Virtual Deck for that file Library Zoom You can change the size of your library text by using the shortcuts ctrl and ctrl Display Album Art MP3 files can contain album art information Click the Album Art button at the very bottom left of the screen to open a small window This window displays the album art of the track currently select...

Page 28: ...your hard drive sending them to the recycle bin use the shortcut ctrl shift delete If you are using iTunes playlists your files cannot be deleted this way You will need to delete them from within iTunes Copy Move Files Folders Scratch Live gives you the ability to copy and move files folders and crates between drives or to a new location on the same drive To copy or move your files and or folders ...

Page 29: ... audio Ideally the meter should sit just below the red meaning your signal is as loud as it can be without clipping NOTE If you turn the record Gain knob down and the red clip led is still illuminated the signal is clipping the input of the SL2 Turn down the level at your audio source before it reaches the SL2 TIPS The keyboard shortcut ctrl n turns recording on and off Load a recording without sa...

Page 30: ... In Gated xx dB LiveFeed Rane SL2 Left In LiveFeed Rane SL2 Right In Gated xx dB LiveFeed Rane SL2 Right In Load the desired LiveFeed file to either Deck The waveforms will start to build in the track overview and main waveform display as the input is recorded you can now use the recording as normal Performing a needle drop on the record brings the playhead back to the now position in the audio st...

Page 31: ...and from library ctrl shift del and ctrl shift backspace Delete the file from your library and send to the recycle bin Note to iTunes users files in your iTunes library cannot be deleted this way ctrl shift Toggle the input reverse switch esc Clear search string if searching or exit Scratch Live SAMPLE PLAYER slot 1 slot 2 slot 3 slot 4 slot 5 slot 6 Load to sample slot ctrl alt Z ctrl alt X ctrl ...

Page 32: ...aller file size or 24 Bit high quality larger file size See Recording on page 29 Sample Rate kHz Choose your sample rate from either 44 1 kHz or 48 kHz Use 44 1 kHz by default if you are not using 48 kHz audio files as 48 kHz will use more CPU Playback Track End Warning Enable this option to flash the Virtual Deck as you approach the end of the track The label will start flashing 20 seconds from t...

Page 33: ...e point the last track was at This option is on by default Instant Doubles This option allows you to quickly match the playhead position of two tracks With this option enabled when you load the same file on one Virtual Deck that is already loaded on the other Virtual Deck the playhead will jump to the position of the track that was loaded first with the keylock state and looping settings copied Th...

Page 34: ...or Scratch Live to read it Any changes made in Scratch Live to the file information of tracks in your iTunes library will not appear in iTunes until after you play the track Scratch Live cannot play files that have been protected by Digital Rights Management systems such as those previously sold through the Apple iTunes Music Store iTunes Plus files are DRM free iTunes is available for Mac and PC ...

Page 35: ...is setting applies to the entire screen i e the Virtual Decks the Waveforms the Library and the Setup screen Audio Cache Use this slider to set the amount of audio that is loaded into memory A small audio cache will place less load on your computer and the tracks will load faster A large audio cache will give you a bigger view of the waveform when the main waveform view is zoomed out The default i...

Page 36: ... usual The threshold goes to the far right when I click the estimate button Make sure the needle is on the record and the record is stopped when you click estimate If the slider goes hard right and stays there you most likely have an grounding problem with your turntables mixer If you cannot eliminate this problem use REL mode instead of ABS mode Scratch Live makes a strange digital noise even whe...

Page 37: ... as Scratch Live is concerned Please make sure this really is an audio file Unsupported file This MP3 contains mul tiple layers While scanning this file Scratch Live found frames belonging to multiple MPEG layers Scratch Live does not support MP3s containing frames from multiple layers some frames may output as silence Unsupported file This file is more than 2 GB in size Self explanatory At the mo...

Page 38: ... control signal check your connections BAD TURNTABLE VIBRATION Bass is reaching the stylus Try to isolate the turntable from the speakers CD PLAYER INTO PHONO INPUT The SL2 is set to receive a phono level input Switch to the correct setting on the SL2 PHONO INTO LINE INPUT The SL2 is set to receive line level input Switch to the correct setting on the SL2 DUSTY NEEDLE Dust is preventing the stylus...

Page 39: ...ring BAD RECORD BURN Your record is badly worn and Scratch Live is unable to track Swap sides or get new vinyl ASAP LEFT CHANNEL IS NOISE Left signal has been lost with a noisy loose connection RIGHT CHANNEL IS NOISE Right signal has been lost with a noisy loose connection TONEARM IS SLIGHTLY TOO LIGHT Susceptible to dust and vibration Adjust the tonearm SIGNALS ARE SUMMING TO MONO Left and right ...

Page 40: ...3 Vrms Dynamic Range 101 dB A weighted analog in to analog out Dynamic Range DAC 104 5 dB A weighted Device Latency 1 4 ms 44 1 kHz and 1 3 ms 48 kHz USB 2 0 High Speed Port Required 3 unit load 300 mA max Blue Indicator Flashing while device is booting Lit when USB 2 0 connection is detected Yellow Indicator Lit when the analog section is powered on Optional RS5 External Universal Power Pack 7 5 ...

Page 41: ...ten consent of the manufacturer This declaration of conformity is issued under the sole responsibility of Rane Corporation Type of Equipment Professional Audio Signal Processing Brand Rane Model SL2 Immunity Results THD N 4 dBu 400 Hz BW 20 Hz 20 kHz Test Description Results Conditions RF Electromagnetic Fields Immunity 80 MHz 1000 MHz 1 kHz AM 80 depth 3V m 80 dB 1400 MHz 2700 MHz 1 kHz AM 80 dep...

Page 42: ... SPECIFIC PERIOD OF THIS LIMITED WARRANTY SHALL BE THAT WHICH IS DESCRIBED TO THE ORIGINAL RETAIL PURCHASER BY THE AUTHORIZED RANE DEALER OR DISTRIBUTOR AT THE TIME OF PURCHASE Rane Corporation does not however warrant its products against any and all defects 1 arising out of materials or workmanship not provided or furnished by Rane or 2 resulting from abnormal use of the product or use in violat...

Page 43: ...E COUNTRY WHERE THE UNIT WAS PURCHASED OR if product was purchased in the U S AT THE RANE FACTORY IN THE U S If the product is being sent to Rane for repair please call the factory for a Return Authorization number We recommend advance notice be given to the repair facility to avoid possible needless shipment in case the problem can be solved over the phone UNAUTHORIZED SERVICE PERFORMED ON ANY RA...

Page 44: ...RANE SL2 FOR SERATO SCRATCH LIVE OPERATOR S MANUAL 2 4 4 PART 21316 ...

Reviews: