Manual-6
After
Polling
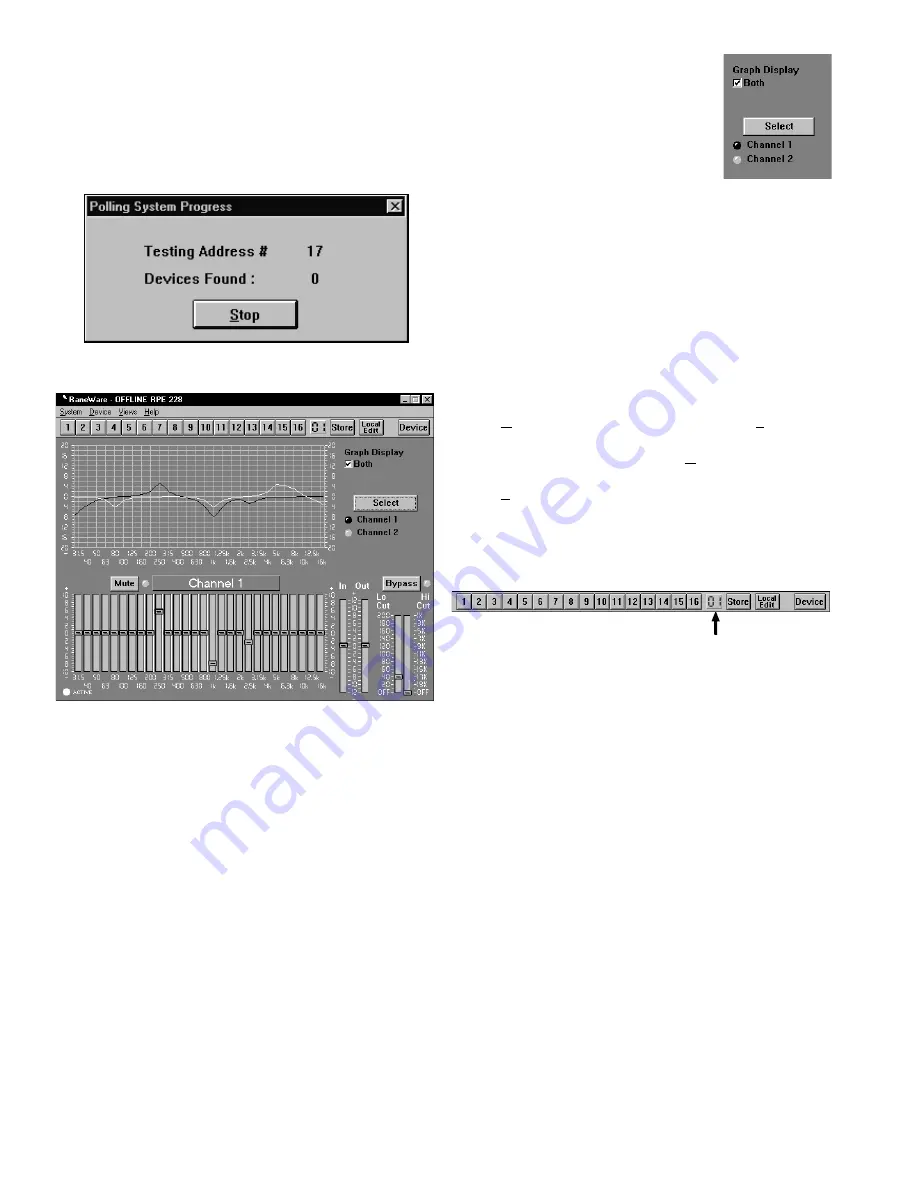
, the Graph Editing window appears.
The startup splash screen stays up for a few seconds, then
Polling
begins the first time you run the program. This
process checks if any RPEs are connected to the serial port. If
a Device is found, you are in control! (If not, with an RPE
connected, read the Help file [Reference, Troubleshooting
Hints]). If you don’t have an RPE connected, you can still use
RaneWare offline.
Changing curves
Go ahead, grab any slider with the
mouse cursor. An accurate representation
of the full audio frequency response is
portrayed in the graph. Once a filter band
is selected, clicking above or below the
slider can make fine half decibel adjust-
ments. The up/down cursor keys can also
make these adjustments, while the left/right keys move from
one band to the next.
Clicking the
Select
key changes the audio Channel being
controlled. Channel 1 appears in red. Channel 2 appears in
yellow. Checking the
Both
box under
Graph Display
shows
both Channels at the same time, but only the active Channel’s
sliders can be operated.
Go ahead, play! You'll find
Low
and
High Cut
filters,
Input and Output level controls,
Mute
and
Bypass
switches,
just like our other high end equalizers. Only now you can
instantly see the equalizer response! If you have an equalizer
connected, changes are instantly heard.
The
Device
menu contains a few handy tools.
Flatten
does just that, and gives you a clean slate on either or both
Channels by clicking in the submenu.
Copy
lets you transfer
a curves between Channels.
The
Views
menu lets you switch between viewing a single
channel with graph and sliders, or both sets of sliders on one
screen, or both graphs on one screen. This is useful for
comparing channels and stereo equalization.
Memories
The red local memory number flashes to indicate that
current Memory settings have changed. If you wish to save
these settings in one of the 16 Memories, simply click
Store
,
and the Memory number key. It's that easy! Go ahead and
store different curves in different Memories. After storing a
few, clicking any Memory number instantly recalls that
Memory. Store your favorites in Memories 1 through 8, since
these can be recalled via the rear panel REMOTE SWITCH
contact closures when the computer is removed.
To change a curve without affecting the audio in the RPE,
simply select
Local Edit
before making any changes, make
them, and re-click
Local Edit
. You will be asked:
Accept the
Edited Curve?
Answering
Yes
sends that curve to the RPE
228. While
Local Edit
is selected, clicking on any of the
Memory buttons displays the preview curve without sending
it to the RPE 228.
The
Device
button brings up a selection menu of up to 15
RaneWare units connected to the computer. Simply select the
device you wish to control.
When active, the Editing window provides:
• Memory Recall & Storing
• EQ Band Editing
• Low & High Cut Filter Adjustment
• Input & Output Level Control
• Bypass & Mute
• Local Edit Mode, which allows you to alter the EQ
without immediately changing the unit
• Display of current control settings using the right
mouse button
The menus also provide:
• Extensive On-Line Help
• Device Selection
• Device Naming
• Device Settings Backup (to computer disk)
• Memory Channel Copying
• EQ Curve and Report Printing
• Device Locking
• Three different Device Editing Channel Views
• Changing Password


