


Manual-13
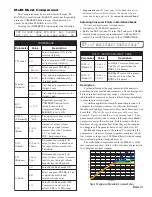
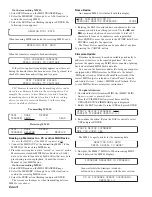
Adjusting Crossover Points in Multi-Band Mode
To view or adjust crossover frequencies:
1. Navigate to the M-BAND parameter.
2. Rotate the DATA control to select SET and press ENTER.
3. Select a band crossover point and adjust with the DATA
control. Press ENTER to return to the LIMITER page.
LIM
|--------X---------X----------|
OUT 1+2| BND1-2=200Hz BND2-3=2.0kHz |
E
G
A
P
Y
C
N
E
U
Q
E
R
F
D
N
A
B
-
I
T
L
U
M
r
e
t
e
m
a
r
a
P
e
u
l
a
V
n
o
i
t
p
i
r
c
s
e
D
2
-
1
D
N
B
)
2
-
1
d
n
a
B
(
o
t
z
H
0
2
z
H
k
0
2
.
y
c
n
e
u
q
e
r
F
r
e
v
o
s
s
o
r
C
d
i
M
/
w
o
L
e
h
t
n
a
h
t
r
e
t
a
e
r
g
t
e
s
e
b
t
’
n
a
C
.
y
c
n
e
u
q
e
r
F
3
-
2
D
N
B
3
-
2
D
N
B
)
3
-
2
d
n
a
B
(
o
t
z
H
0
2
z
H
k
0
2
.
y
c
n
e
u
q
e
r
F
r
e
v
o
s
s
o
r
C
h
g
i
H
/
d
i
M
e
h
t
n
a
h
t
r
e
w
o
l
t
e
s
e
b
t
’
n
a
C
.
y
c
n
e
u
q
e
r
F
2
-
1
D
N
B
Peak Limiter Description
The three-band peak Limiter sets the maximum signal
level allowed to pass through to the main Outputs. Unlike a
Compressor, which acts to maintain an average (rms) signal
level about a Threshold, the Limiter acts quickly to prevent
any
signal — such as the transient from unplugging a
phantom-powered microphone — from exceeding a set
Threshold. As is done in the Compressor section, the signal is
split into three user-defined ranges, each with its own
Threshold, Attack and Release controls. The Limiter and
Compressor
do not share
a common crossover. It is possible
to choose completely different frequency settings for the
Limiter than the Compressor.
Handy Tip: For vocal-heavy mixes try limiting the mid
frequencies slightly more than the low and high frequencies.
This should help smooth things out during the loud part at the
song’s climax, just before the big key change.
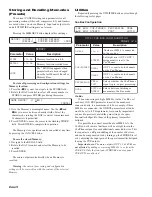
Figure 4 Peak Limiter Characteristic
-20
+20
-18
-16
-14
-12
-10
-8
-6
-4
-2
0
+2
+4
+6
+8
+10
+12
+14
+16
+18
-20
+20
-15
-10
-5
0
+5
+10
+15
d
B
O
U
T
P
U
T
dB INPUT
Using the Cue Bus
Monitor engineers rejoice! The on-board CUE BUS
allows you to solo mixes from one or more MM 42s without
having to constantly re-patch headphones between units.
Simply connect the multiple MM 42s together using the CUE
BUS jacks, plug your headphones into any MM 42 (it doesn’t
matter which one), and press the front panel CUE BUS button
on the unit you wish to monitor. The signal from that unit is
automatically routed to the Cue Bus and can be monitored
from
any
MM 42 using the PHONES or CUE OUTs.
See the Cue Bus Configuration section on page Manual-
14 for details on setting up the various Cue Bus functions and
operating modes.
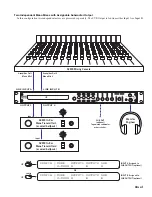
Connecting Multiple MM 42s
Connect multiple MM 42s together on the Cue Bus using
the included telephone-style cable. There are no dedicated
“in” or “out” connections – either jack can be used to daisy-
chain the Cue Bus of one MM 42 to the next.
Note: it is NOT necessary to create a loop between the
first MM 42 in the chain and the last.
There’s no need to panic if you happen to lose a Cue Bus
cable while on tour in Boise, Idaho…at 8 PM…on a Sunday.
Simply find the nearest unused telephone and borrow the
cable. Check to make sure the cable has at least the four
middle conductors (metal prongs) connected on each end.
And don’t forget to return the cable at the end of the tour.
Using the Cue Bus Outputs (rear panel)
In addition to appearing on the front panel PHONE jacks,
the CUE BUS signal appears on the rear panel CUE OUT 1
(left) and CUE OUT 2 (right) jacks.
Connect these Outputs to a spare transmitter/beltpack so
you always monitor the signal
exactly
as the artist hears it.
Also, should the artist’s transmitter or receiver ever fail, you
can save the day (and ensure your position as monitor
engineer to the stars for years to come) by cueing up their
MM 42 mix, running onstage in the official “crouched
roadie” position, and swapping in the spare beltpack.
Alternately, connect the CUE OUTs to unused inputs on
the monitor console so you can cue individual input channels
(kick, snare, etc.) and the processed ear mixes directly from
the mixing console. Simply solo the appropriate channels on
the monitor console, then use the MM 42’s front panel CUE
BUS button to switch between different mixes.
Working in 2-MONO mode
When working in 2-MONO mode the Cue Bus signal
automatically follows the currently selected output. To select
an output to monitor and/or edit:
• Change the Selected Output parameter on any processing
page - Filter/Sub, Compress, EQ, Limit; or
• Quickly double-bump (push-release, push-release) the
OUTPUT control.