


LM01 I&M MANUAL/EN/11.30.2010
25/65
This document and the information contained herein, is the exclusive property of R&M MATERIALS HANDLING, INC. and represents a non-public, confidential and proprietary trade secret
that may not be reproduced, disclosed to third parties, altered or otherwise emplo
yed in any manner whatsoever without the express written consent of R&M MATERIALS HANDLING, INC.
Copyright © (2010) R&M MATERIALS HANDLING, INC. All rights reserved.
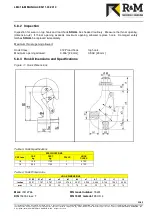
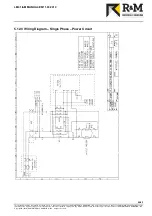
5.4.3 Load Chain Specifications (see
Figure 6
)
Chain use:
Load chain
Chain type:
Standard - Galvanized
Size: (d) diameter x (t) pitch:
0.122” [3.1 mm] / 0.366” [9.3 mm]
Class:
DAT
Grade:
H8S or HE G80 RAS
Maximum working stress:
14,516.1 lbs / in
2
[100 N / mm
2
]
Hardened surface:
580 to 700 HV [Vickers Hardness]
Thickness:
0.0039” [0.1 mm] to 0.0079” [0.2 mm]
Standard:
DIN 5684
Marking ( 10 x t ):
1 or 16
H 8 S or A 8
Maximum working load, 1-fall:
275 lbs. [125 kg]
Breaking load:
2520 lbs [11.2 kN]
Maximum breaking stress:
116,030 lbs / in
2
[800 N/mm
2
]
Total breaking elongation:
>10% min.
Weight per foot [meter]:
0.148 lbs. [0.22 kg]
5.4.4 Removing the Load Chain
1-FALL CHAIN
1. Remove load from hook block assembly.
2. Remove load block assembly from load chain. Some disassembly of 1-fall load block is required.
3. Attach the chain insert tool to the end of bottom block end of the chain.
4. Run hoist in “UP” direction until all of chain is in container. Stop the hoist with the insertion tool
remaining in the hoist ready for the new chain.
5. Remove chain container with all of old chain in chain container.
6. Remove fall stop from old chain and save for use with new chain.
2-FALL CHAIN
1. Remove load from hook block assembly.
2. Run hoist in “UP” direction until hook block assembly is about 1.0 foot [30cm] from hoist body.
3. Unfasten load chain from chain anchor mounted on hoist body.
4. Remove load block assembly from load chain by allowing chain to run through it. Attach the chain
insertion tool to the bottom block end of the chain.
5. Run hoist in “UP” direction until all of the chain is in the container. Stop the hoist with the insertion tool
remaining in the hoist ready for the new chain.
6. Remove chain container with old chain.
7. Remove fall stop from old chain and save for use with new chain.