background image

Documentation Center

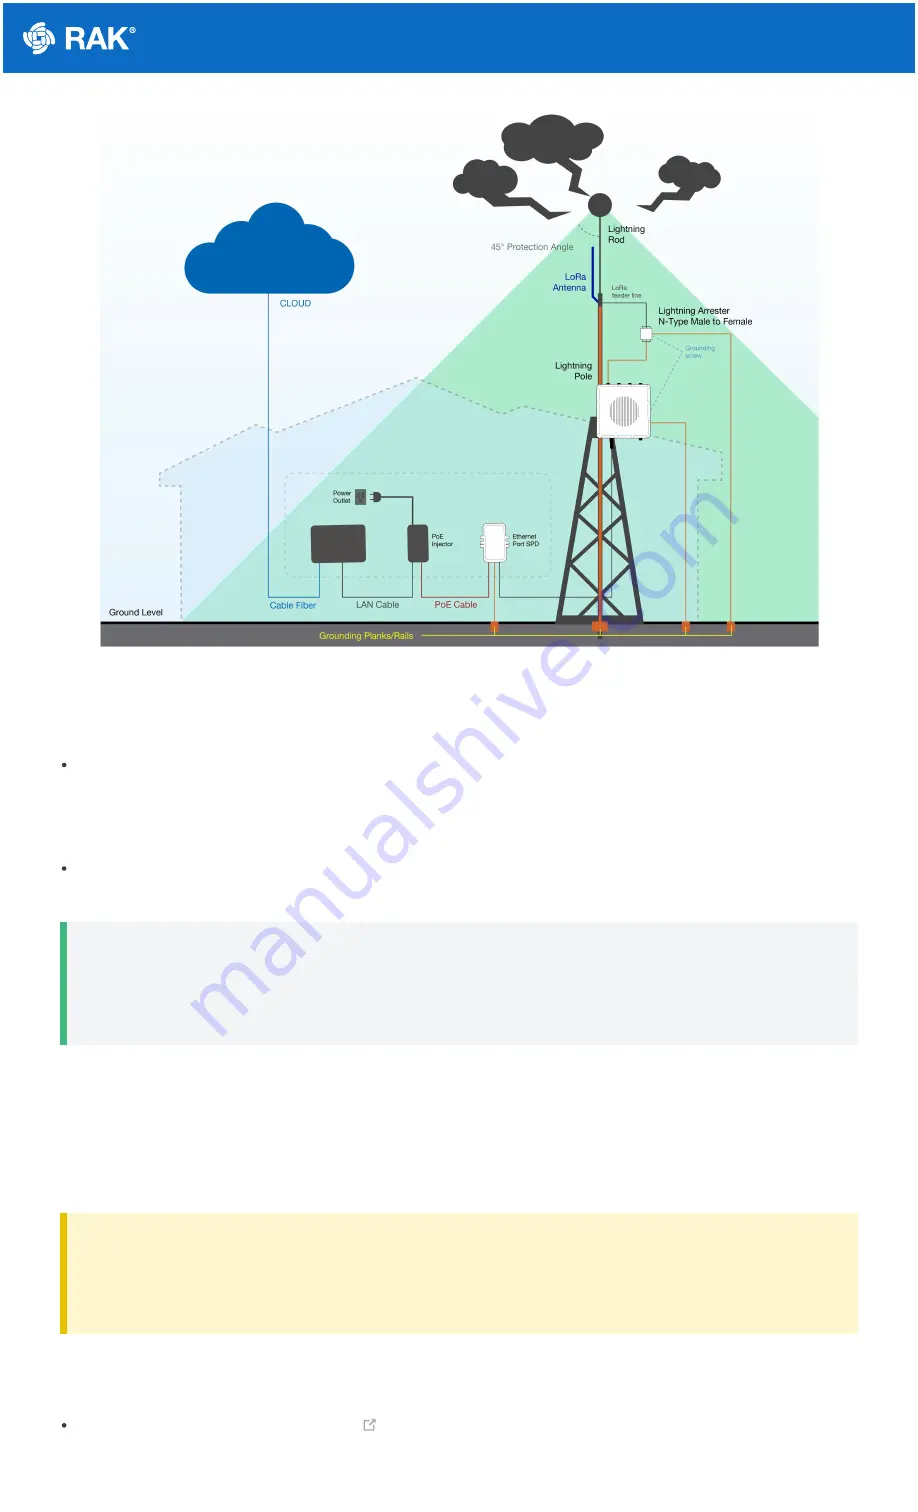
Figure 8: Full lightning protection set-up

Outdoor Surge Protection System

Antenna Grounding - RAKwireless recommends a lightning arrestor to be installed on all the antenna N-type
terminals. The arrestors have to be N-type Female to Male in order to fit the antenna and enclosure connectors.
Make sure you use a 10 AWG or better wire to connect the screw terminals of the arrestors to the grounding rail
mounted on the building wall (grounding bar in case of field deployment).
Gateway Grounding - Additionally, it is recommended to use another 10 AWG or better grounding wire to
connect the screw terminal on the bottom left side of the gateway casing to the grounding rail (bar).

📝

 NOTE

No additional protection for the Ethernet cabling is required at the gateway side. There is a surge
protection system built-in (GDT + Anti-surge resistor).

Indoor Surge Protection

For protecting the indoor equipment and circuitry connected to the gateway, it is recommended to install an
Ethernet port SPD lightning arrestor. It should be positioned along the cabling connecting the gateway to the PoE
injector. Make sure you connect its grounding wire terminal to an appropriate building grounding point.

 WARNING

Should you fail to adhere to the recommendations in this document RAKwireless carries no responsibility
for any damage your equipment incurs due to a lightning strike.

Recommended Equipment

Lightning arrestor for the LoRa antennas  

- This is a surge protective device for securing transceivers against

over-voltage and surge current induced by bolts of lightning. RAKwireless recommends installing a lightning

Summary of Contents for RAK7289V2

Page 1: ...sure the gateway is switched off before inserting or ejecting the SIM card The SD card found in the SD card slot must not be ejected as it might affect the performance of the device as different logs...

Page 2: ...this value hose clamps can be used The standard mounting kit does not include hose clamps If needed they should be purchased separately The clamp s back also has openings for hose clamps that are not...

Page 3: ...f the connector that will be wrapped Wrap a layer of PVC tape with a 50 overlap according to the rotation direction of the connector Continue wrapping the PVC tape to about 10 mm below the end of the...

Page 4: ...and the tail of the connector Figure 7 Final PVC wrapping Lightning Protection In this section how to set up lightning surge protection system whether your RAK7289 V2 WisGate Edge Pro V2 is situated o...

Page 5: ...tional protection for the Ethernet cabling is required at the gateway side There is a surge protection system built in GDT Anti surge resistor Indoor Surge Protection For protecting the indoor equipme...

Page 6: ...cts or similar telecommunication applications such as Gigabit Ethernet ATM ISDN and VoIP systems Ethernet Cabling A CAT5 Ethernet Cable is recommended for an outdoor surge protection system It is used...

Page 7: ...nts needed WARNING Do not power the device if the LoRa antenna port has been left open to avoid potential damage to the RAK7289 V2 WisGate Edge Pro Wi Fi AP Mode By default the gateway will work in Wi...

Page 8: ...red Web browser input the aforementioned IP address and you should see the Login Page Login with the provided credentials Username root Password root WAN Port Ethernet 1 Connect the Ethernet cable to...

Page 9: ...ple the last four bits of the MAC address are 0F 01 and the IP address is 169 254 15 1 Make sure to manually set the address of your PC to one in the same network for example 169 254 15 100 3 To do th...

Page 10: ...e desired password and confirming it in the provided fields The password needs to comply with the following rules Should be at least 12 characters long Has at least one special character _ Has at leas...

Page 11: ...ter Figure 16 LoRaWAN statistics page 3 On the next login you need to use the set password for access The default login username is root Figure 17 Login Page with set password Access the Internet Conn...

Page 12: ...Fi settings 2 You can either click the Scan button to choose your ESSID or manually type the ESSID of the network by clicking enter network E SSID manually 3 Select the right Encryption method and ent...

Page 13: ...the PoE injector 2 Connect the LAN port of the PoE injector to your router The router s DHCP server should assign an IP Address to the gateway 3 Now you can access the assigned IP to access the gatew...

Reviews: