


WRS Wireless Rain Sensor
4
3
WRS Wireless Rain Sensor
Normally Open Installations
Some controllers require rain sensors to be installed “Normally Open” (“NO”). In this case
substitute the White lead for the Brown lead in the instructions for Normally Closed
installations described above.
IMPORTANT! Brown lead is only used for “Normally Closed” configurations, and is
not used here.
For connecting to all other controllers, please refer to your controller’s user guide.
Testing the Transmitter and Receiver Pair
If you bought the Transmitter
and Receiver together, they were
programmed at the factory to
work together. If you purchased
them separately, or, if the
following test procedure doesn’t
work properly, it may be
necessary to program the
receiver to work with the
transmitter. Use the following
procedure to test the two units
together.
See Illustration 3.
1. Push and hold the pin for a few seconds on the top of the Sensor Transmitter.
2. If the Receiver detects the signal, the Red LED will begin to indicate “Watering
Suspended”. You can release the Transmit button and continue with the installation.
3. If the LED does not light, follow the procedure below for programming. Otherwise skip
to “Select a Location for the Sensor Transmitter.”
Programming the Transmitter and Receiver Pair
Use the following procedure to program the Receiver to recognize the Sensor Transmitter.
It is possible to program a Receiver to receive signals from up to five Sensor Transmitters.
This allows your Receiver to work with multiple sensors that may be used to interrupt
watering. It is also possible to program multiple Receivers to work with a single
Transmitter. This is ideal for locations using multiple controllers. A single Transmitter can
be used to communicate with multiple controllers (as long as all are within range).
1. Press and hold the bypass switch on the Receiver button until the Green LED begins
to blink rapidly, then release (Green LED will then begin to blink approximately once
per second).
2. Activate the transmitter (by pushing the pin on the top of the Sensor Transmitter)
until a clicking noise is heard from the receiver and the Red LED indicates
“Watering Suspended”.
3. If more than one click is heard, this means multiple transmitters are programmed into
this Receiver unit. The number of clicks will indicate how many of five locations have
been programmed.
4. To exit the Program Mode prior to activating the Transmitter, push and release the
Receiver button. If the Transmitter is not activated for thirty (30) seconds after the
Receiver is in Program Mode, the Receiver will return to Sensor Bypass Mode.
SENSOR
BYPASS
Watering
Suspended
WATERING SUSPENDED
BY SENSOR
3
Test Sensor Transmitter with Receiver
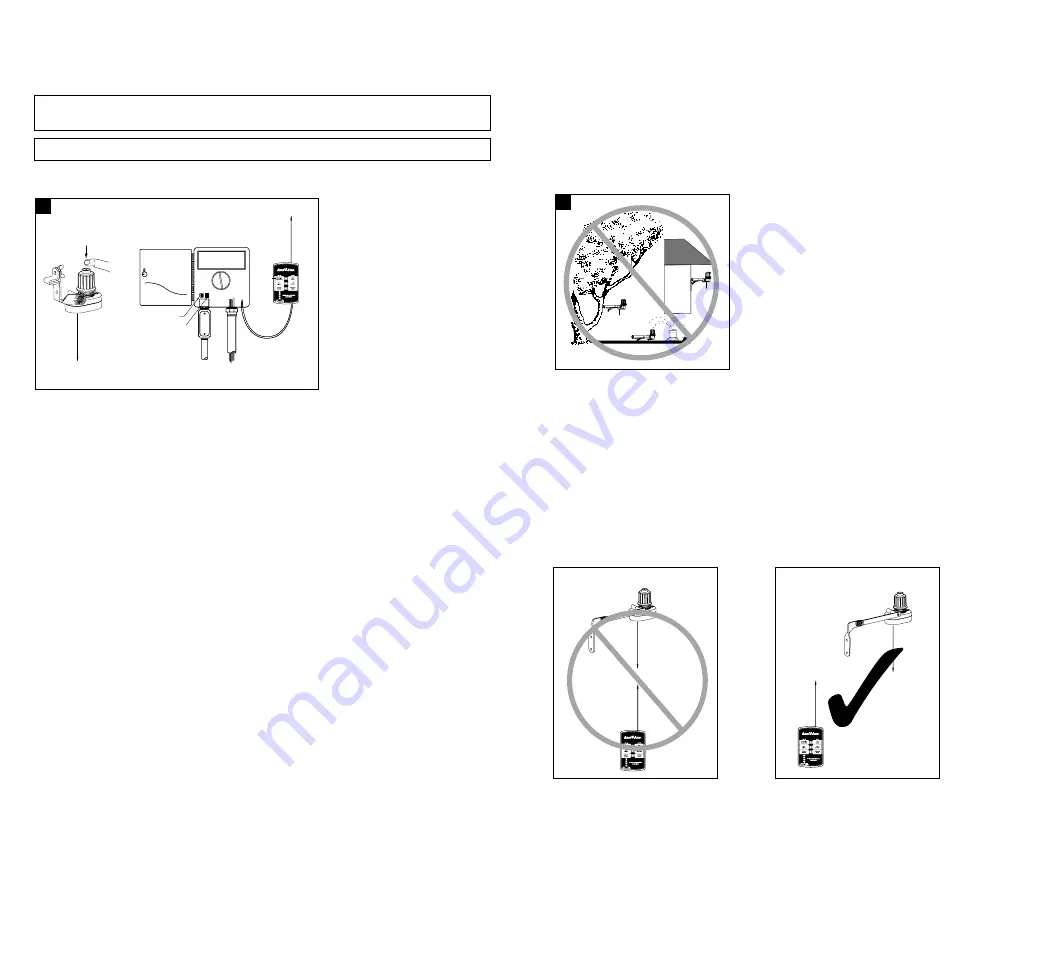
Selecting a Location for the Sensor Transmitter
Select a mounting location where the rain-sensing head will receive direct rainfall. Make
sure the head extends beyond the roof line, tree limbs, and any other obstructions. Install
the Sensor Transmitter in an area that receives as much rain and sunlight as the grass.
Be sure to mount the sensor above spray from sprinklers. Avoid mounting locations such
as those shown in
Illustration 4.
Be sure that the sensor is located within range of the receiver portion of the Wireless Rain
Sensor system. See “Testing the System” section.
4
Coverage Area/ Antenna Alignment
To ensure optimal coverage area, the Transmitter and Receiver must be aligned properly as
shown here.
Both the transmitter and receiver antennas radiate “outward”. Placing antennas directly
above one another will result in poor signal reception.
Furthermore, coverage area (500 feet maximum line-of-site) may be reduced due to
building materials, atmospheric conditions, terrain and other forms of interference.
IMPROPER ALIGNMENT
PROPER ALIGNMENT


