background image

6

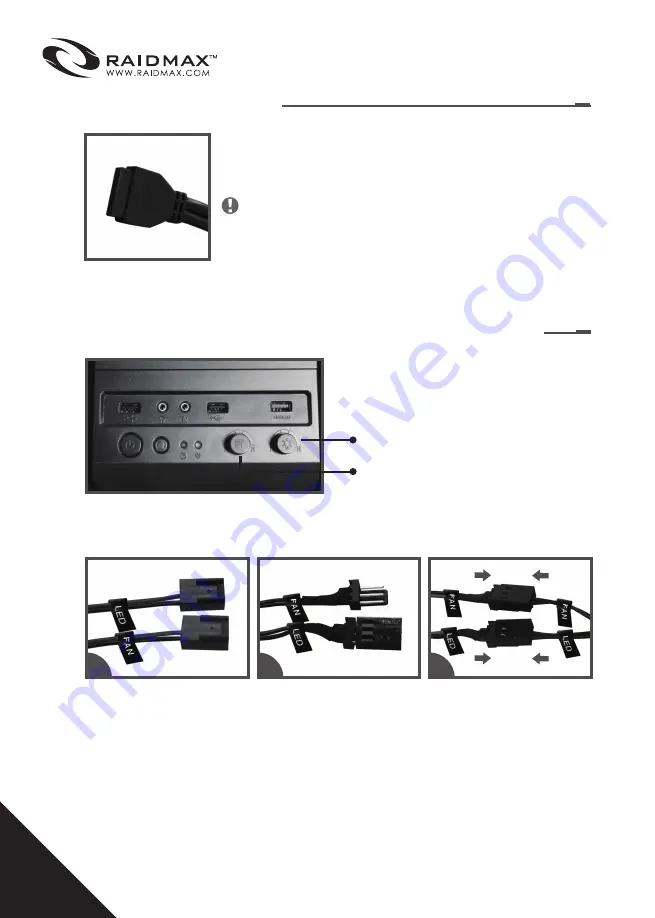
1. Fan and LED light cables are with labels on.

2. Controller cables are with labels on. 

3. Connect cables at both ends of the cables.  

1

2

3

4. FAN SPEED AND LIGHT CONTROLLER CONNECTION


1.Use left button to control fan speed.

2.Use right button to control LED light.

Fan light controller

Fan speed controller

Please refer to your motherboard manual for proper 

installation instructions.

(1) The motherboard with USB3.0 support is required.

(2) Connect the USB3.0 cable to the USB3.0 port.

3. 

USB 3.0 CONNECTION

NOTE:

Summary of Contents for AGUSTA

Page 1: ...AGUSTA ATX605 ...

Page 2: ... excellent performance and quality products After numerous global feedback Raidmax is known all over the world It is said our company is not only a case designer but also the perfect budget keeper If you have any critics and or comments to Raidmax please do not hesitate to email us directly We are more than happy to offer our best service and solutions at any time We appreciate your continued supp...

Page 3: ...S 6 x 3 5 SSD DRIVE BAYS 2 6 SYSTEM BOARD 10 X 12 MAX SIZE ATX FORM FACTOR MICRO ATX EXPANSION SLOTS STANDARD ATX 7 SLOTS I O PORTS 1 x USB3 0 2 X USB2 0 2 x HD AUDIO DIMENSIONS 540 L x 234W x 602 H mm SYSTEM FAN rear 1 x 120mm black fan front 1 x 120mm LED fan top 2 x 120mm LED fan rear 2 x 80mm black fan bottom tower front 1 x 80mm black fan bottom tower SPECIFICATION ...

Page 4: ...e the power supply at the back of the case CPU RAM and any other peripheral installations are not included in this manual Please refer to the actual manuals which are related to its own mounting instructions and troubleshooting Secure the PSU in the right direction by using the screw NOTE ...

Page 5: ... modular components before placing your motherboard inside the chassis Due to each motherboard has different layout it is highly suggested to refer to your motherboard s manual when installing motherboard into the case This chassis is available for standard ATX and Micro ATX This case includes the standard I O panel which is used by majority of today s motherboard However your motherboard may requ...

Page 6: ...AND LIGHT CONTROLLER CONNECTION 1 Use left button to control fan speed 2 Use right button to control LED light Fan light controller Fan speed controller Please refer to your motherboard manual for proper installation instructions 1 The motherboard with USB3 0 support is required 2 Connect the USB3 0 cable to the USB3 0 port 3 USB 3 0 CONNECTION NOTE ...

Page 7: ...g wires through the holes to keep all wires organized 2 Specail cut out design of side panel gives more room for cable management 3 Rubber avoids damage of cables and also helps fastened 5 CABLE MANAGEMENT 1 2 3 ...

Page 8: ...into the place and turn clockwise to secure the drive 1 Slightly pressing clicks to move the hard disk bracket 2 Secure H D with screws 3 Put the hard disk bracket back in the right direction 6 DRIVER BAYS INSTALLATION a 5 25 Driver bays installation b 3 5 HDD installation 1 1 2 2 3 3 Close a d b c ...

Page 9: ...ews 2 3 Put the hard disk bracket back in the right direction c 3 5 HDD cage is also available for 2 5 H D installation 1 2 3 1 Extra location for 2 5 H D installation 2 Place 2 5 H D on the right location 3 Secure 2 5 H D with four screws on the both sides of the chassis d 2 5 HDD installation 1 2 3 ...

Page 10: ...10 1 Loosen the screw to remove the cover 2 Secure the graphic card in the right direction by using the screw 7 PCIEXPRESS AGP PCI CARD INSTALLATION ...

Page 11: ...If you have any further questions or comments please do not hesitate to contact us at techsupport raidmax com Thank you for your support ...

Page 12: ...www raidmax com ...

Reviews: